






'%3e%3cpath%20d='M7.48145%2024H3.74023C1.67456%2023.9999%204.09854e-05%2022.3467%200%2020.3076V16.6152H7.48145V24ZM15.8955%2024H8.41406V16.6152H15.8955V24ZM7.48145%2015.6924H0V8.30762H7.48145V15.6924ZM24%2015.6924H16.5195V8.30762H24V15.6924ZM15.5859%207.38477H8.10547V0H15.5859V7.38477ZM20.2598%200C22.3256%200%2024%201.65318%2024%203.69238V7.38477H16.5195V0H20.2598Z'%20fill='white'/%3e%3cpath%20d='M108.786%2019.0507L105.767%2014.2636H104.397L108.397%208.80874H111.915L108.119%2013.9483V12.3155L112.544%2019.0507H108.786ZM101.527%2019.0507V5.5061H104.897V19.0507H101.527Z'%20fill='white'/%3e%3cpath%20d='M88.8242%2019.0505V8.80858H91.4908V13.2059H91.3421C91.3421%2012.1422%2091.4779%2011.264%2091.7499%2010.5712C92.0214%209.86618%2092.4224%209.34052%2092.953%208.99418C93.4965%208.64778%2094.1506%208.47461%2094.9158%208.47461H95.0644C96.2245%208.47461%2097.1193%208.86427%2097.7488%209.64353C98.3911%2010.4104%2098.7117%2011.5917%2098.7117%2013.1874V19.0505H95.342V13.0946C95.342%2012.6246%2095.2001%2012.2411%2094.9158%2011.9443C94.6443%2011.635%2094.2679%2011.4804%2093.7864%2011.4804C93.3049%2011.4804%2092.9162%2011.635%2092.6202%2011.9443C92.3358%2012.2411%2092.194%2012.6369%2092.194%2013.1317V19.0505H88.8242Z'%20fill='white'/%3e%3cpath%20d='M82.4214%2019.0506V8.80875H85.7912V19.0506H82.4214ZM81.125%2011.2579V8.80875H85.7912V11.2579H81.125ZM83.81%207.99232C83.1928%207.99232%2082.7359%207.83773%2082.4398%207.5285C82.1561%207.2069%2082.0137%206.79872%2082.0137%206.30388C82.0137%205.80913%2082.1561%205.40713%2082.4398%205.09789C82.7359%204.77628%2083.1866%204.61548%2083.7916%204.61548C84.4088%204.61548%2084.8595%204.77628%2085.1433%205.09789C85.427%205.40713%2085.5688%205.80913%2085.5688%206.30388C85.5688%206.79872%2085.427%207.2069%2085.1433%207.5285C84.8595%207.83773%2084.4149%207.99232%2083.81%207.99232Z'%20fill='white'/%3e%3cpath%20d='M71.1328%2019.0507V5.5061H74.5769V19.0507H71.1328ZM74.2065%2019.0507V16.0449H79.6876V19.0507H74.2065Z'%20fill='white'/%3e%3cpath%20d='M65.4458%2019.0507L62.428%2014.2636H61.0576L65.0571%208.80874H68.5755L64.7795%2013.9483V12.3155L69.2049%2019.0507H65.4458ZM58.1875%2019.0507V5.5061H61.5578V19.0507H58.1875Z'%20fill='white'/%3e%3cpath%20d='M51.2917%2019.3845C49.8103%2019.3845%2048.6438%2019.0814%2047.7921%2018.4753C46.9403%2017.8568%2046.4836%2016.991%2046.4219%2015.8777H49.3844C49.4339%2016.1869%2049.6252%2016.4529%2049.9585%2016.6755C50.2918%2016.8982%2050.7608%2017.0095%2051.3657%2017.0095C51.7978%2017.0095%2052.1681%2016.9477%2052.4767%2016.824C52.7977%2016.6879%2052.9581%2016.4715%2052.9581%2016.1745C52.9581%2015.9148%2052.8347%2015.7045%2052.5878%2015.5437C52.3409%2015.3705%2051.8903%2015.2531%2051.2361%2015.1912L50.5325%2015.117C49.224%2014.9809%2048.2611%2014.6222%2047.6439%2014.0408C47.0267%2013.4595%2046.7181%2012.7297%2046.7181%2011.8515C46.7181%2011.0969%2046.9033%2010.4784%2047.2736%209.99603C47.6439%209.50126%2048.1562%209.13018%2048.8105%208.8828C49.4647%208.63541%2050.2115%208.51172%2051.0509%208.51172C52.4211%208.51172%2053.526%208.81473%2054.3653%209.42089C55.2048%2010.0146%2055.6492%2010.8743%2055.6986%2011.9999H52.7359C52.6866%2011.6907%2052.5199%2011.4309%2052.236%2011.2206C51.9521%2010.998%2051.5447%2010.8867%2051.0139%2010.8867C50.6312%2010.8867%2050.3164%2010.9547%2050.0696%2011.0907C49.835%2011.2268%2049.7178%2011.4185%2049.7178%2011.6659C49.7178%2011.9257%2049.8289%2012.1174%2050.0511%2012.2411C50.2856%2012.3648%2050.6559%2012.4576%2051.162%2012.5194L51.8657%2012.5936C53.1741%2012.7297%2054.1802%2013.0946%2054.8838%2013.6883C55.5998%2014.2697%2055.9578%2015.0366%2055.9578%2015.989C55.9578%2016.6941%2055.7664%2017.3002%2055.3838%2017.8073C55.0134%2018.3145%2054.4764%2018.7041%2053.7728%2018.9763C53.0816%2019.2484%2052.2545%2019.3845%2051.2917%2019.3845Z'%20fill='white'/%3e%3cpath%20d='M31.0117%2019.0507L35.3445%205.5061H40.8624L45.3434%2019.0507H41.7882L38.3072%207.91816L39.2885%208.28924H36.8444L37.8442%207.91816L34.4558%2019.0507H31.0117ZM34.5483%2015.915L35.5853%2013.0948H40.7143L41.7512%2015.915H34.5483Z'%20fill='white'/%3e%3c/g%3e%3cdefs%3e%3cclipPath%20id='clip0_5596_142775'%3e%3crect%20width='113'%20height='24'%20fill='white'/%3e%3c/clipPath%3e%3c/defs%3e%3c/svg%3e "AskLink")
Common Features During Remote Control
After initiating remote control, members can expand the control panel through the floating arrow above the remote control screen, and adjust features such as video, audio, keyboard and mouse, clipboard, preferences, and performance monitor as needed.
Prerequisites
- The member has joined the enterprise;
- The administrator has authorized the target device for the member;
- The member has successfully initiated a remote control session;
- The current member has the corresponding feature permissions.
If a feature entry is not visible, contact the enterprise administrator to confirm role permissions.
Resolution, Refresh Rate, and Image Quality
If you need to adjust resolution, refresh rate, or image quality during a remote session, first click the floating arrow above the screen to expand the control panel, go to Video, and then configure the following settings as needed.
Resolution
Click Resolution and select a suitable resolution option as needed.
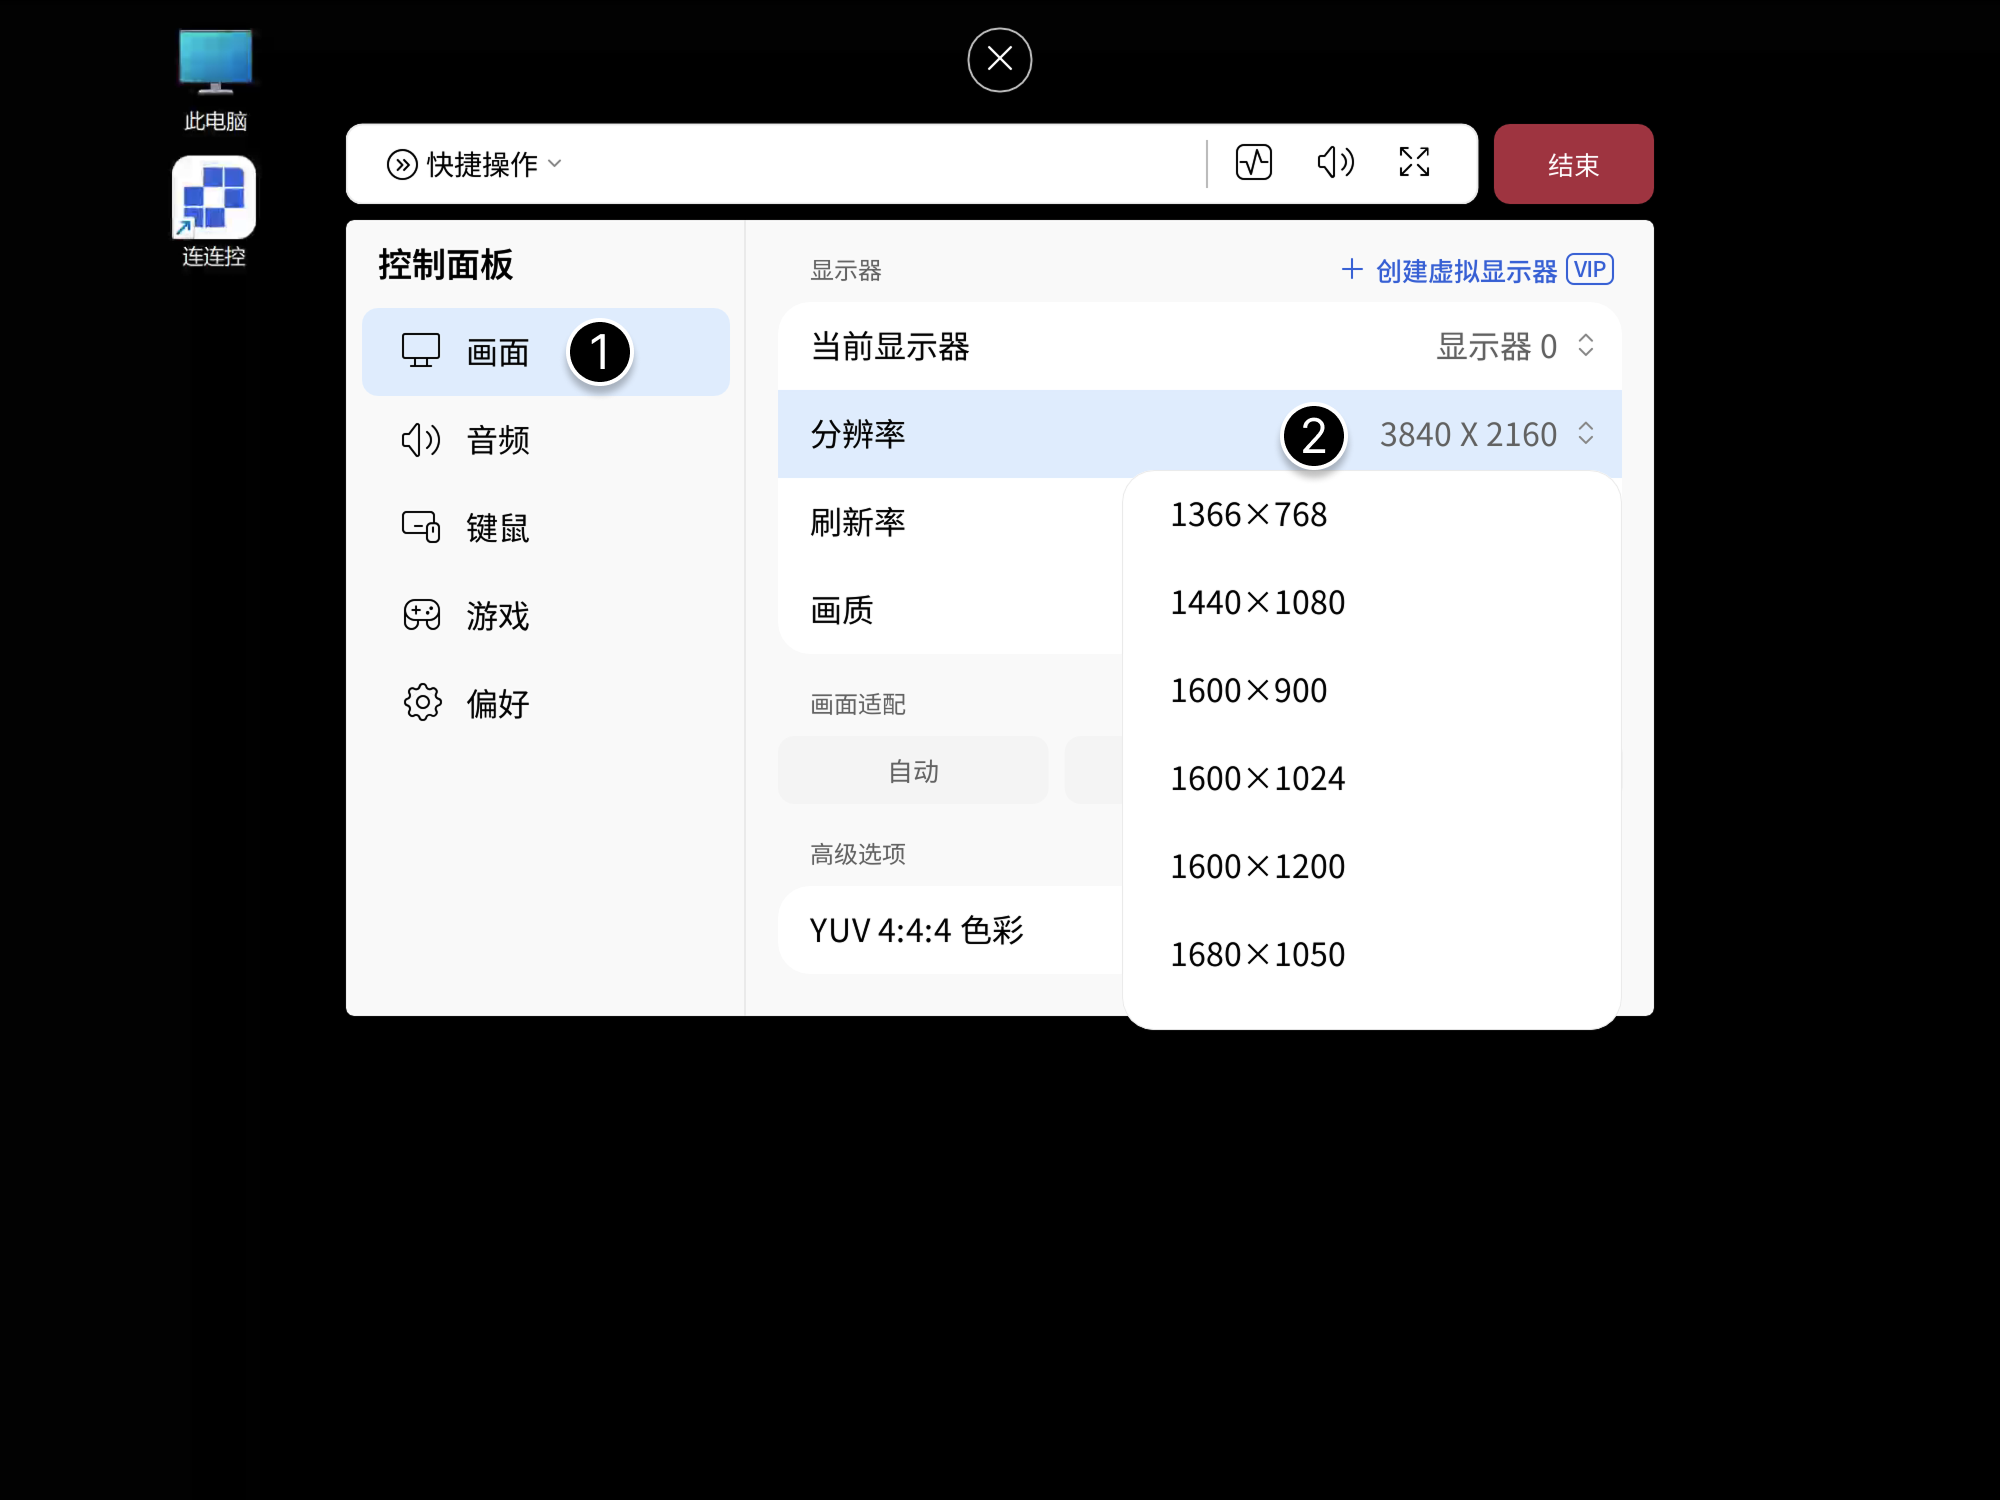
Up to 8K resolution is supported.
Refresh Rate
Click Refresh Rate and select a suitable refresh rate.
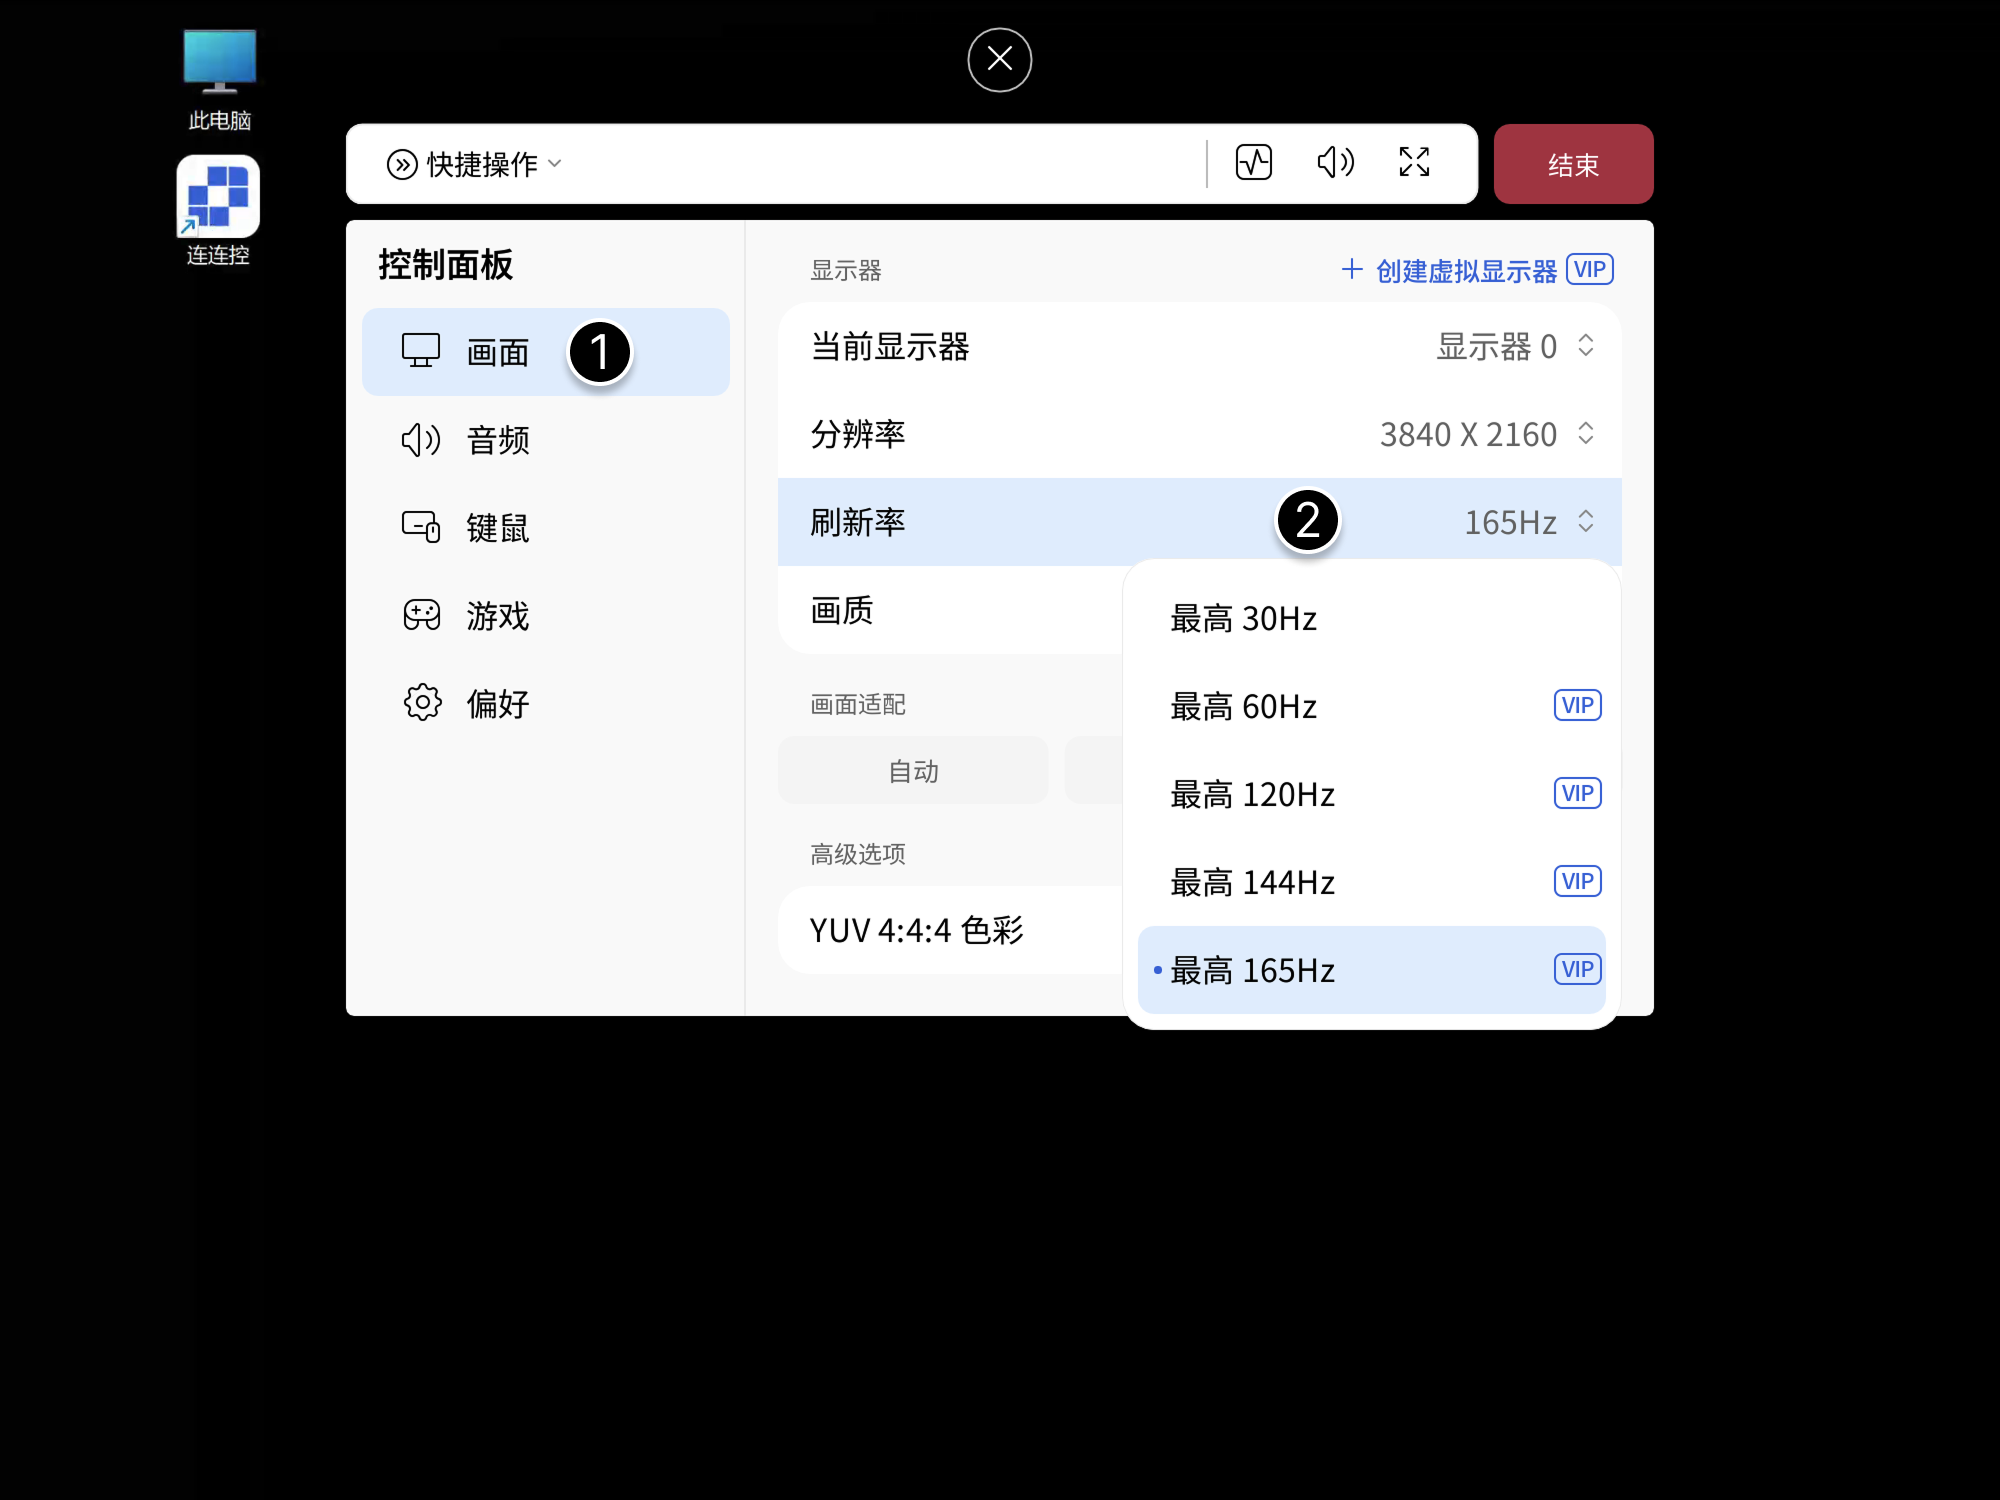
Up to 165Hz is supported.
Image Quality
Click Image Quality and select a suitable image quality option as needed.
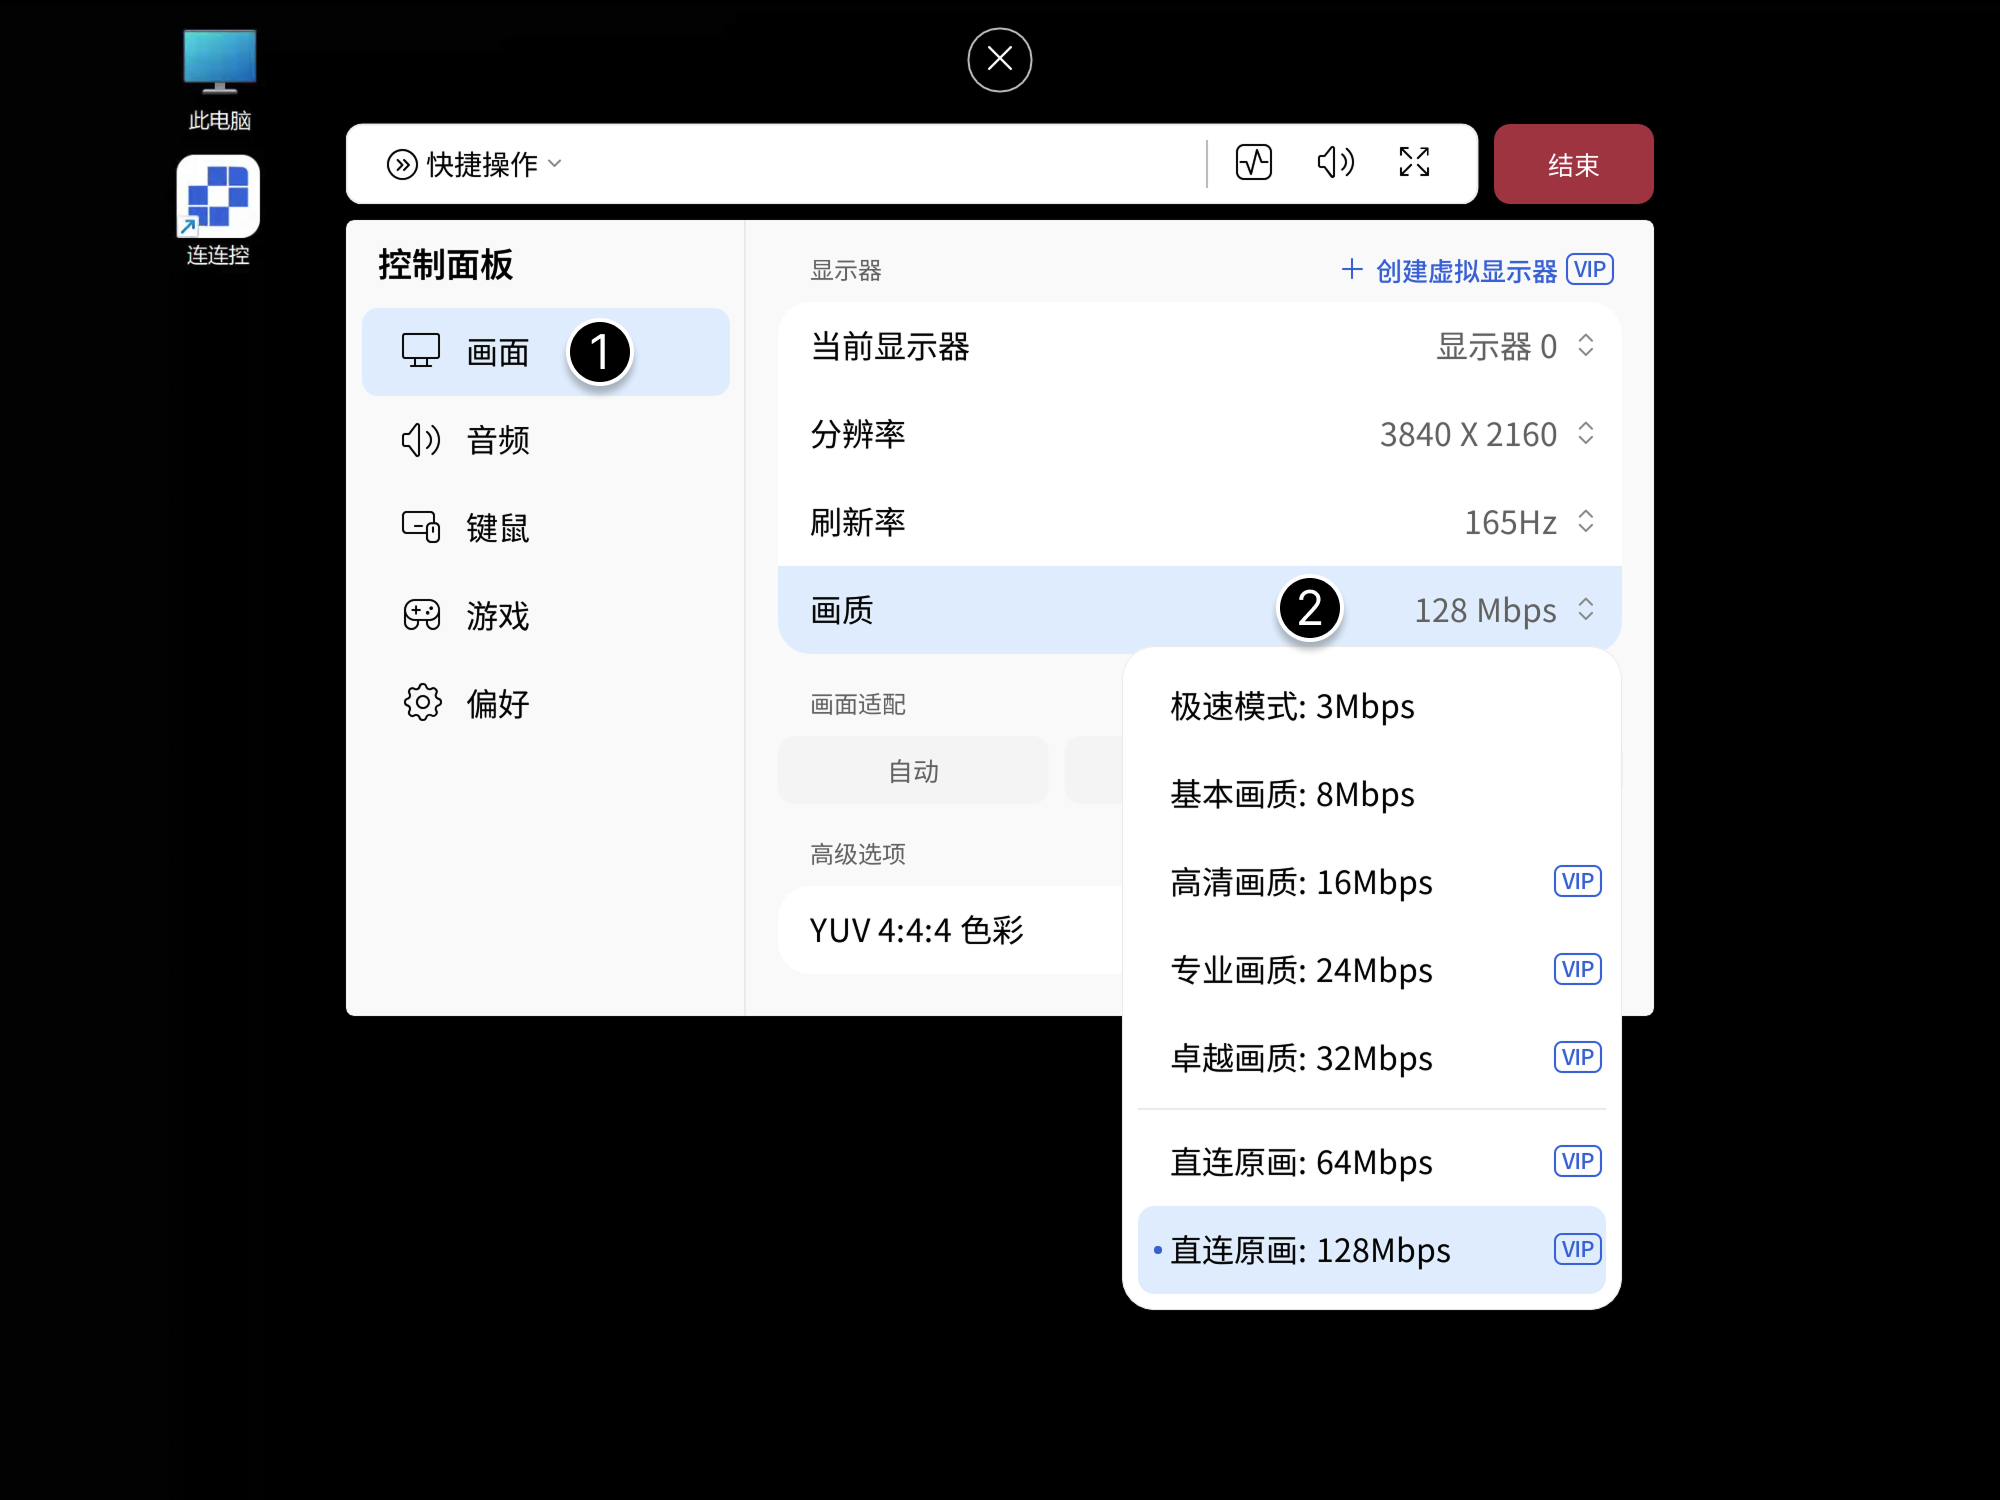
Advanced option: Select YUV 4:4:4 Color to improve image color performance.
In AskLink Business, the available image quality upper limit may be affected by enterprise service, network route, and administrator configuration.
Full Screen, Maximize, and Display Fit
This section explains AskLink's display fit options to help you find suitable settings between clear display and convenient operation.
Display Fit Options
Through Display Fit, you can select how the remote screen fits the window. The following three modes are available:
- Scale Mode: The remote screen is proportionally filled inside the remote window and adjusts with the window size;
- Original Mode: The remote screen is displayed at its original resolution. If the remote screen resolution is larger than the local resolution, scroll bars appear;
- Auto Mode: Intelligently combines scale and original strategies.
If black borders appear, it is usually because the aspect ratios of the Controlled and Controller are different. You can adjust the resolution ratio on the Controlled.
Click the floating arrow above the remote screen to expand the control panel, select the Video settings item, and choose the desired display mode under Display Fit.
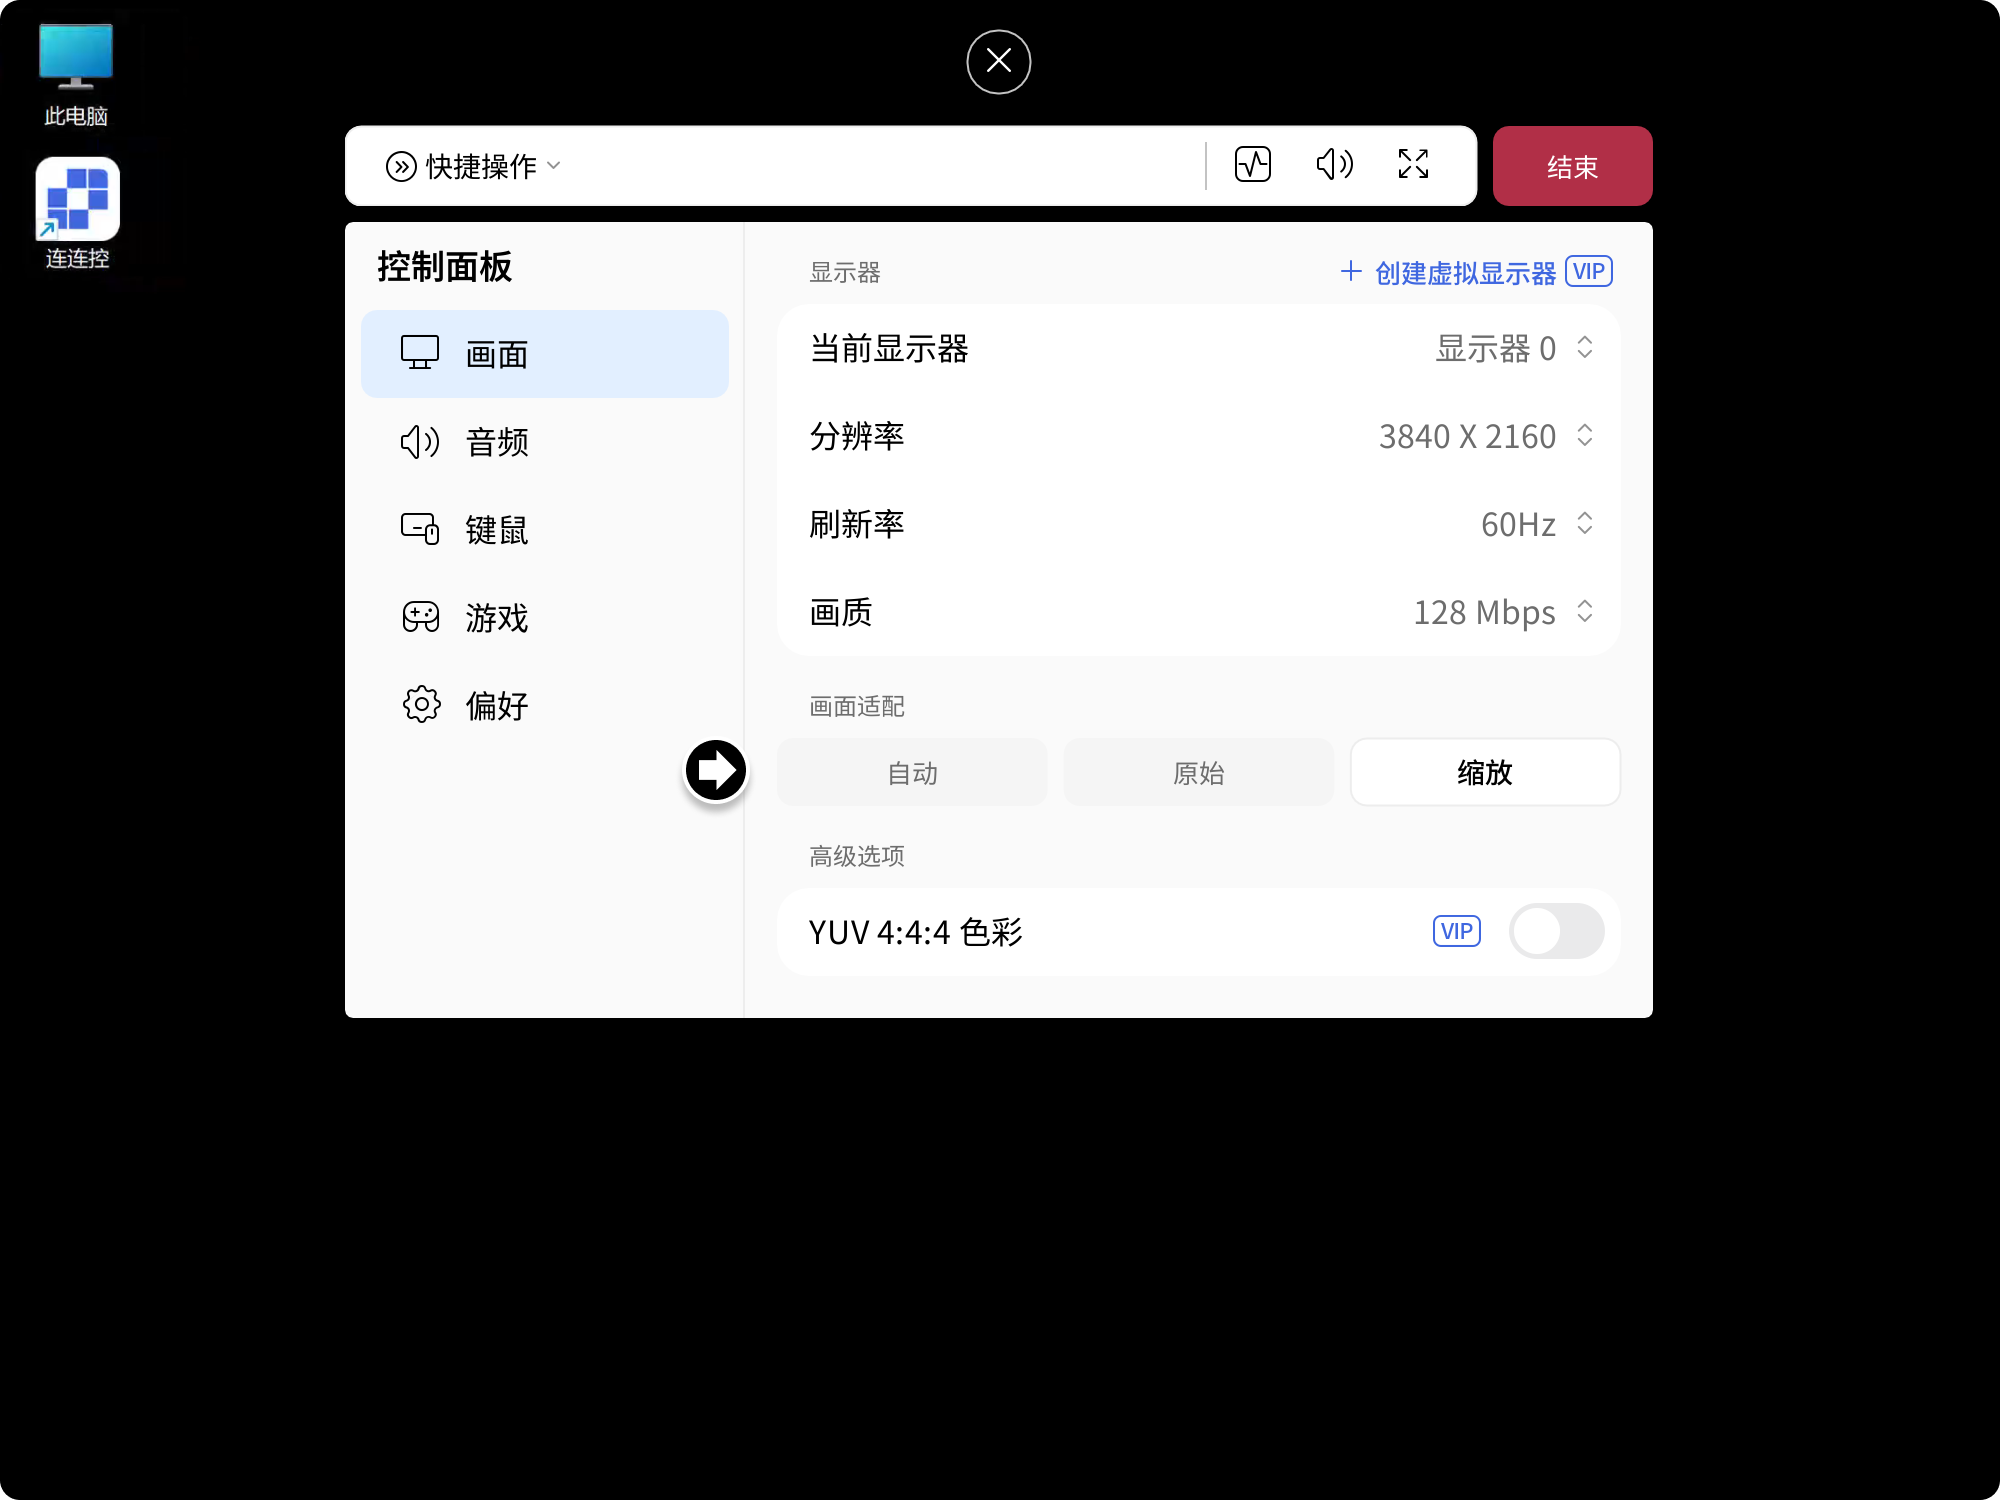
Fit Strategy in Full Screen
Click the floating arrow above the screen to expand the control panel, then click the Full Screen Mode button.
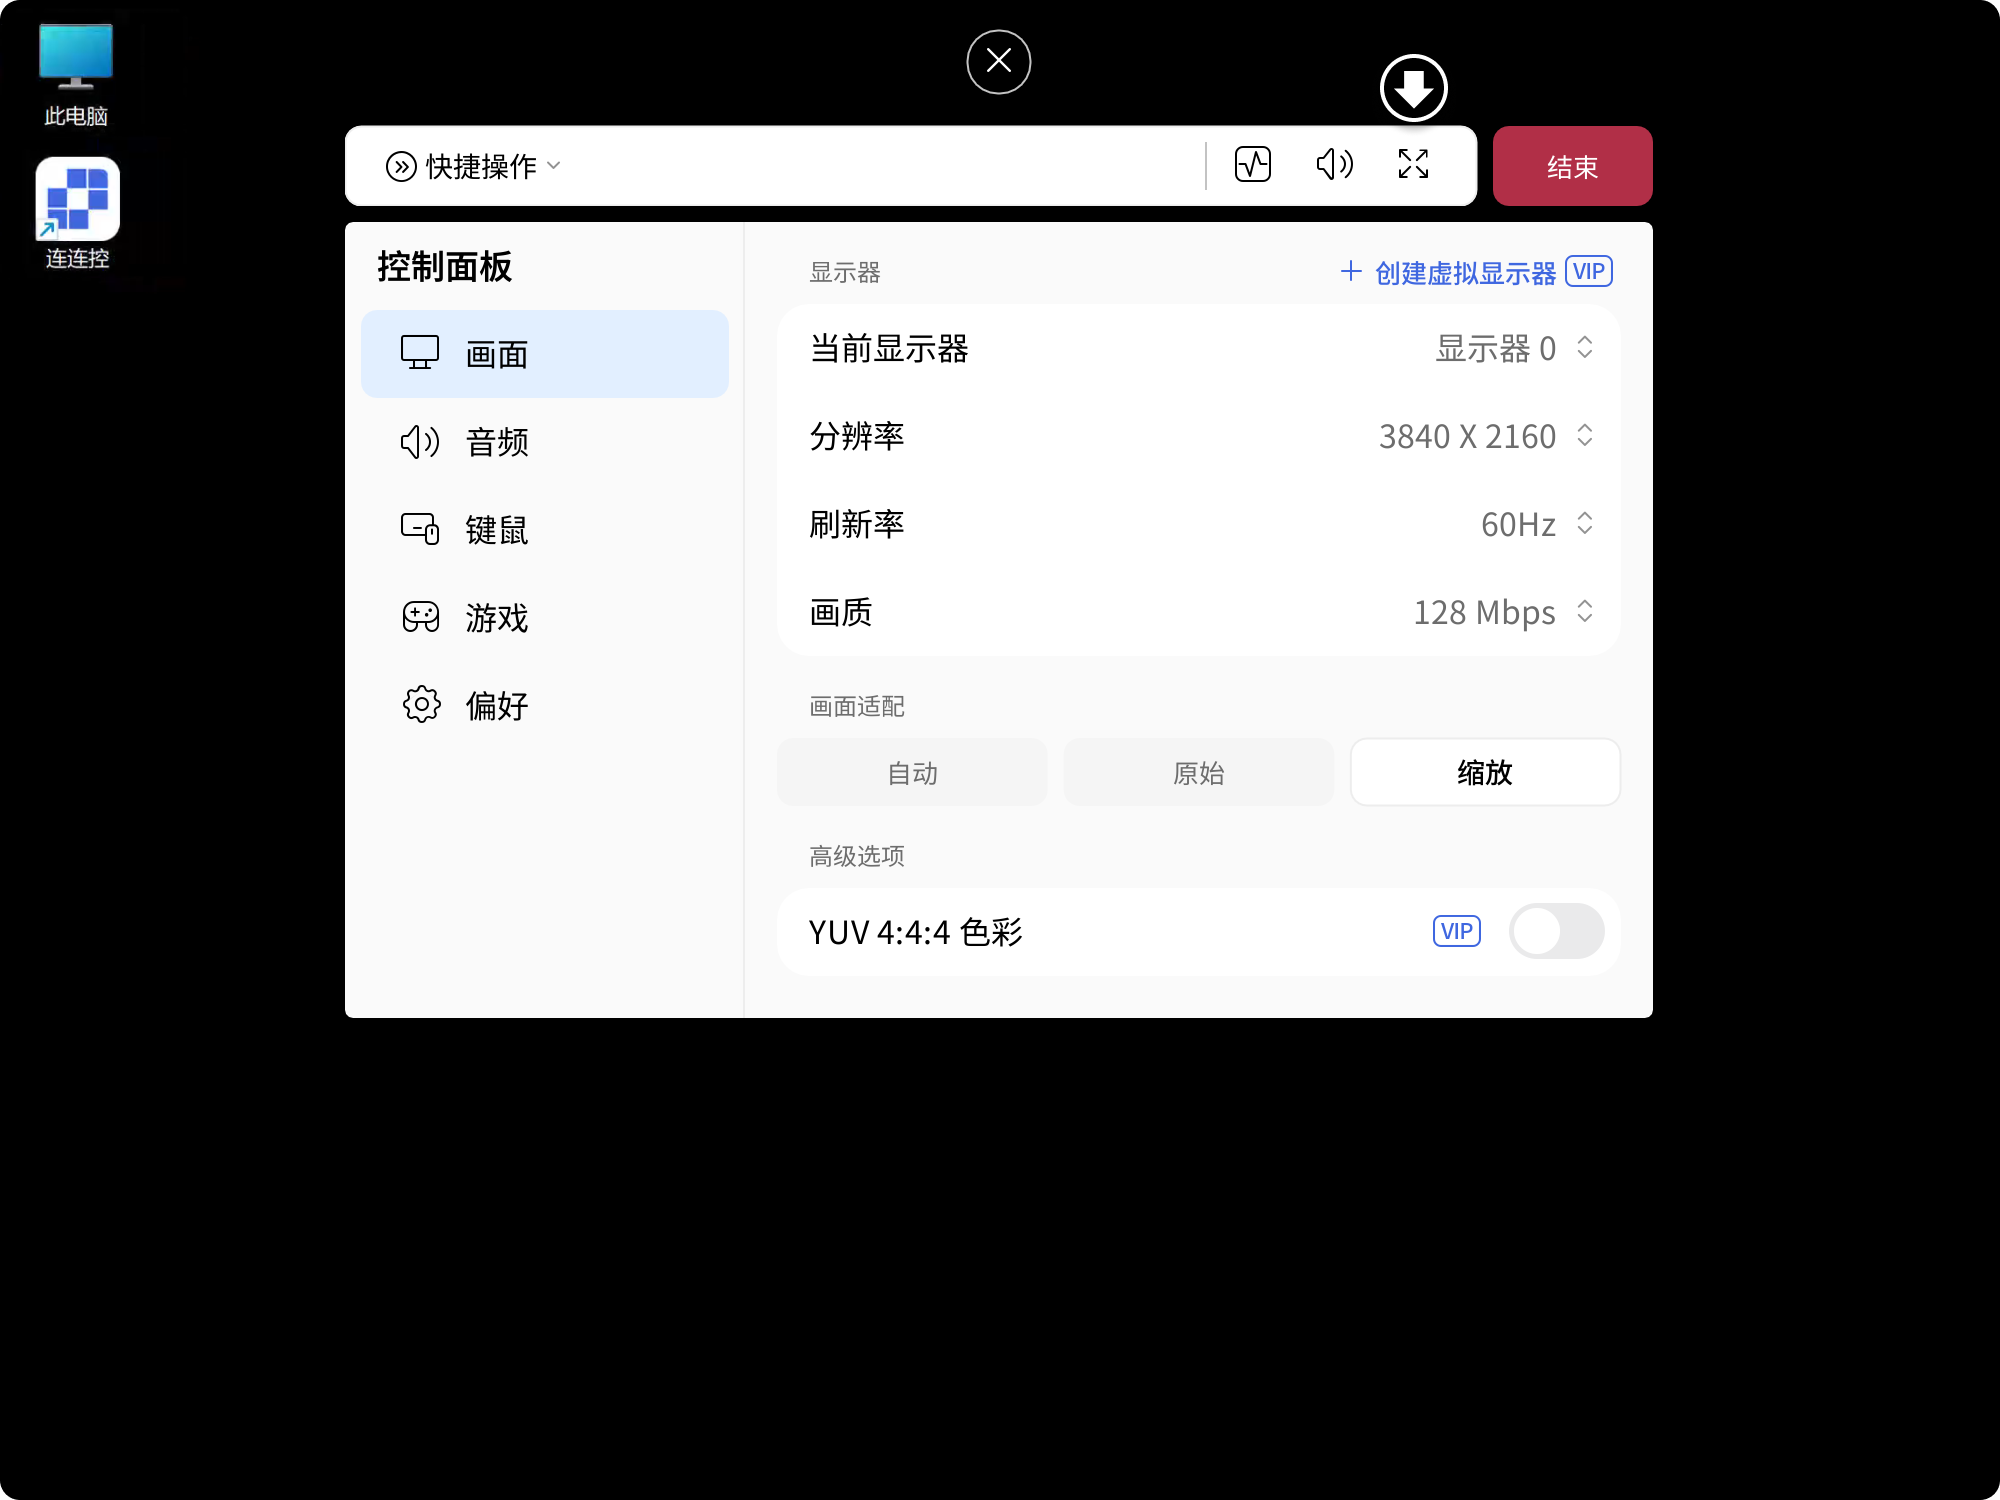
Fit Strategy When Maximized
- Auto: The remote screen proportionally fills the remote window;
- Original: The remote screen is tiled inside the remote window;
- Scale: The remote screen proportionally fills the remote window.
Click the Maximize button above the window or double-click the taskbar to maximize the window.
The default scale mode on macOS cannot be adjusted.
Remote Audio
Remote audio can transmit sound from the Controlled device to the Controller, making it easier to receive system notifications, meetings, media playback, and other audio content in sync. You can also select the capture device of the Controlled as needed to meet different usage scenarios.
Turn Remote Audio On or Off
Through the Control Panel
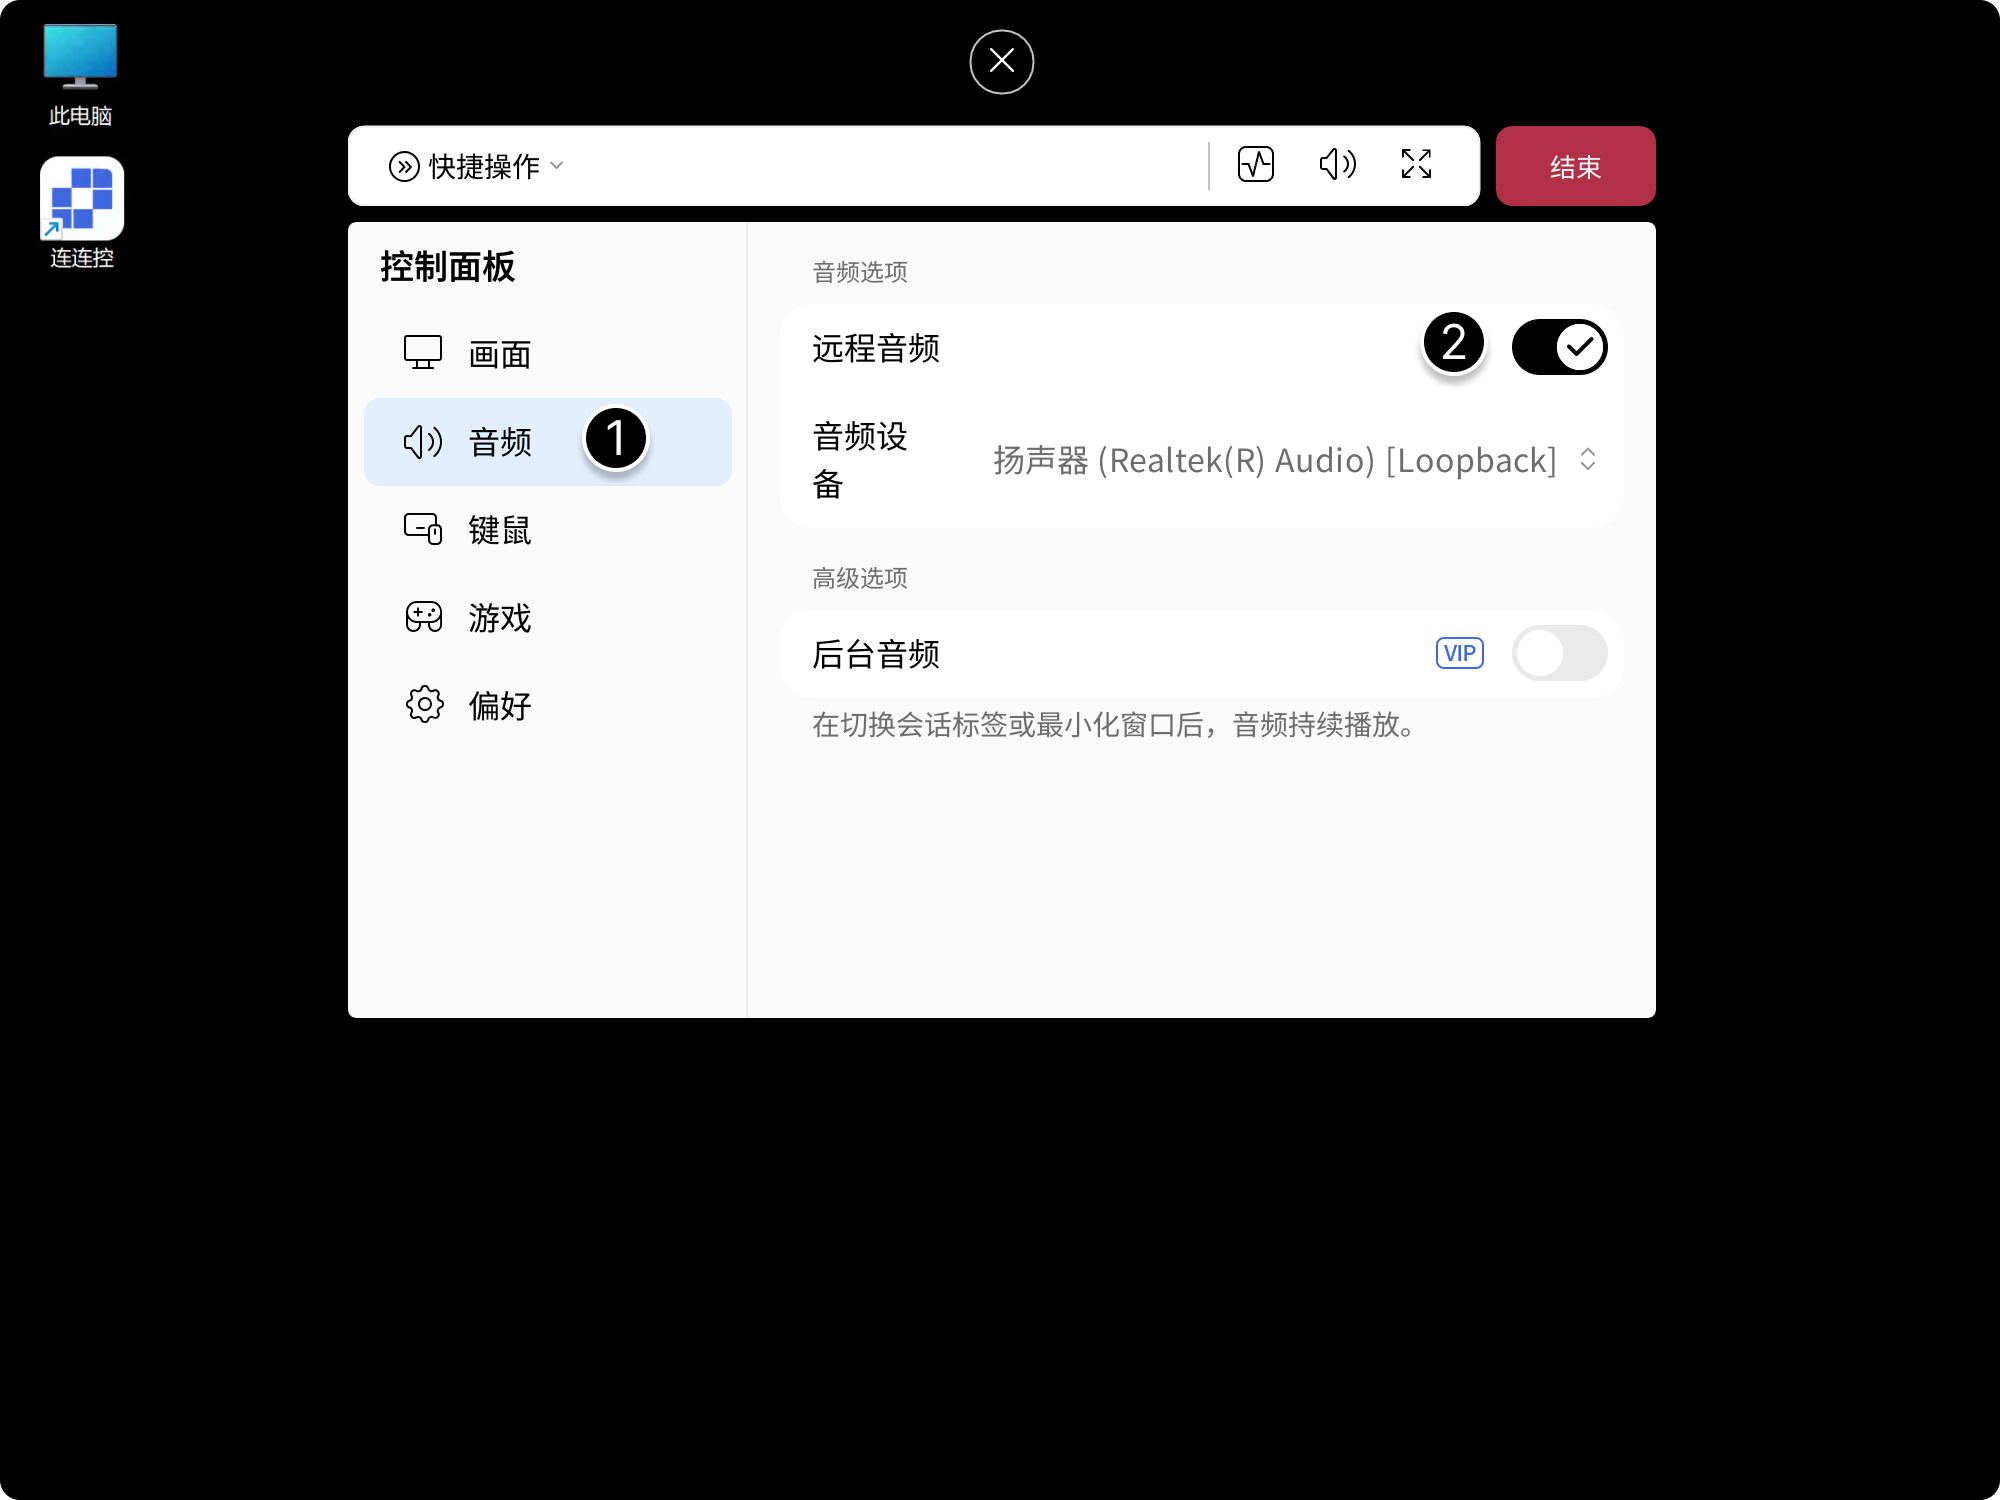
- Click the floating arrow above the remote screen to expand the control panel, then select the Audio settings item;
- Turn the Remote Audio option on or off to enable or disable remote audio.
Through the Shortcut Bar
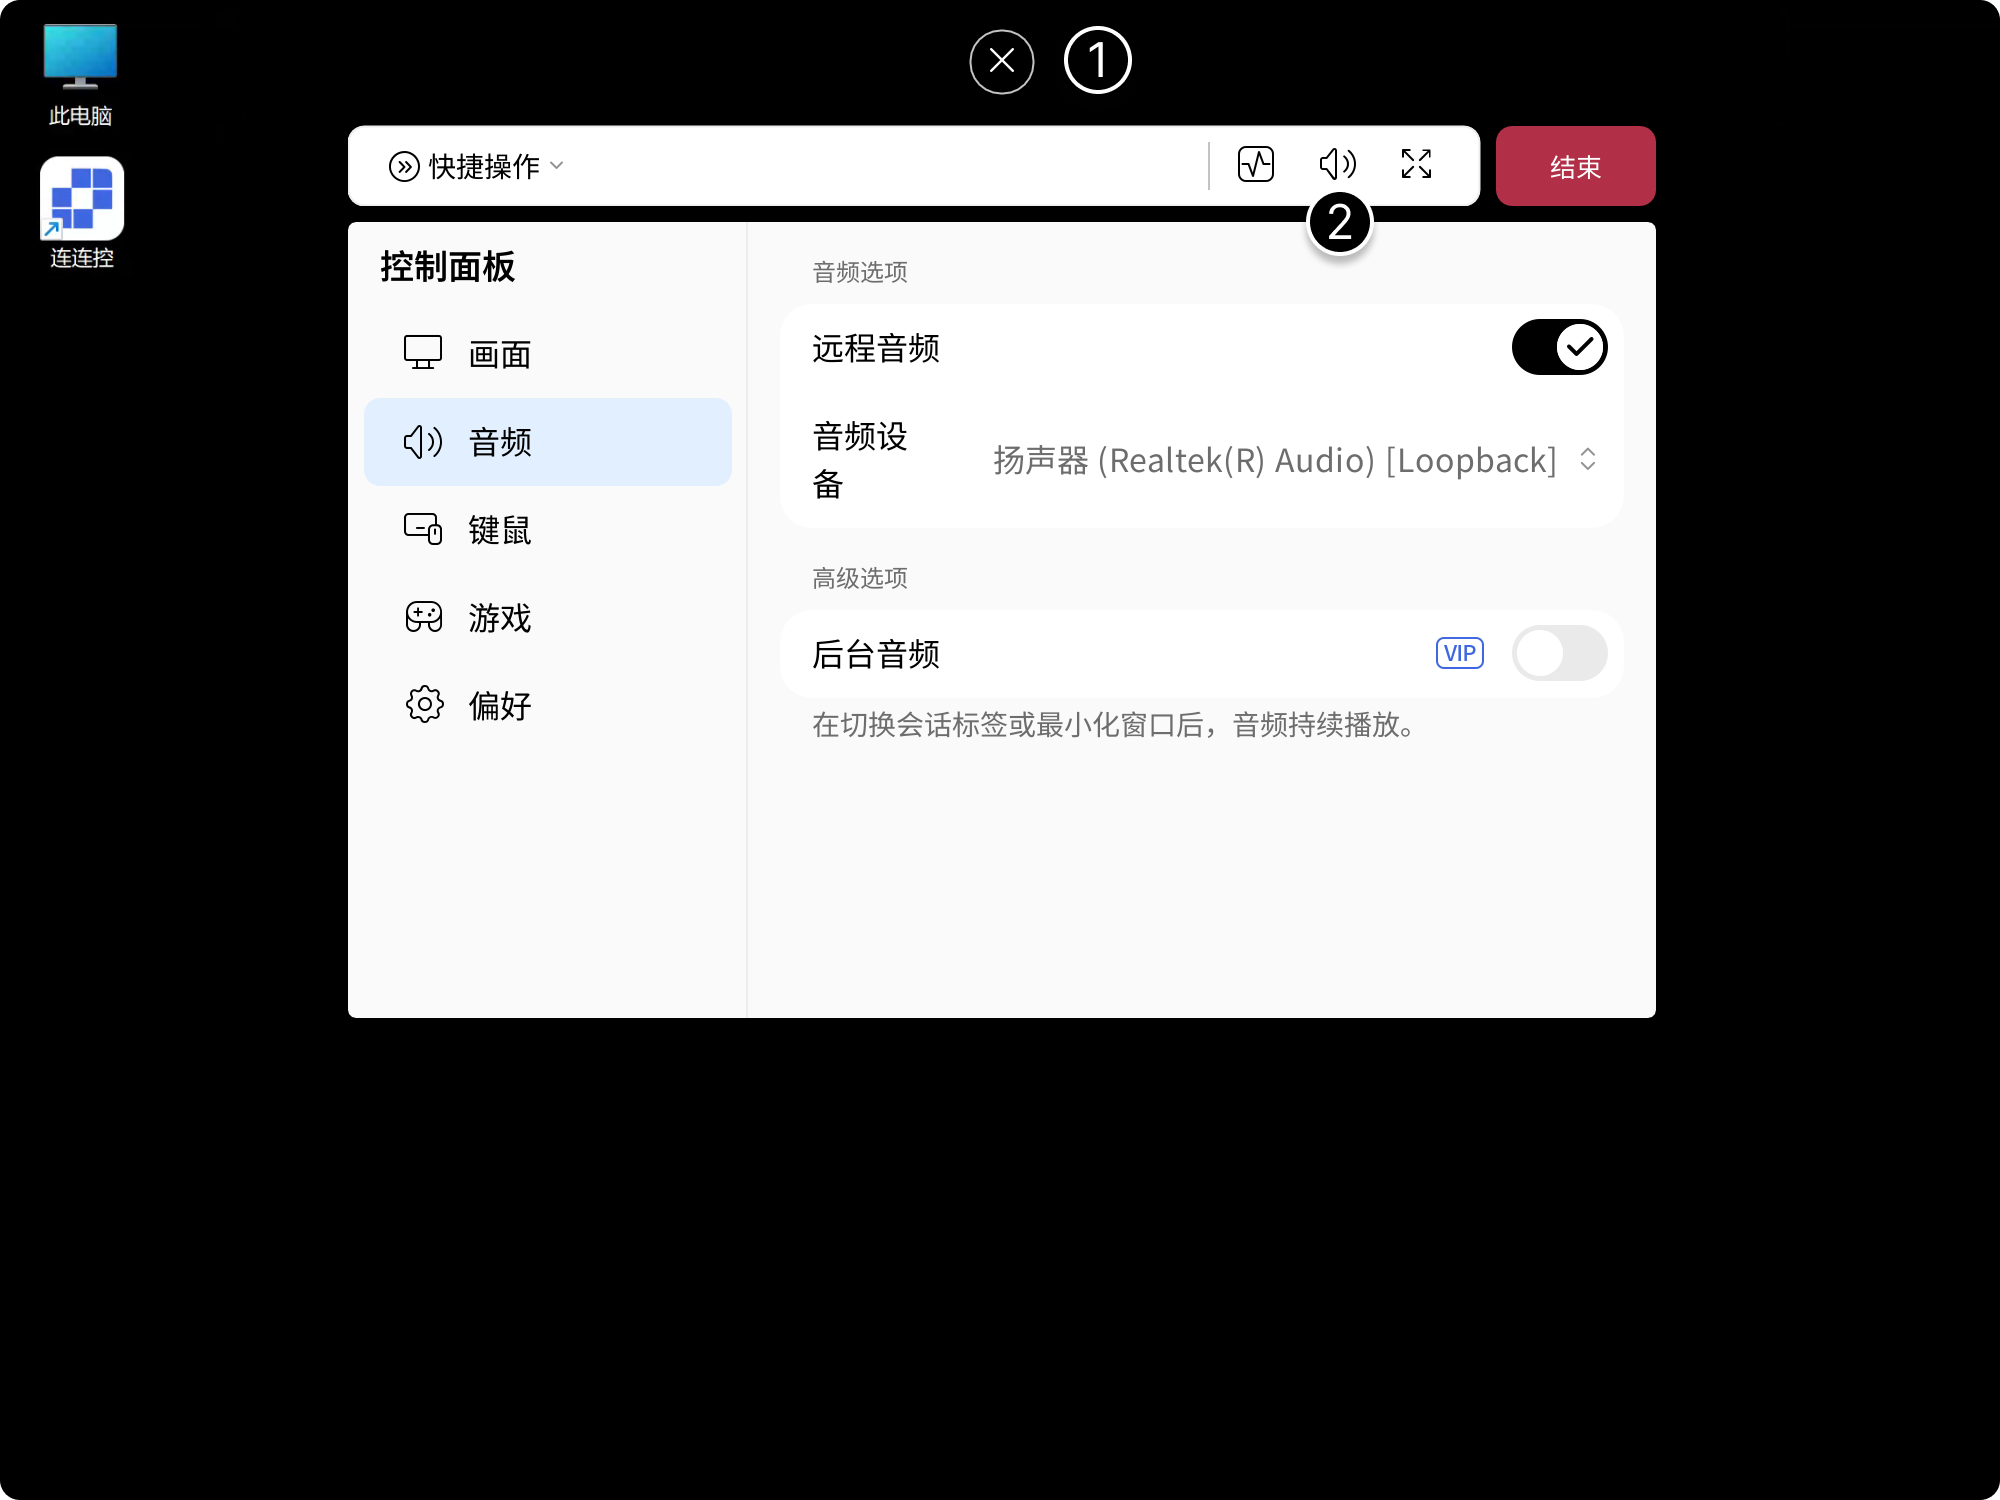
- Click the floating arrow above the remote screen to expand the control panel;
- Click the Audio Button to enable or disable audio transmission.
Background Audio
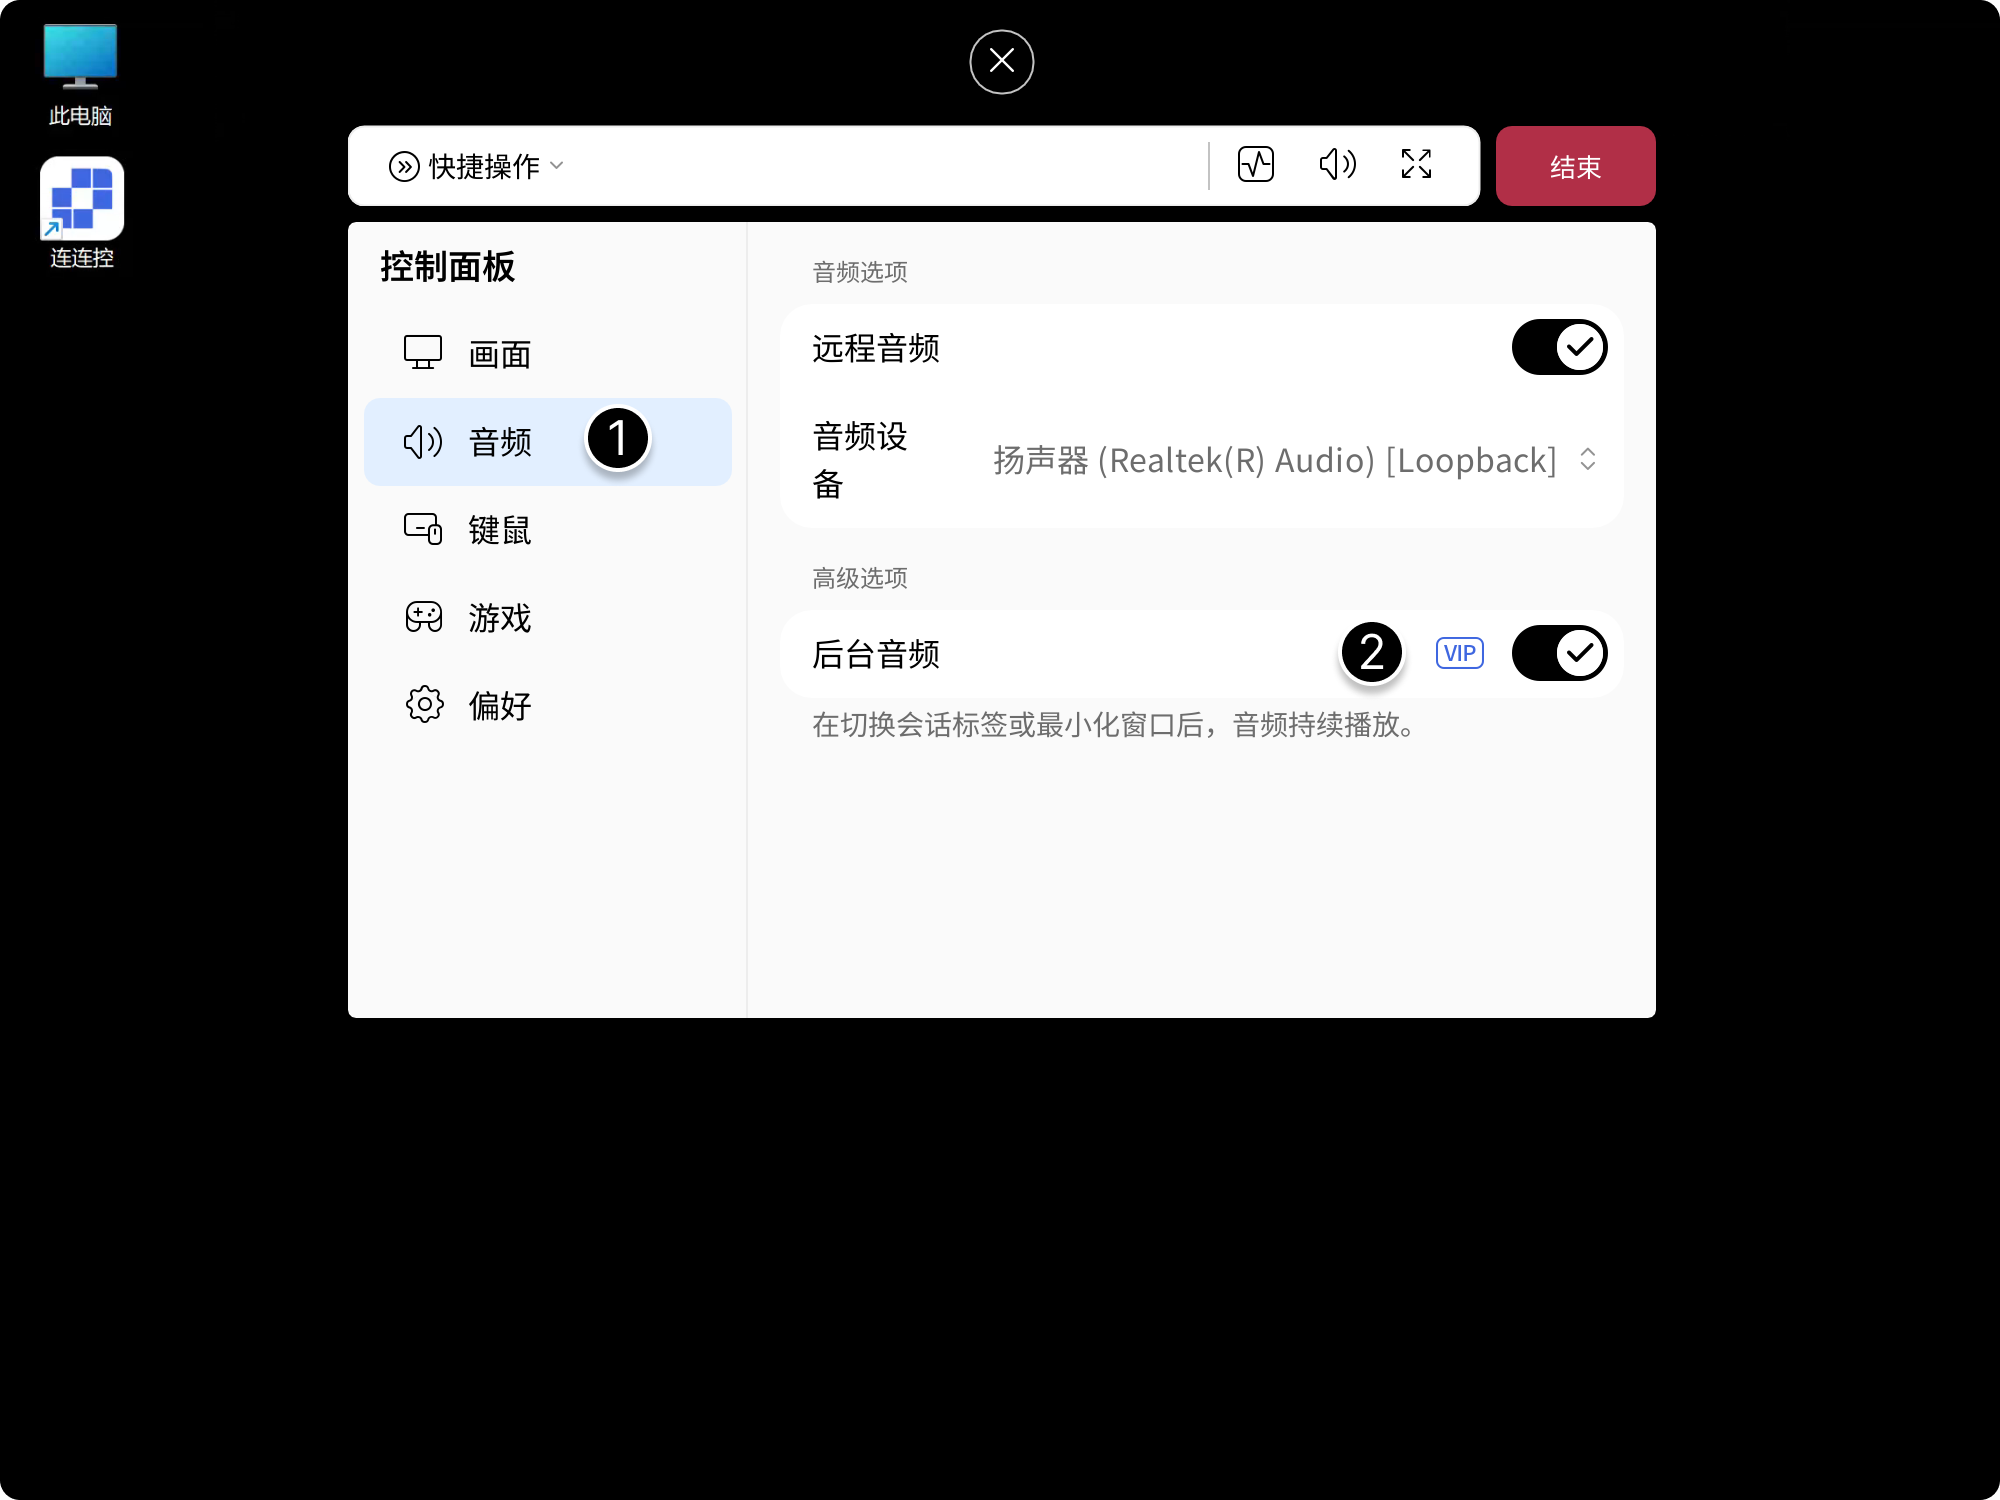
On desktop, background audio lets audio continue playing after switching session tabs or minimizing the window.
- Click the floating arrow above the remote screen to expand the control panel, then select the Audio settings item;
- Turn the Background Audio option on or off to enable or disable background audio.
On mobile devices, after Background Audio is enabled, remote audio can continue playing even after switching to another app.
- Click the settings button in the lower-right corner of the remote screen;
- Select Audio and then select Background Audio.
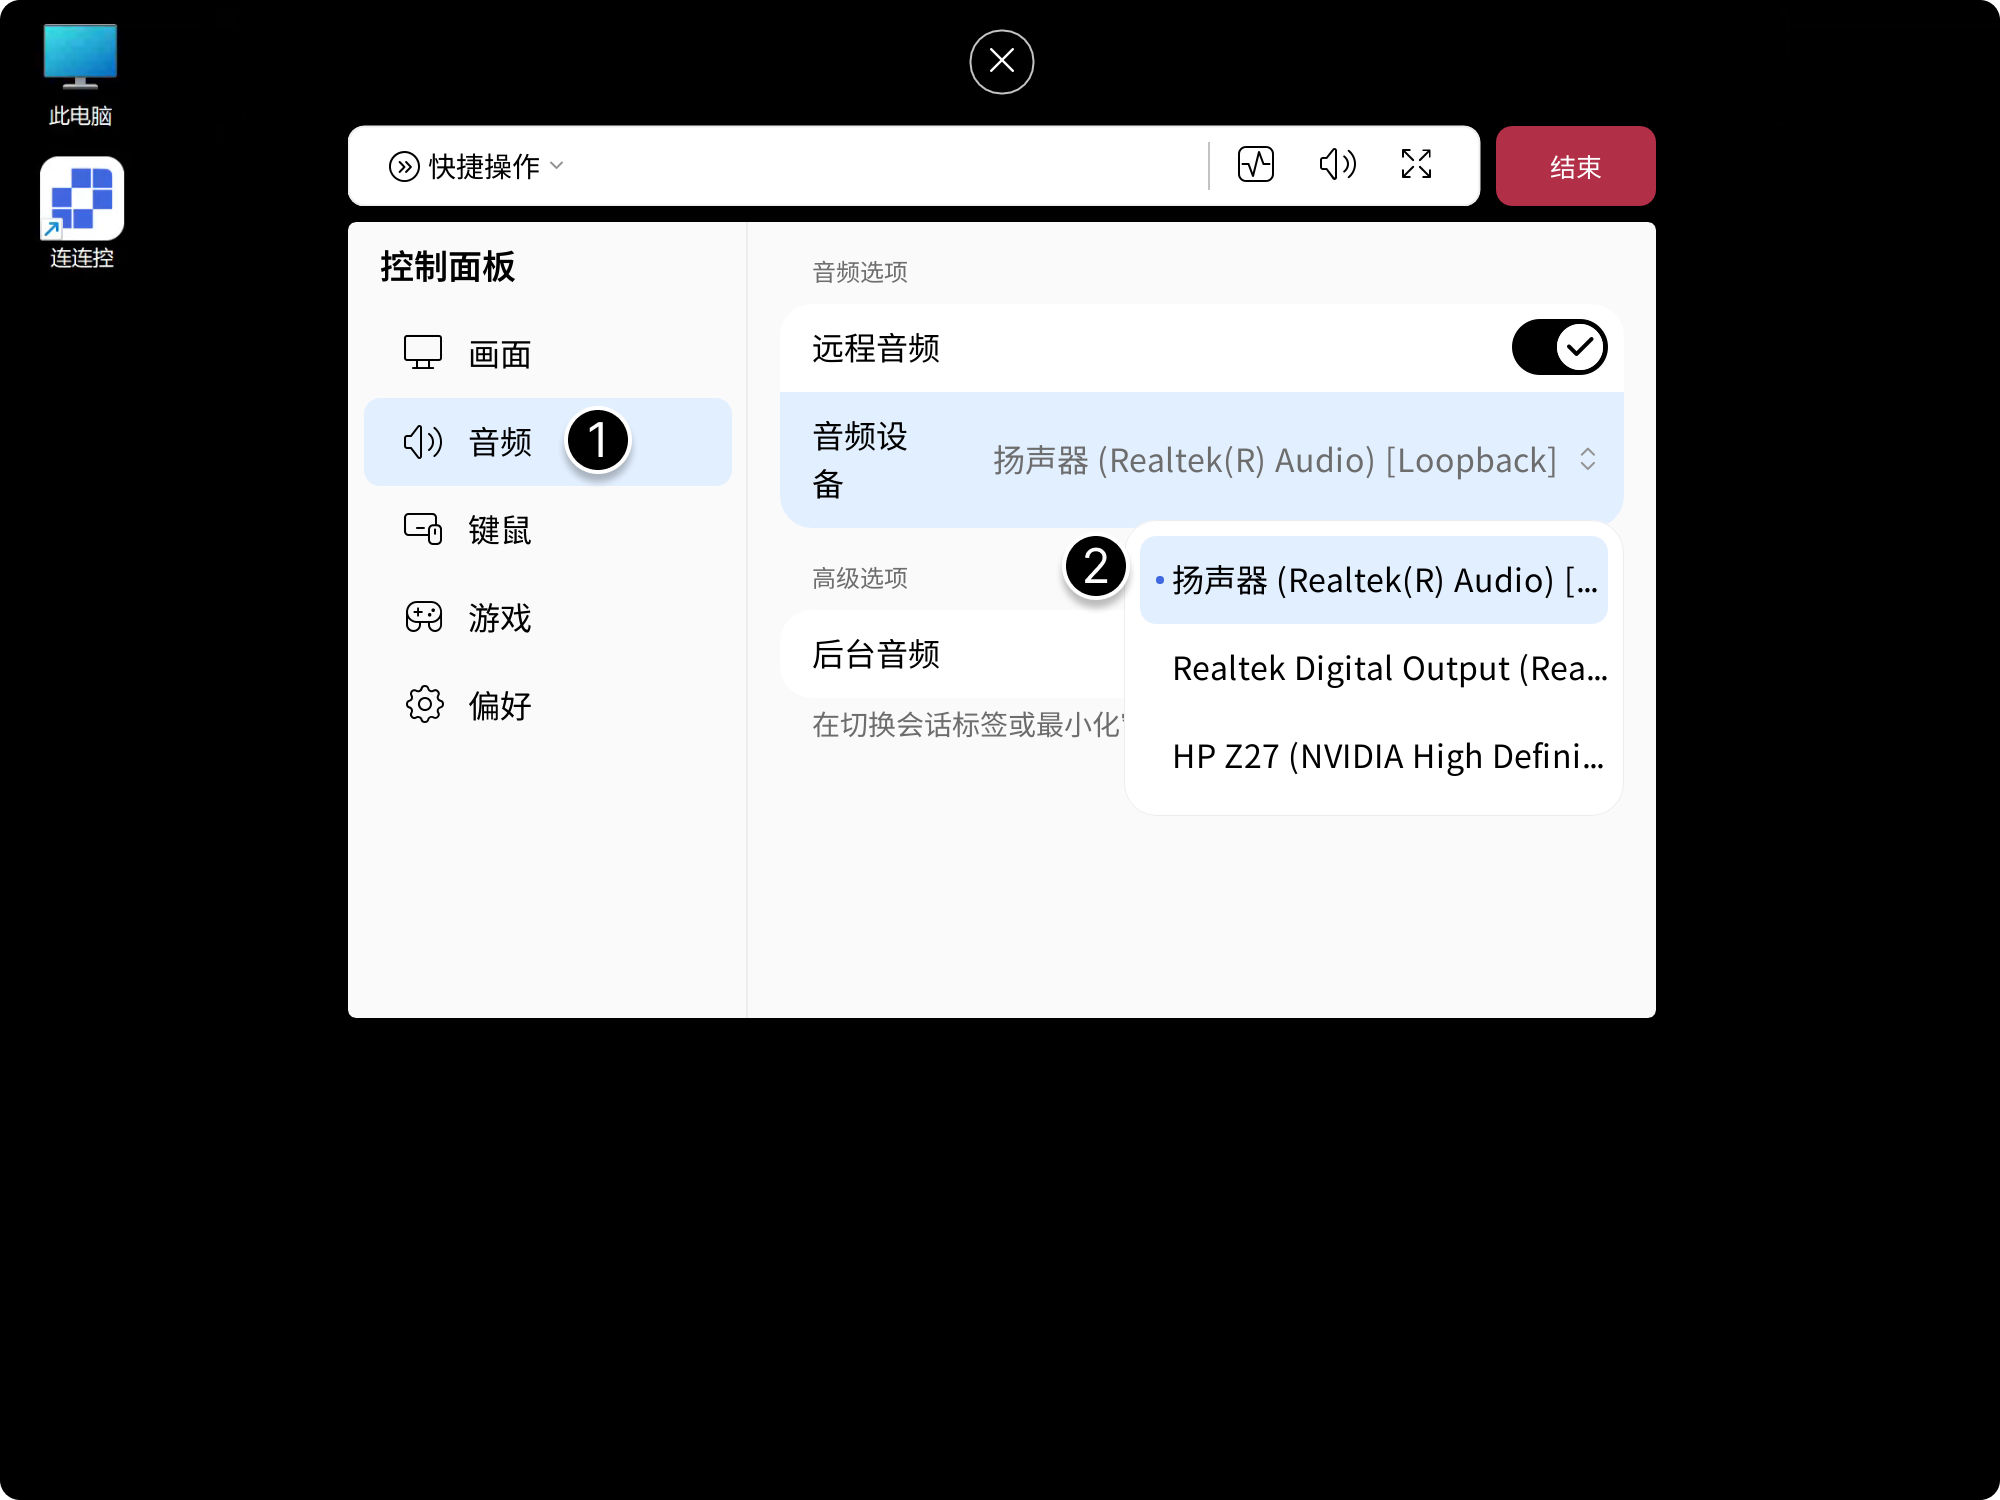
Audio Device
Multiple audio devices may exist on the same device. You can select different audio output devices to switch between them.
- Click the floating arrow above the remote screen to expand the control panel, then select the Audio settings item;
- Click Audio Device and select the required audio device.
Keyboard, Mouse, and Input
AskLink provides multiple keyboard, mouse, and input settings. You can adjust them according to your usage habits.
Lock Mouse Inside Remote Control Screen
Enabling this option locks the mouse inside the remote control screen window to prevent accidental operations on the local device.
- Click the floating arrow above the screen to expand the control panel, then select Keyboard & Mouse;
- Enable Lock Mouse Inside Remote Control Screen.
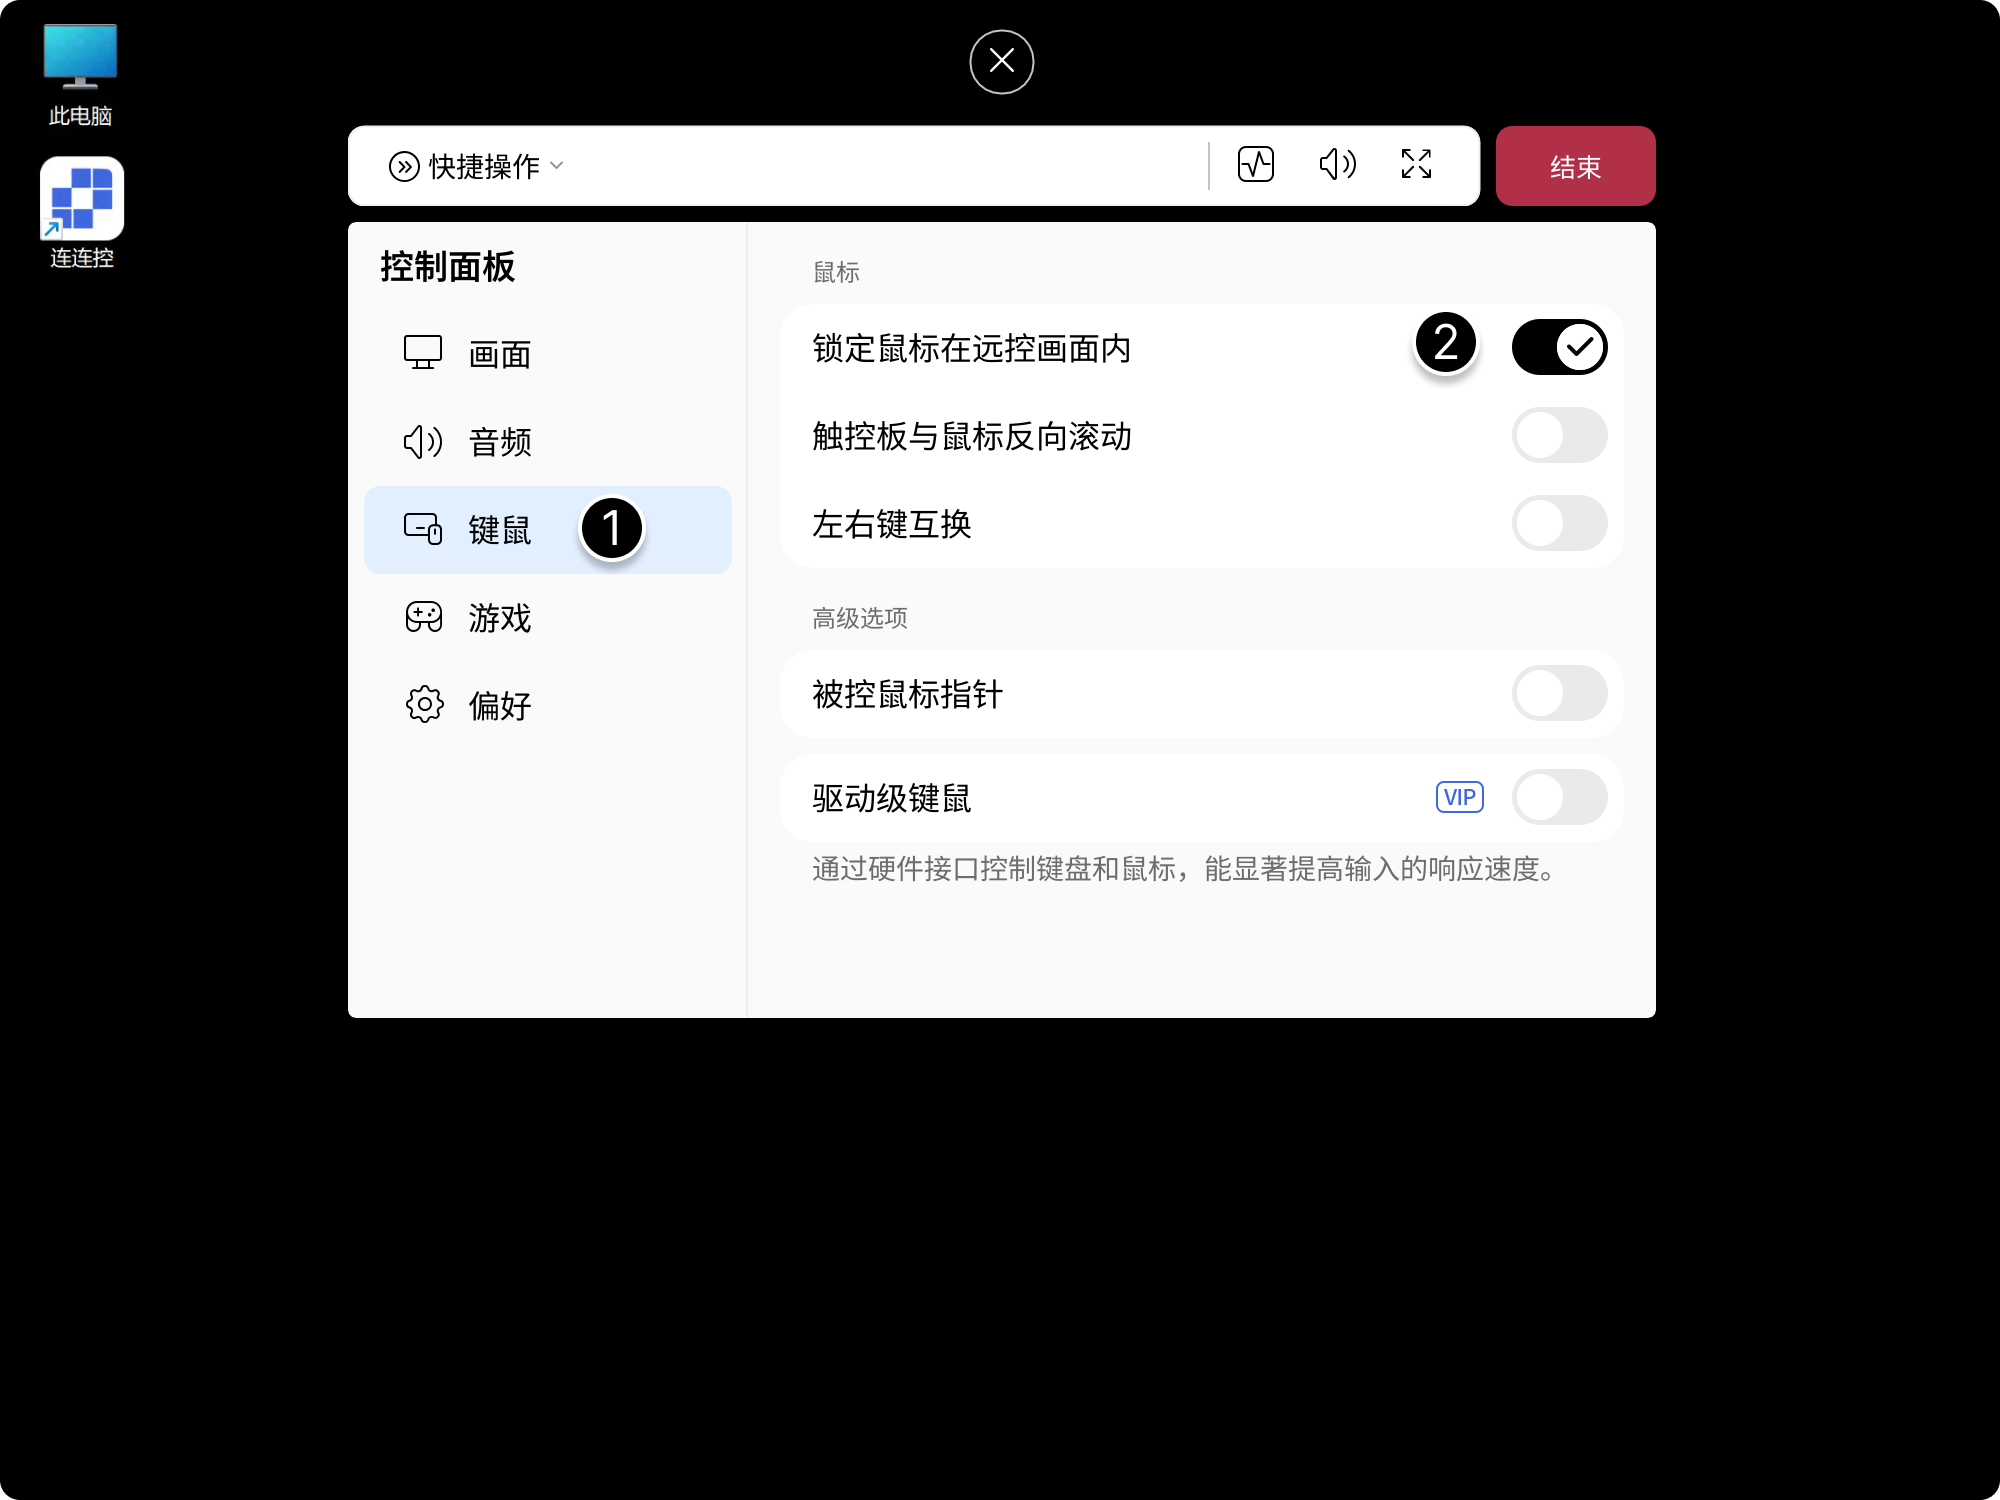
You can use Ctrl + Alt + M to switch the mouse back to the local device.
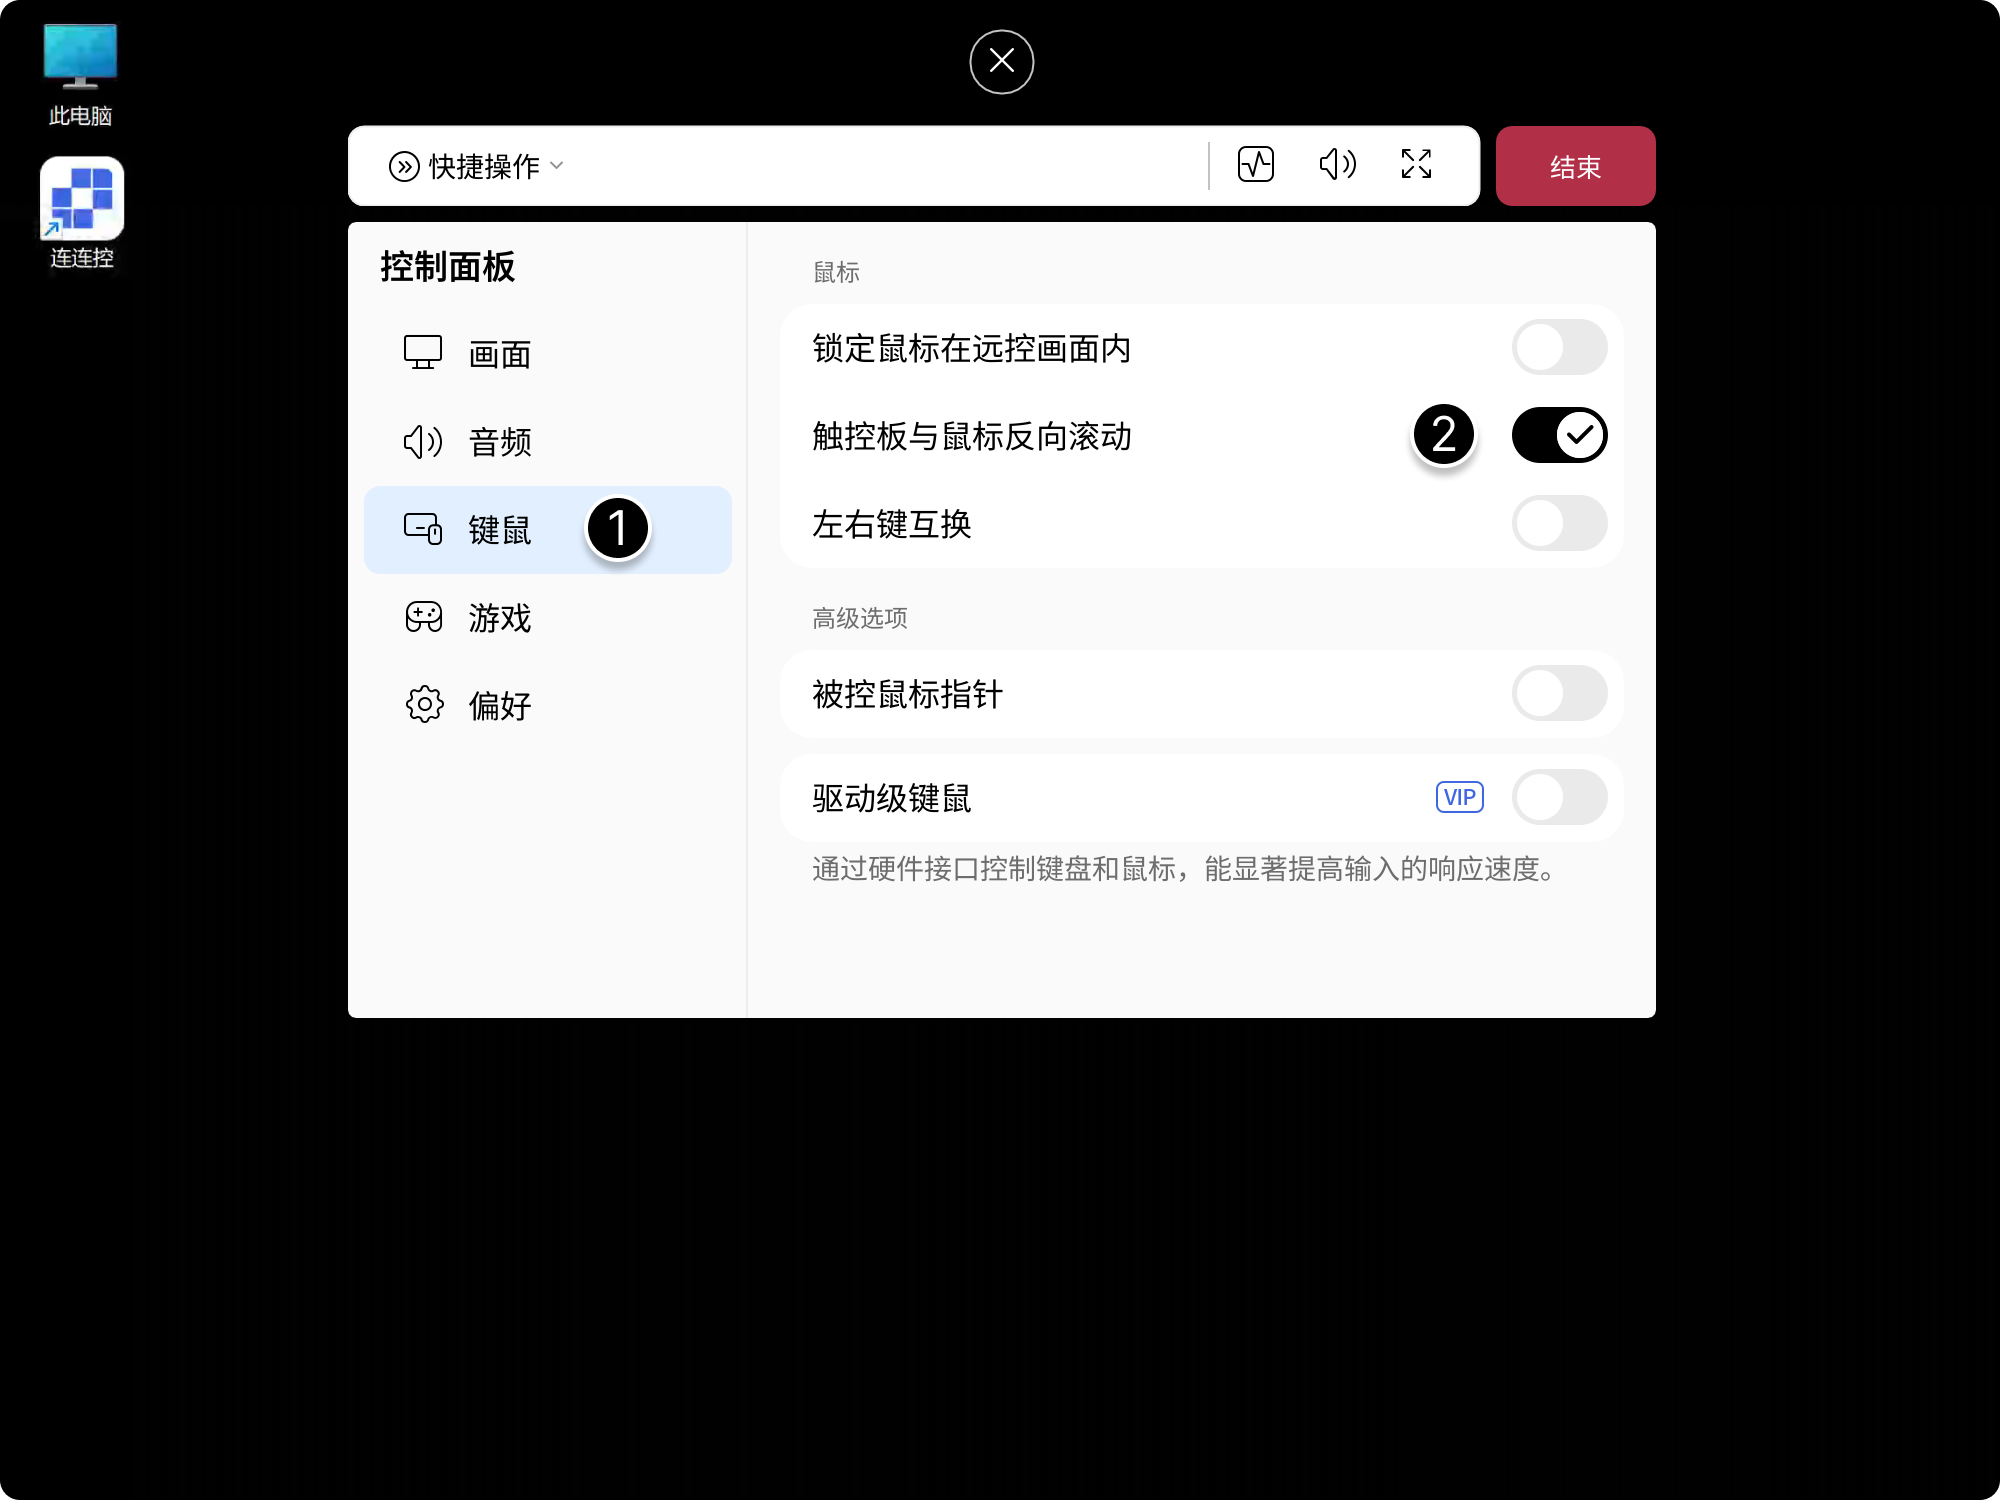
Reverse Scrolling for Trackpad and Mouse
Enabling this option uniformly changes the wheel direction for the trackpad and mouse.
- Click the floating arrow above the screen to expand the control panel, then select Keyboard & Mouse;
- Enable Reverse Scrolling for Trackpad and Mouse.
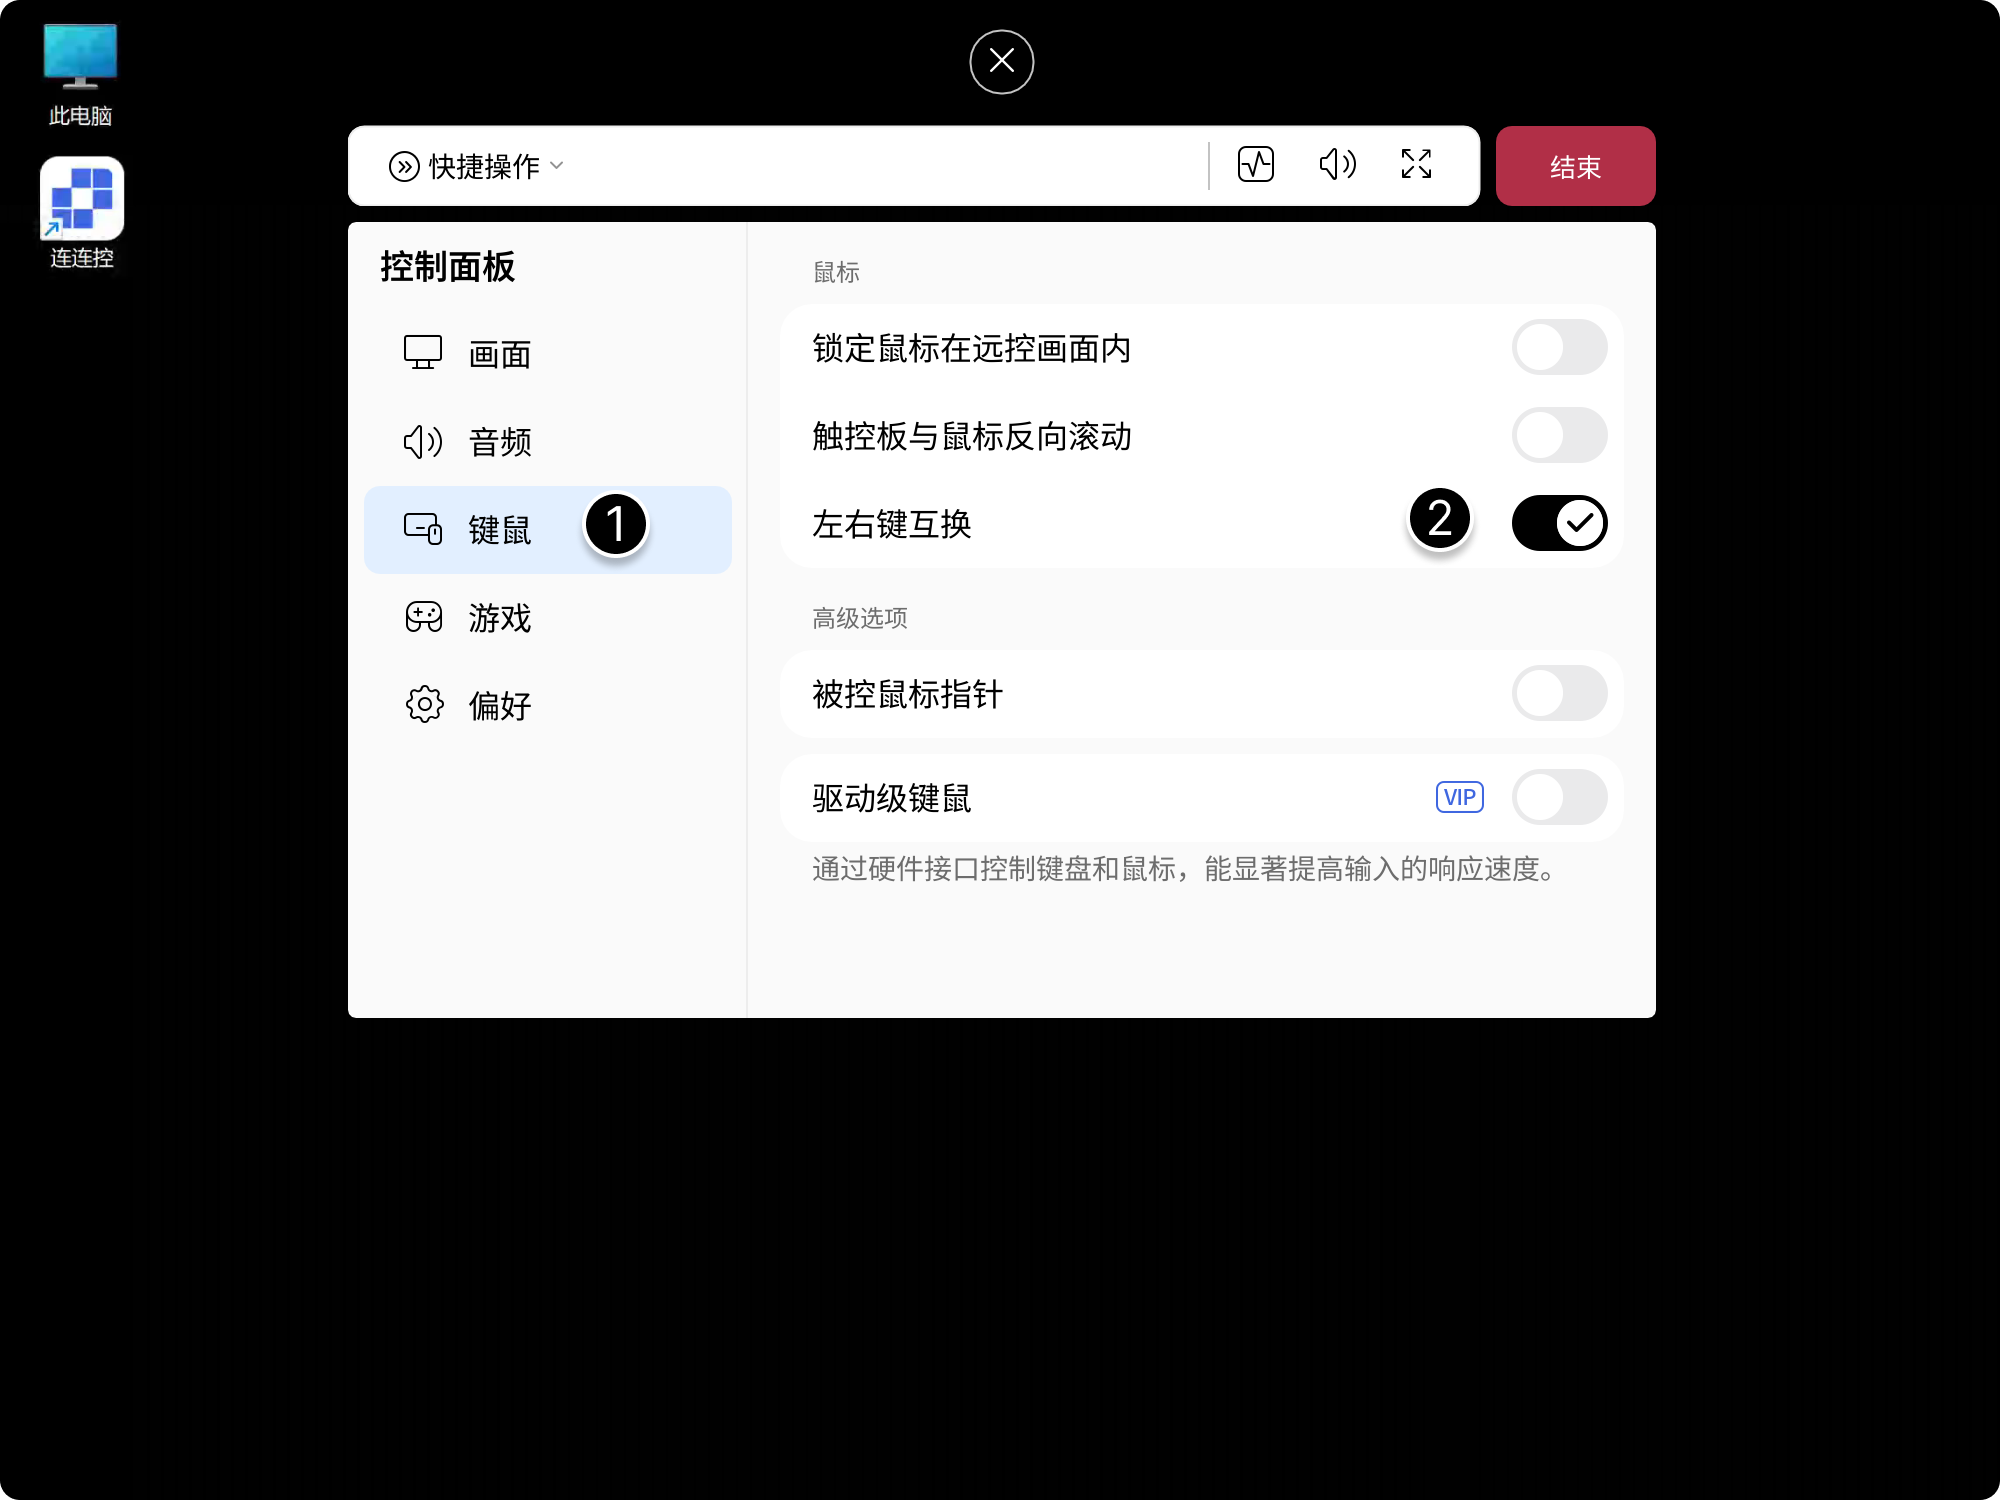
Swap Left and Right Buttons
Enabling this option switches the functions of the left and right mouse buttons.
- Click the floating arrow above the screen to expand the control panel, then select Keyboard & Mouse;
- Enable Swap Left and Right Buttons.
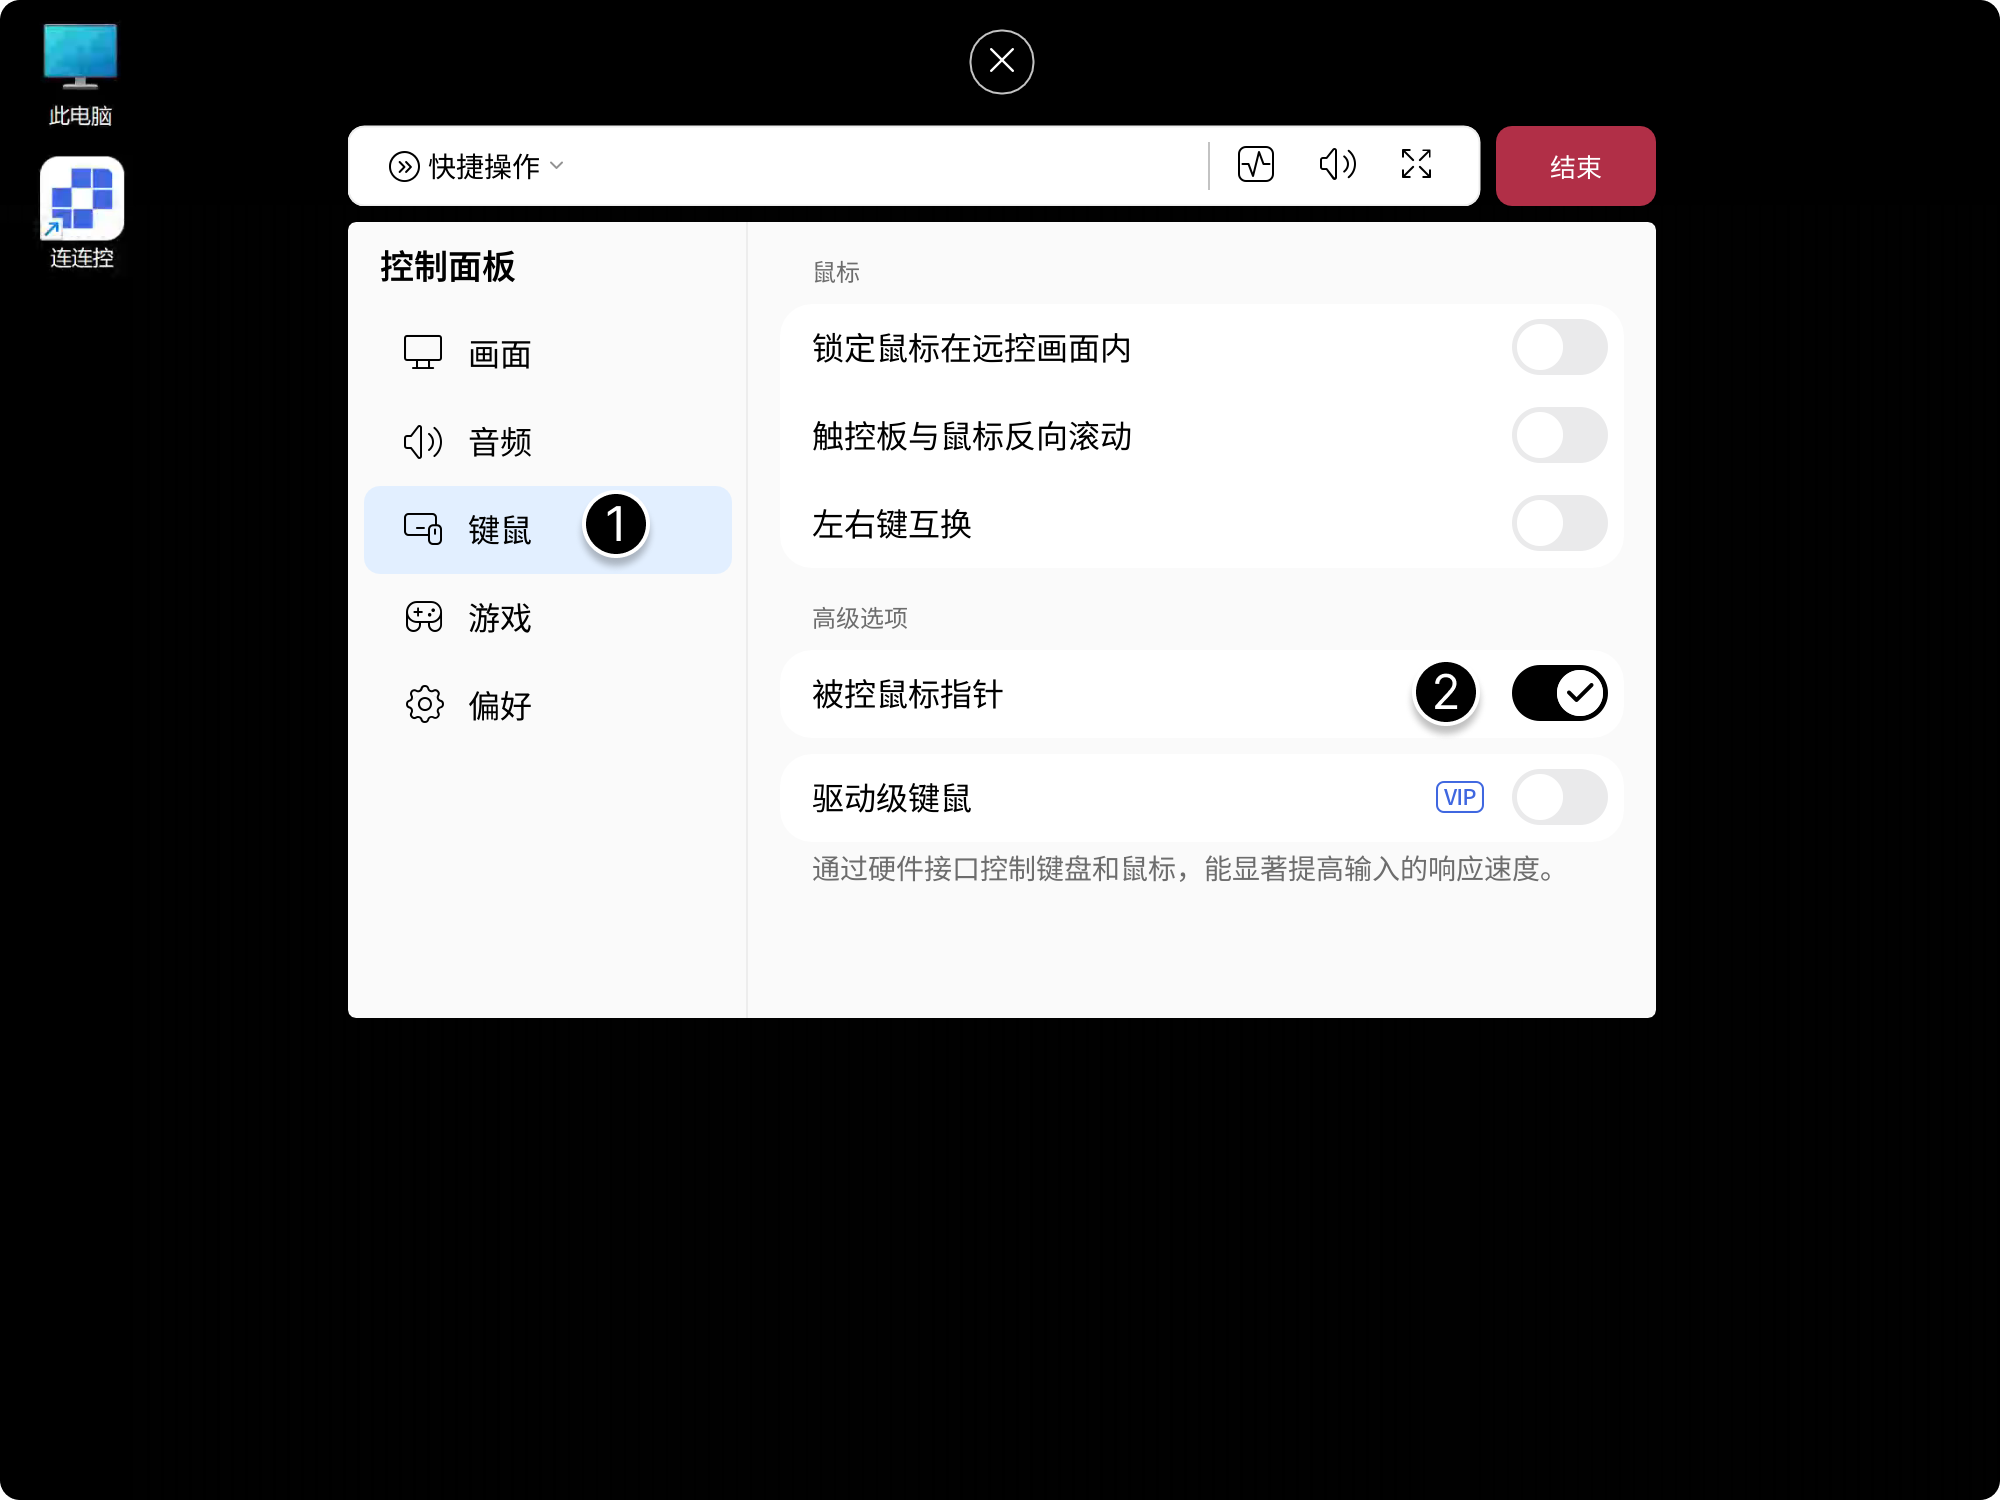
Controlled Mouse Pointer
After this option is enabled, you can see the movement trace of the mouse pointer when operating the Controlled device.
- Click the floating arrow above the screen to expand the control panel, then select Keyboard & Mouse;
- Enable Controlled Mouse Pointer.
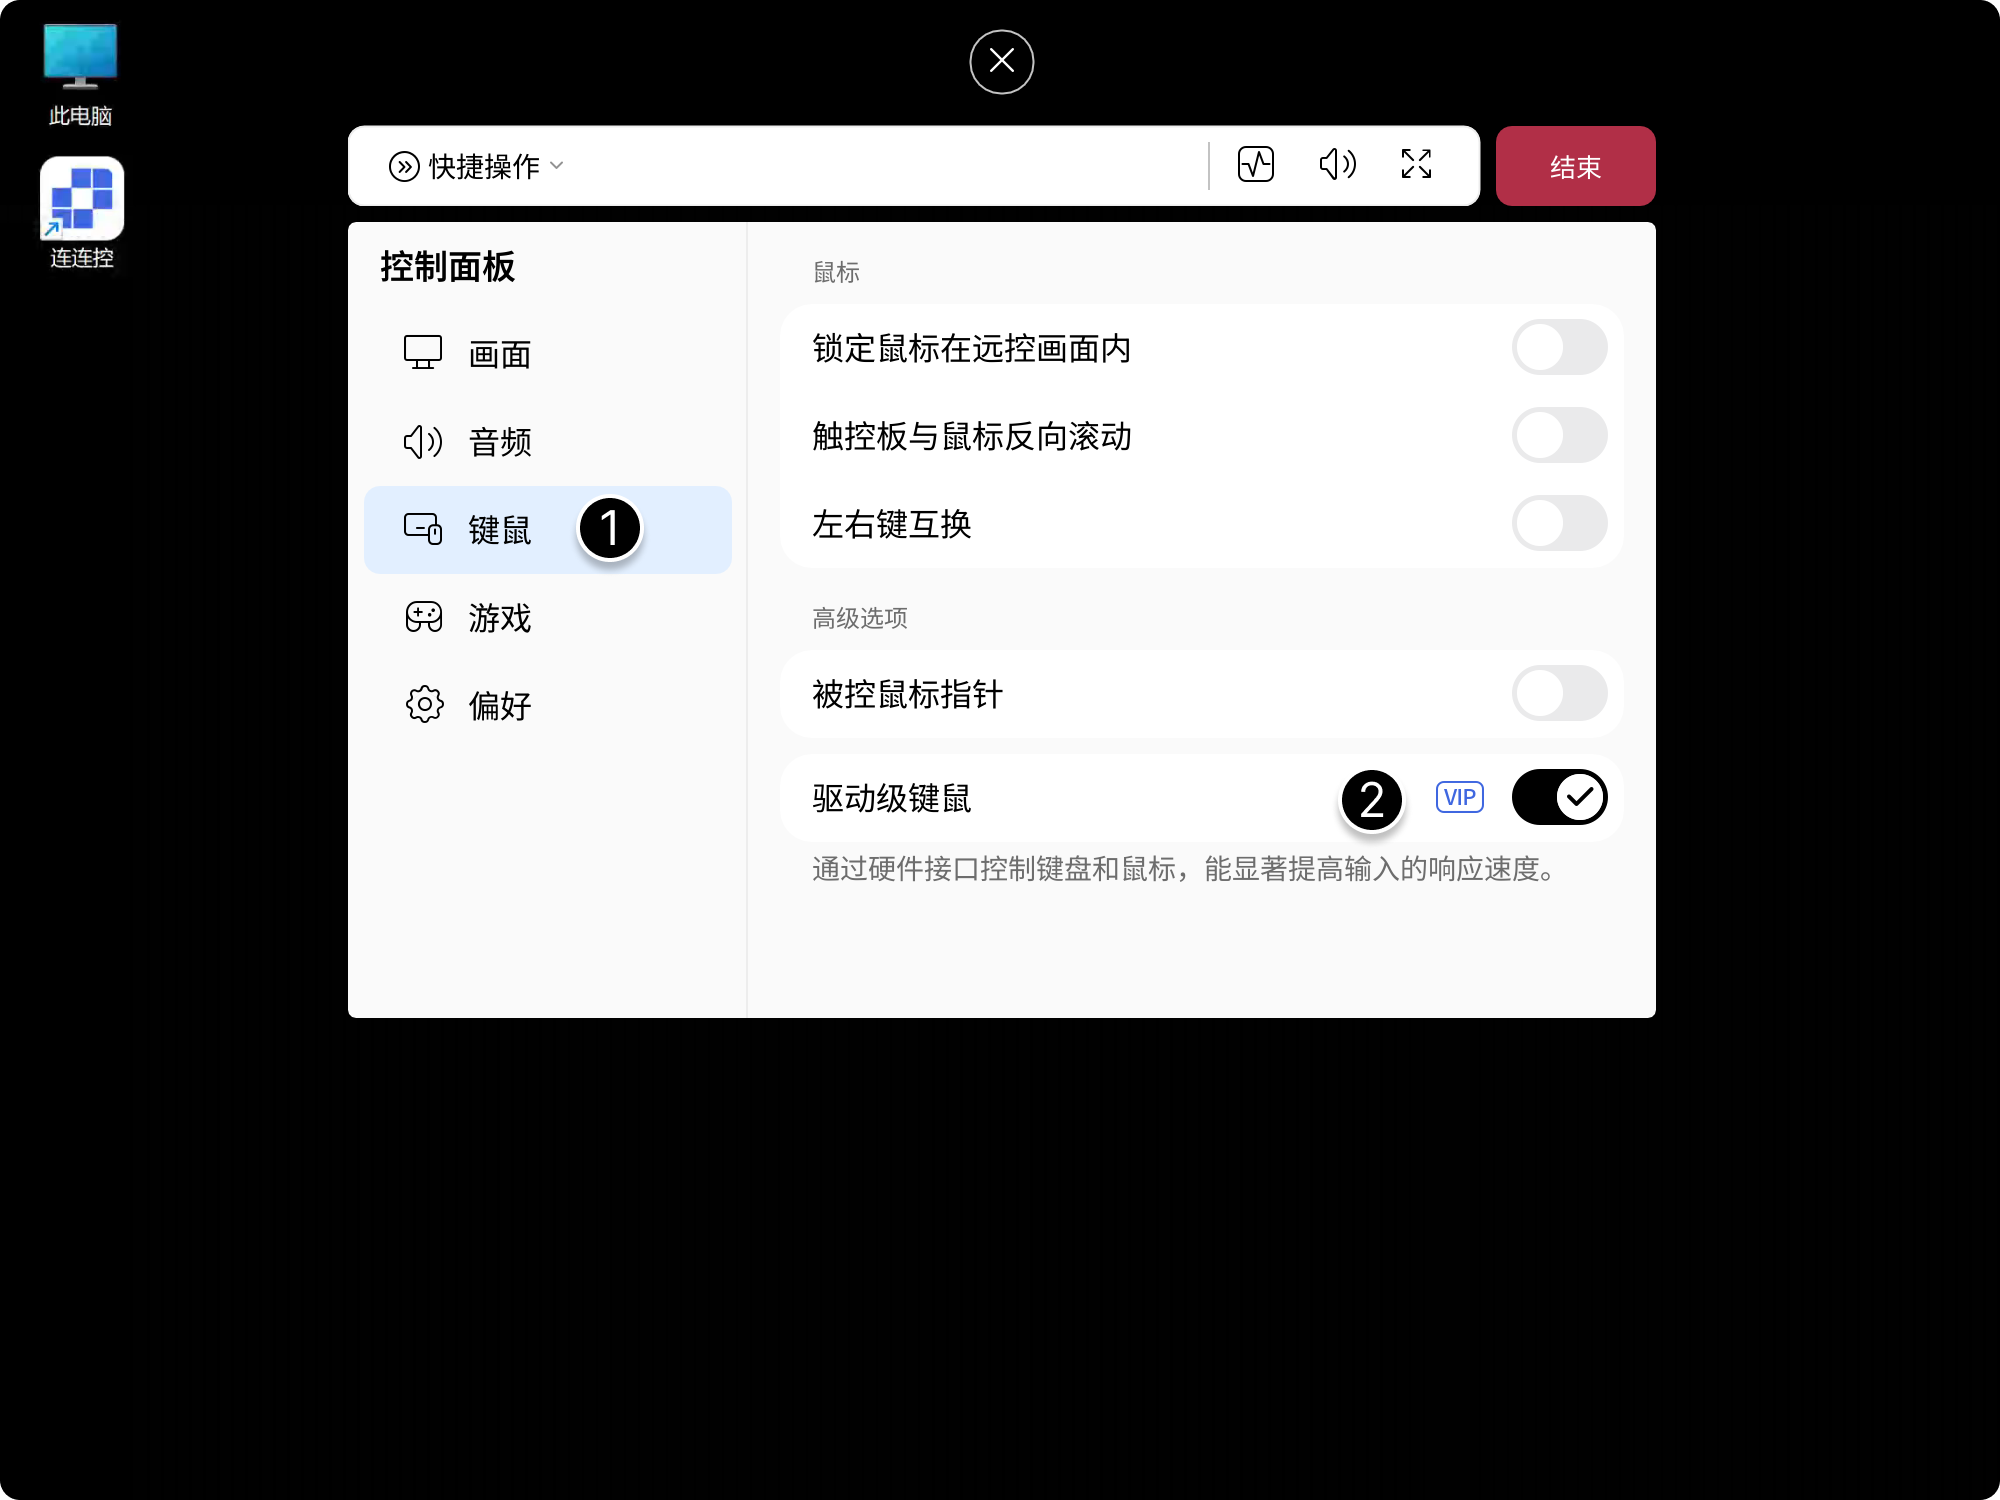
Driver-Level Keyboard and Mouse
After this feature is enabled, remote keyboard and mouse operations receive system-level driver support, which can improve operation response speed and compatibility.
- Click the floating arrow above the screen to expand the control panel, then select Keyboard & Mouse;
- Enable Driver-Level Keyboard and Mouse.
Clipboard Sync
With Clipboard Sync, you can copy and paste text and files directly between devices to sync content across devices.
File / Text Transfer
- After selecting a file or text, use the shortcut Ctrl + C, or right-click and select Copy;
- At the target location, use the shortcut Ctrl + V, or right-click and select Paste.
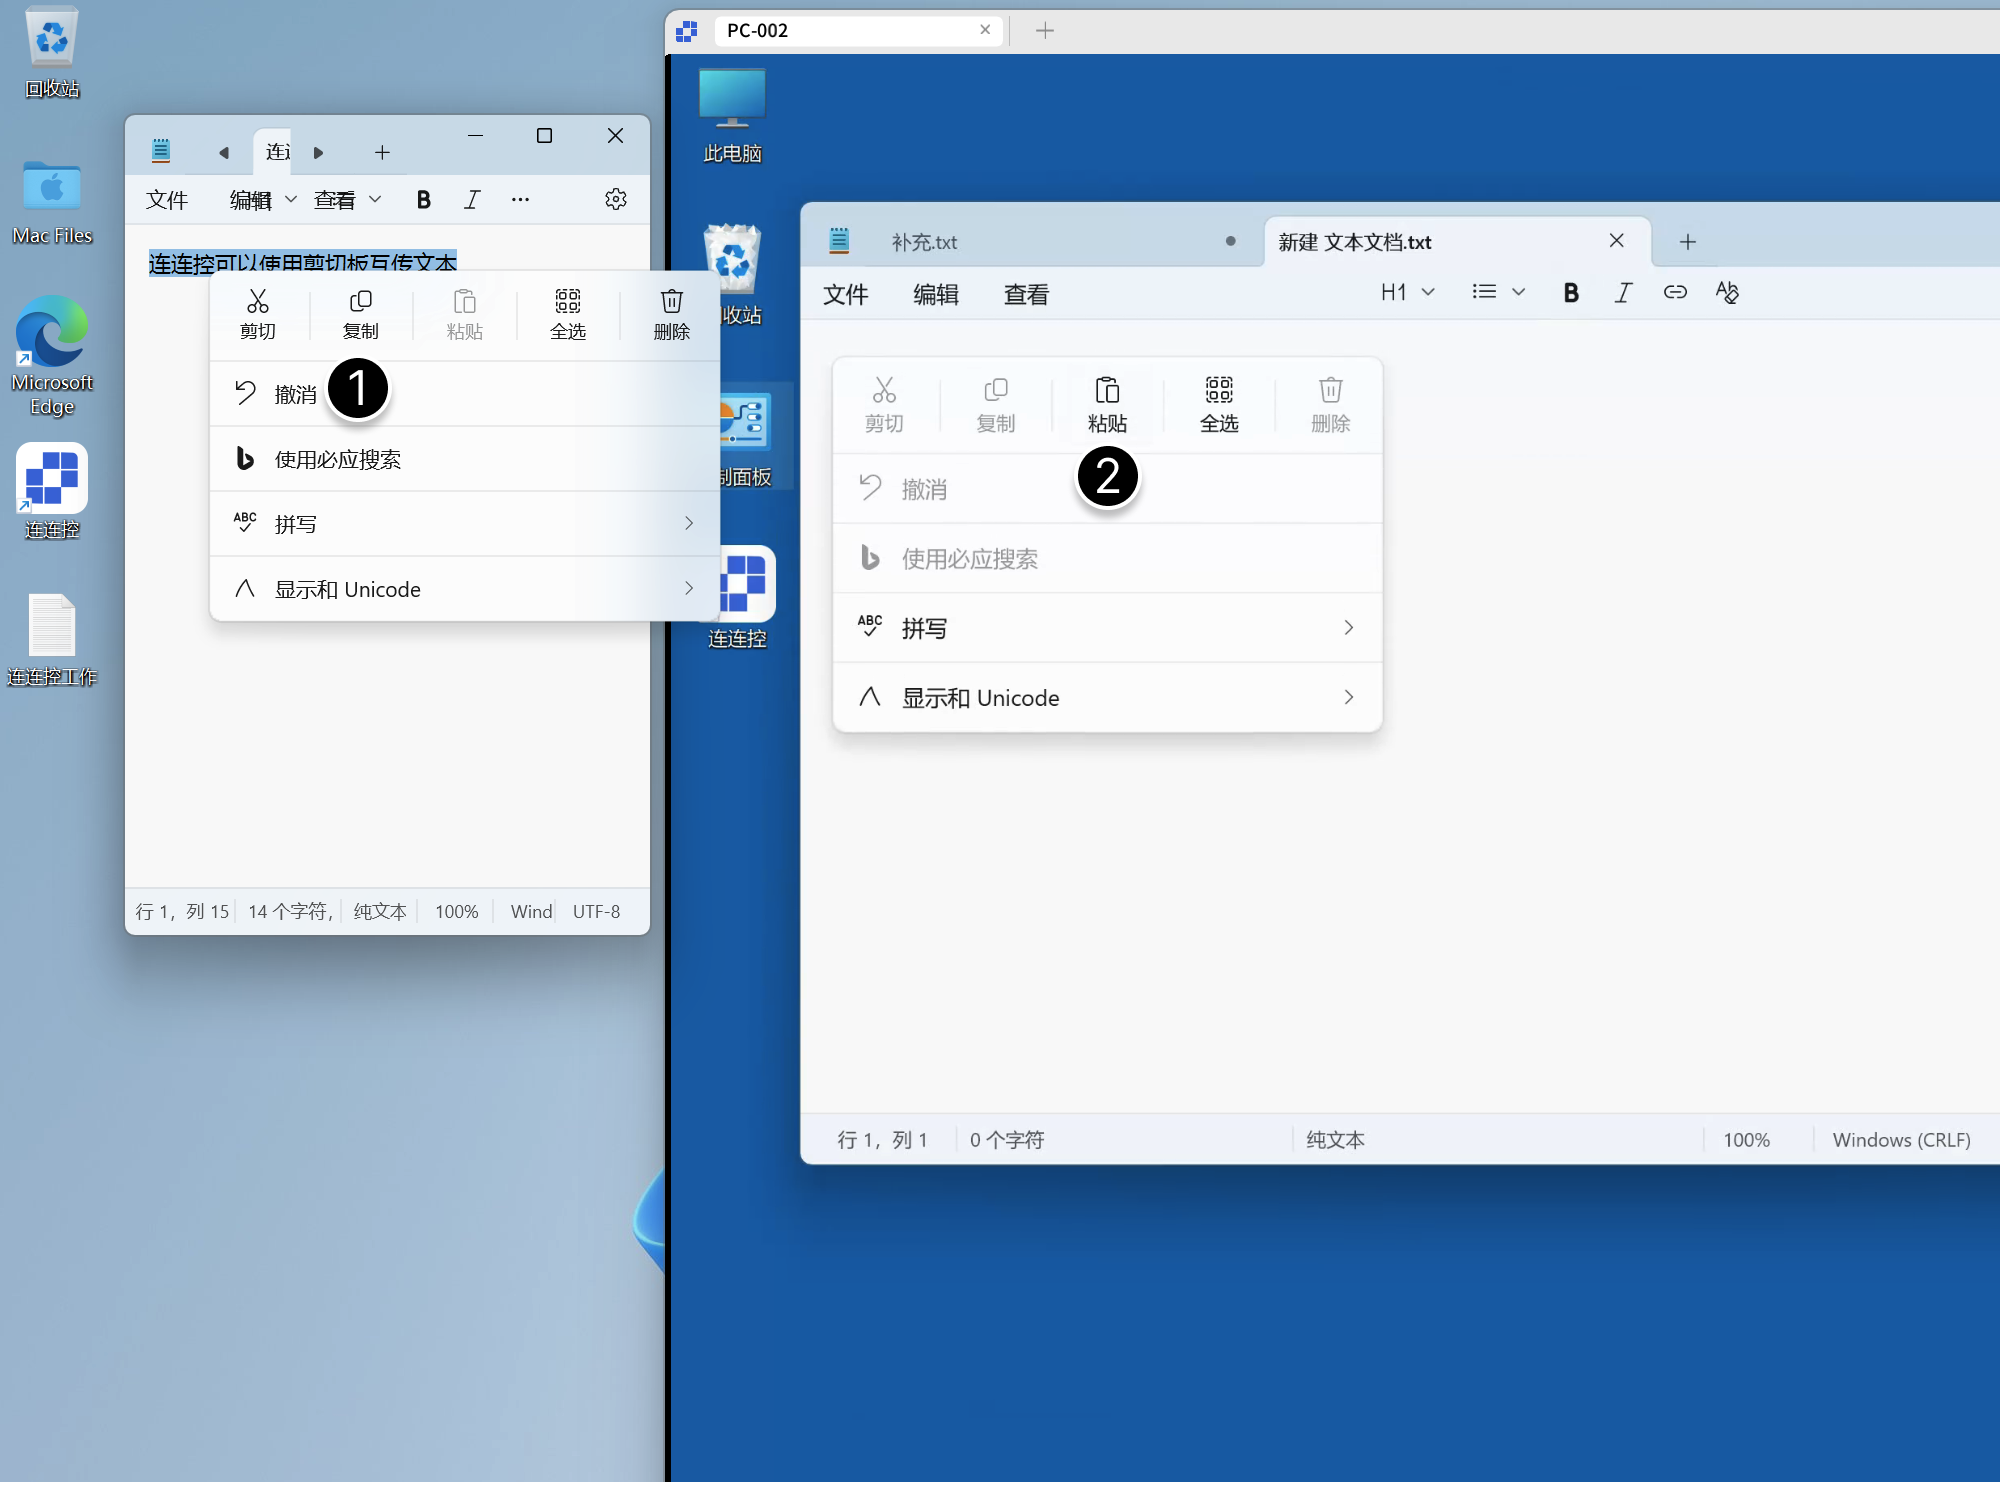
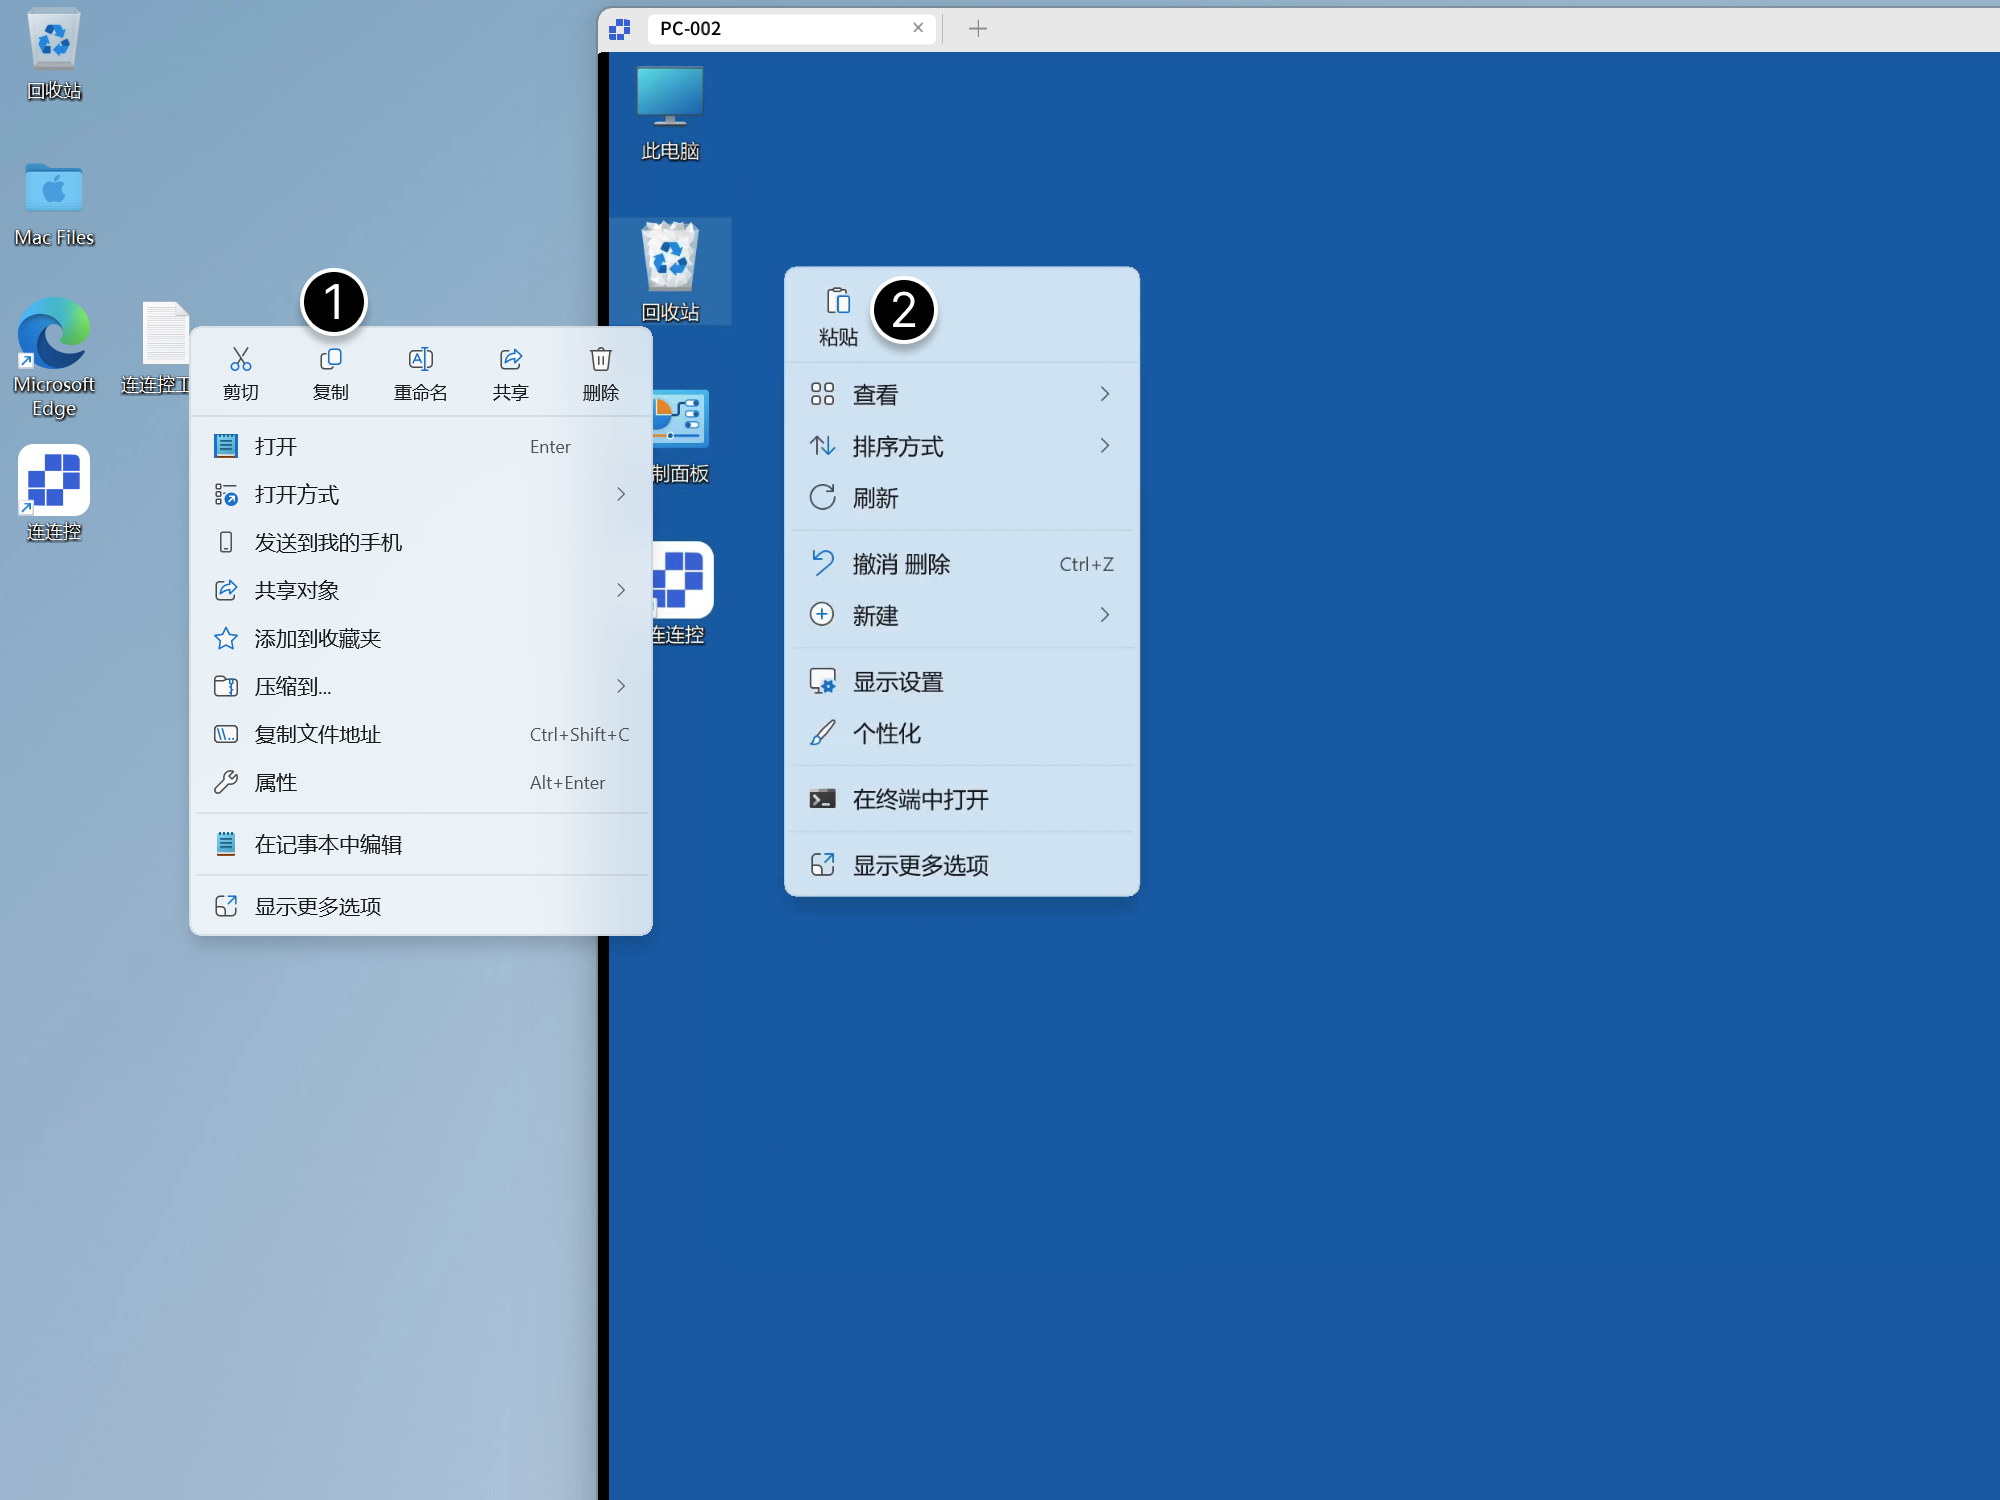
If you do not need real-time clipboard content sync, keep Clipboard Sync in Preferences on the control panel turned off.
When macOS is used as the Controller, two-way text sync is supported, while files only support sync from the Controller to the Controlled.
Virtual Display
During remote control, you can create one or more virtual screens to expand the workspace.
Create a Virtual Display
- Click the floating arrow above the screen to expand the control panel, then select Video;
- Click Create Virtual Display to complete the operation.
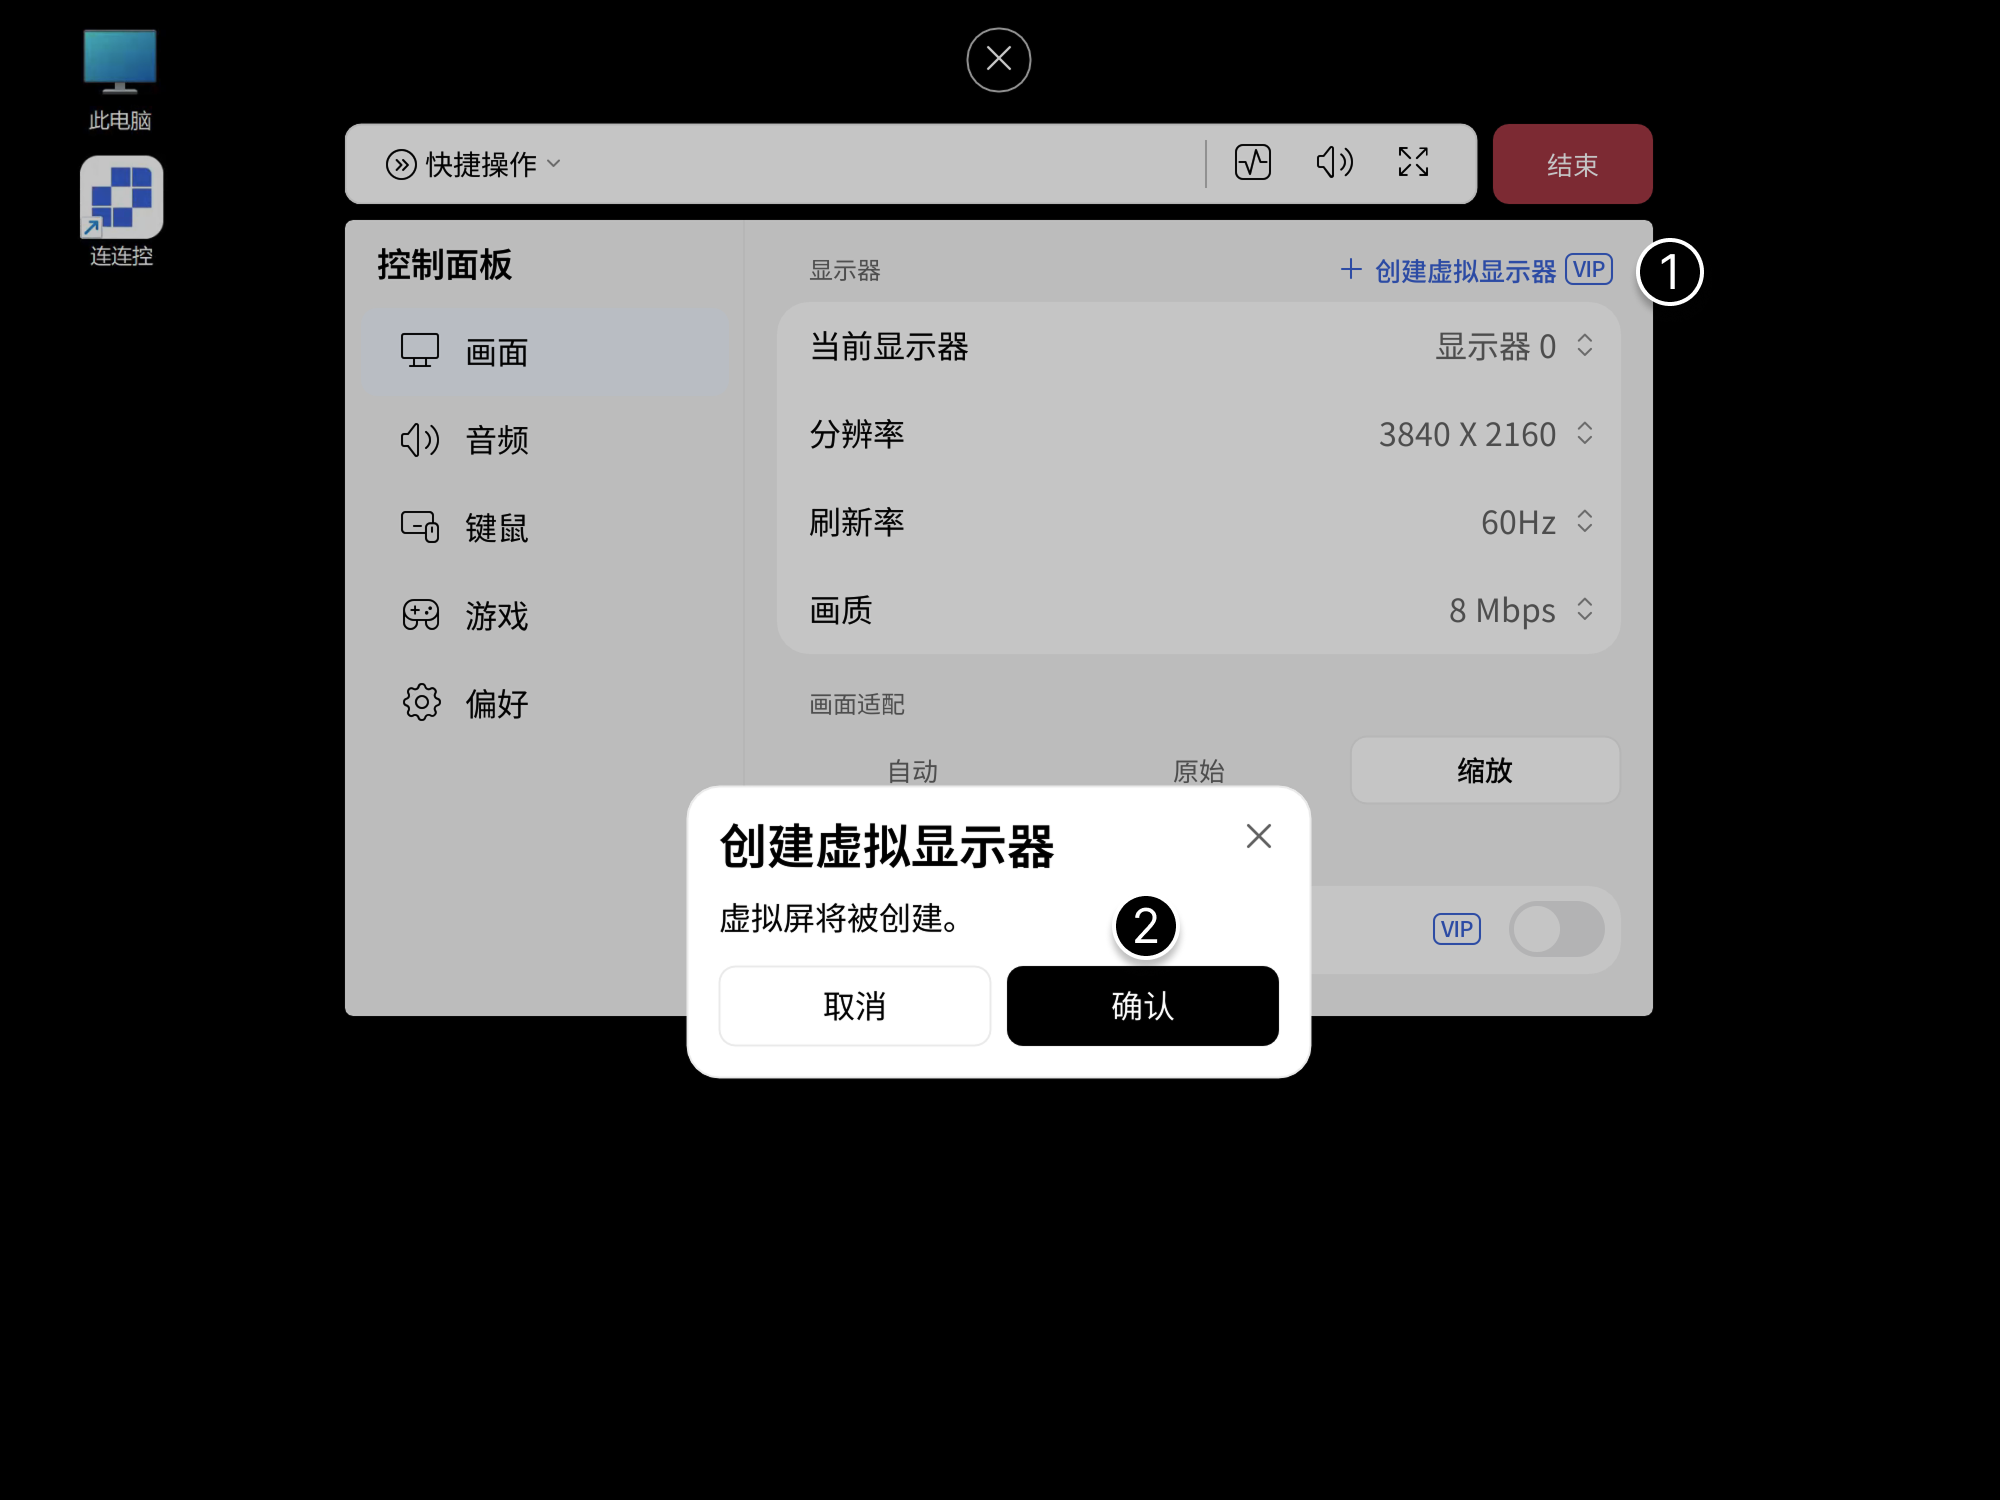
- Virtual displays support up to 4K 120Hz.
- This feature requires Windows 10 1903 or later.
- When no display is connected to the Controlled device, creating a virtual display can improve remote control smoothness.
Preferences
During a remote session, click the floating arrow above the screen to expand the control panel, then go to Preferences to enable more features as needed.
Performance Monitor
After it is enabled, you can view encoding parameters, color information, network status, and frame rate in real time.
Enable Performance Monitor in the Preferences tab, or open it through the shortcut bar icon.
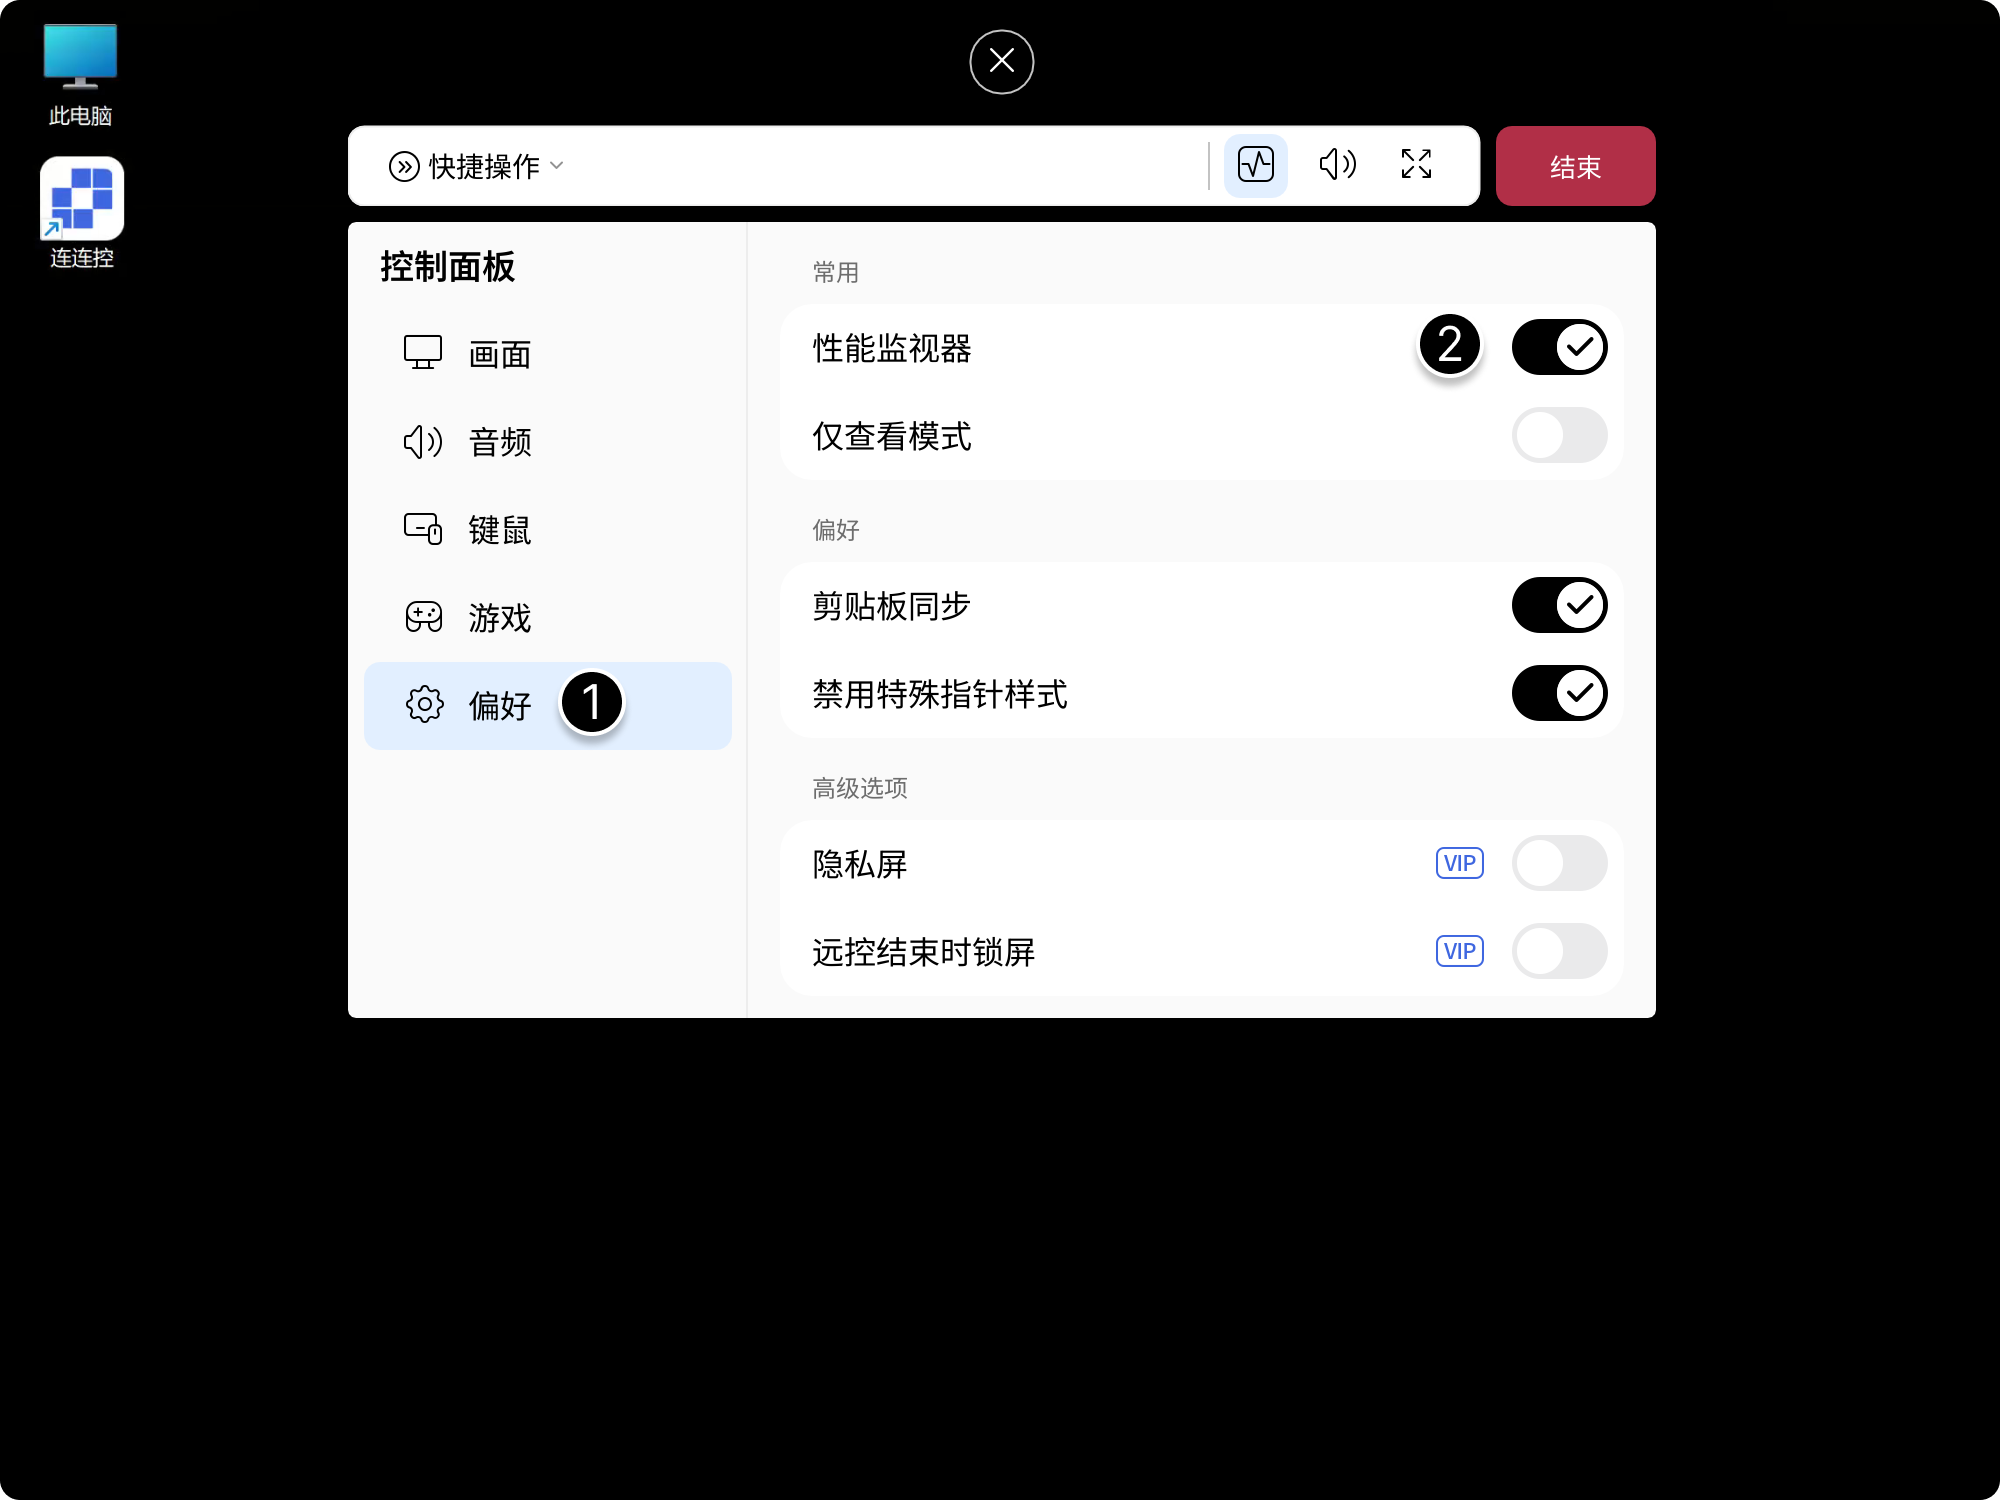
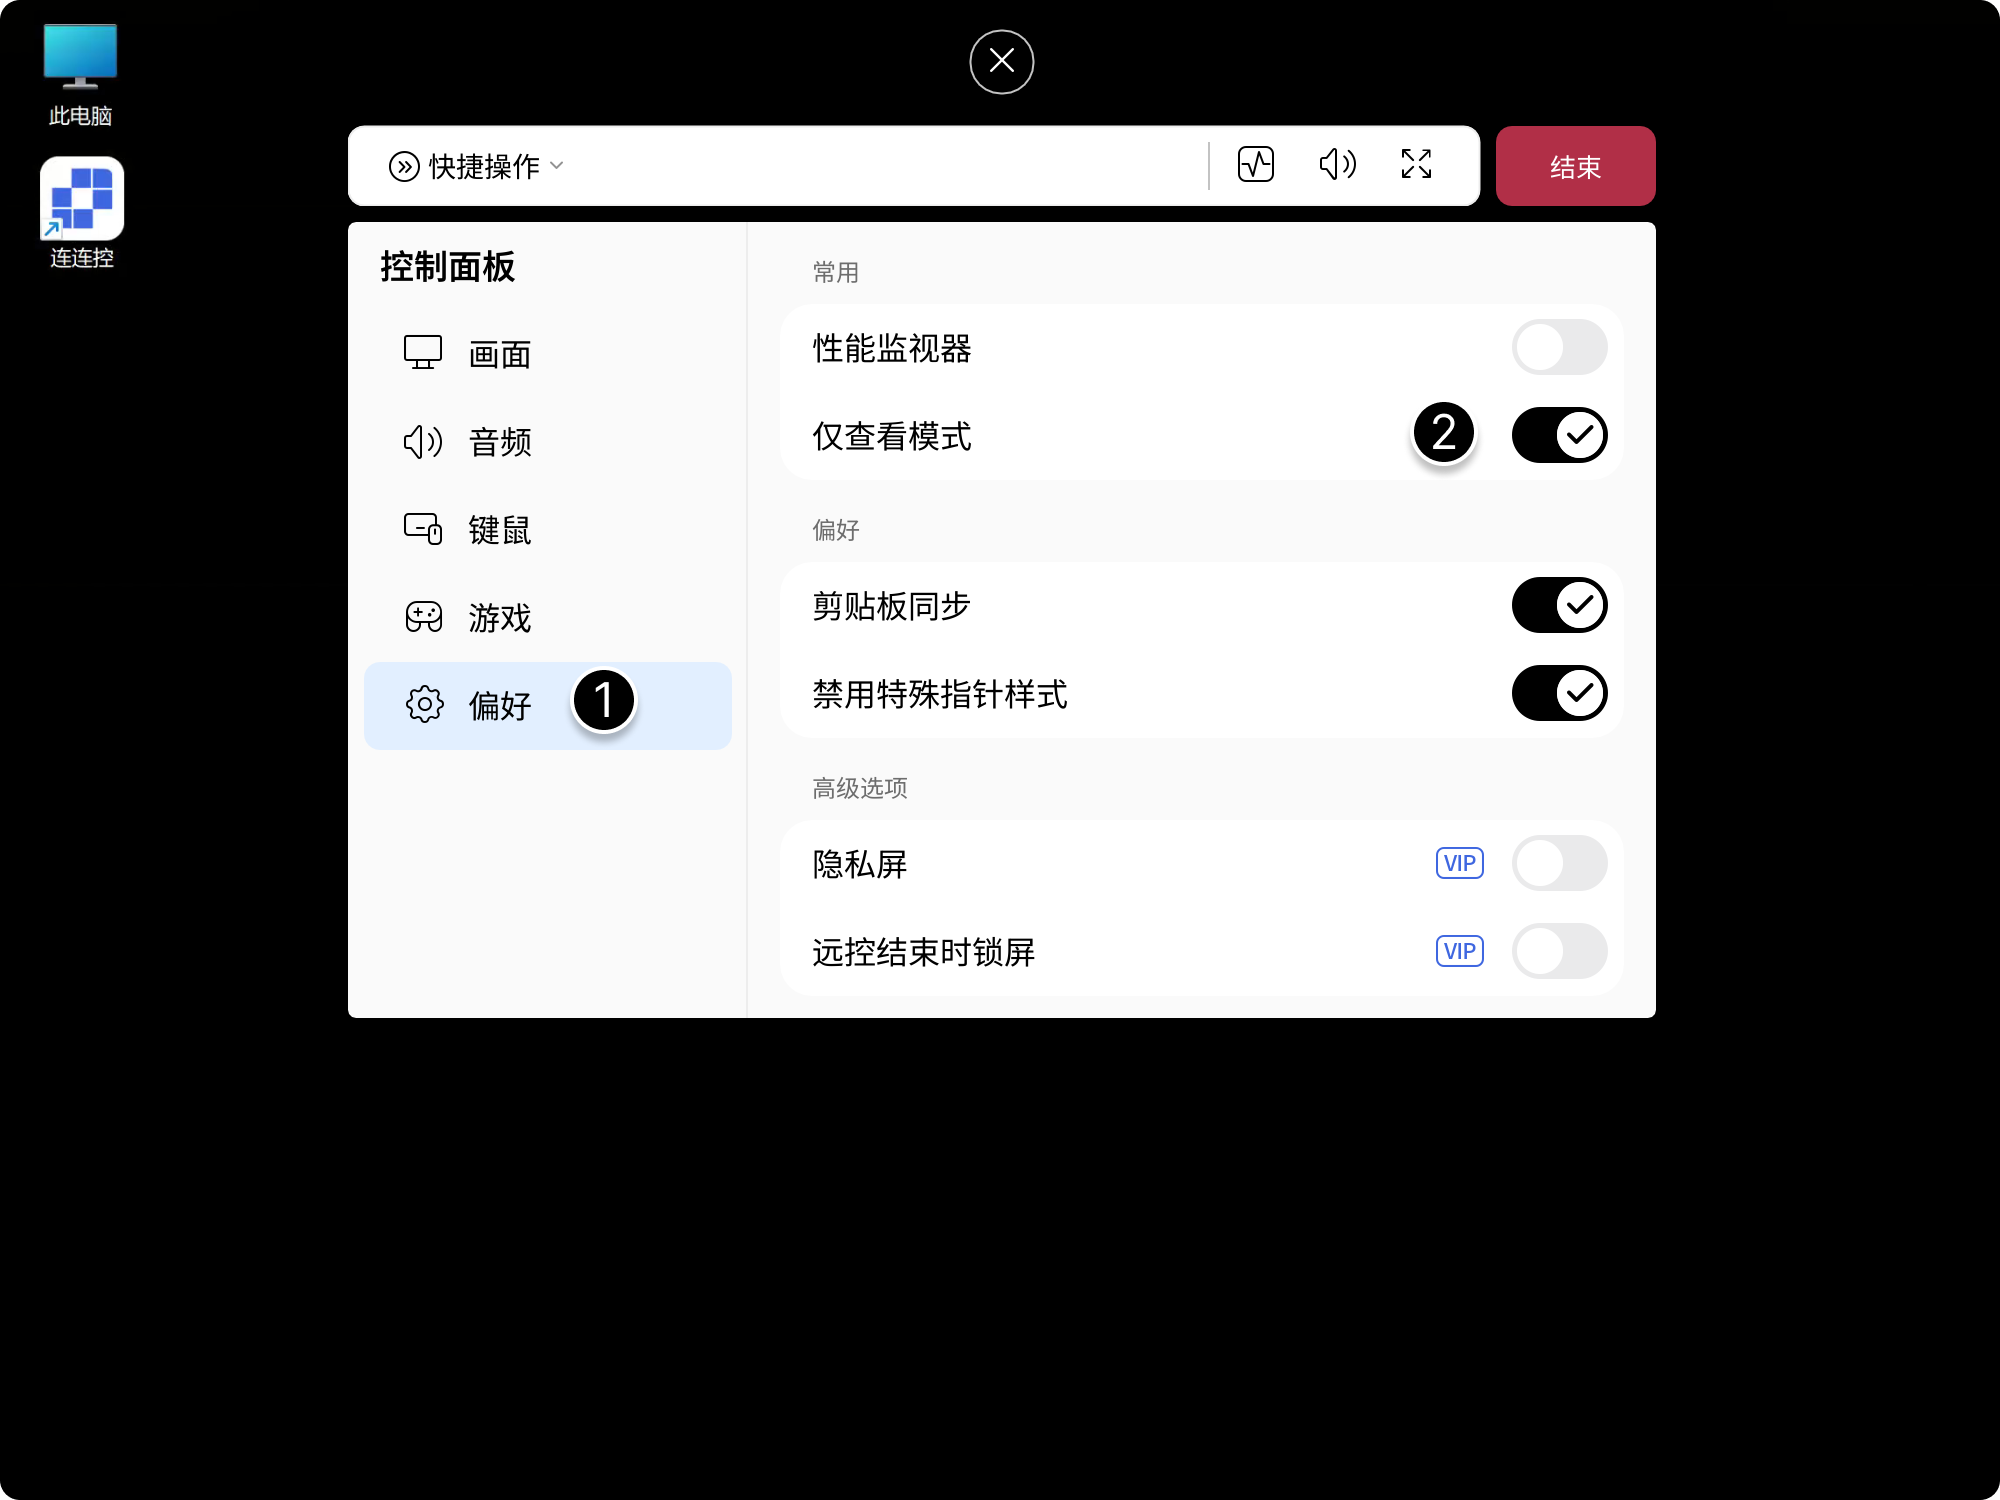
View-Only Mode
After it is enabled, only the Controlled screen is displayed, and no keyboard, mouse, or touch input is sent. This is suitable for observation-only or presentation scenarios.
Enable View-Only Mode in the Preferences tab.
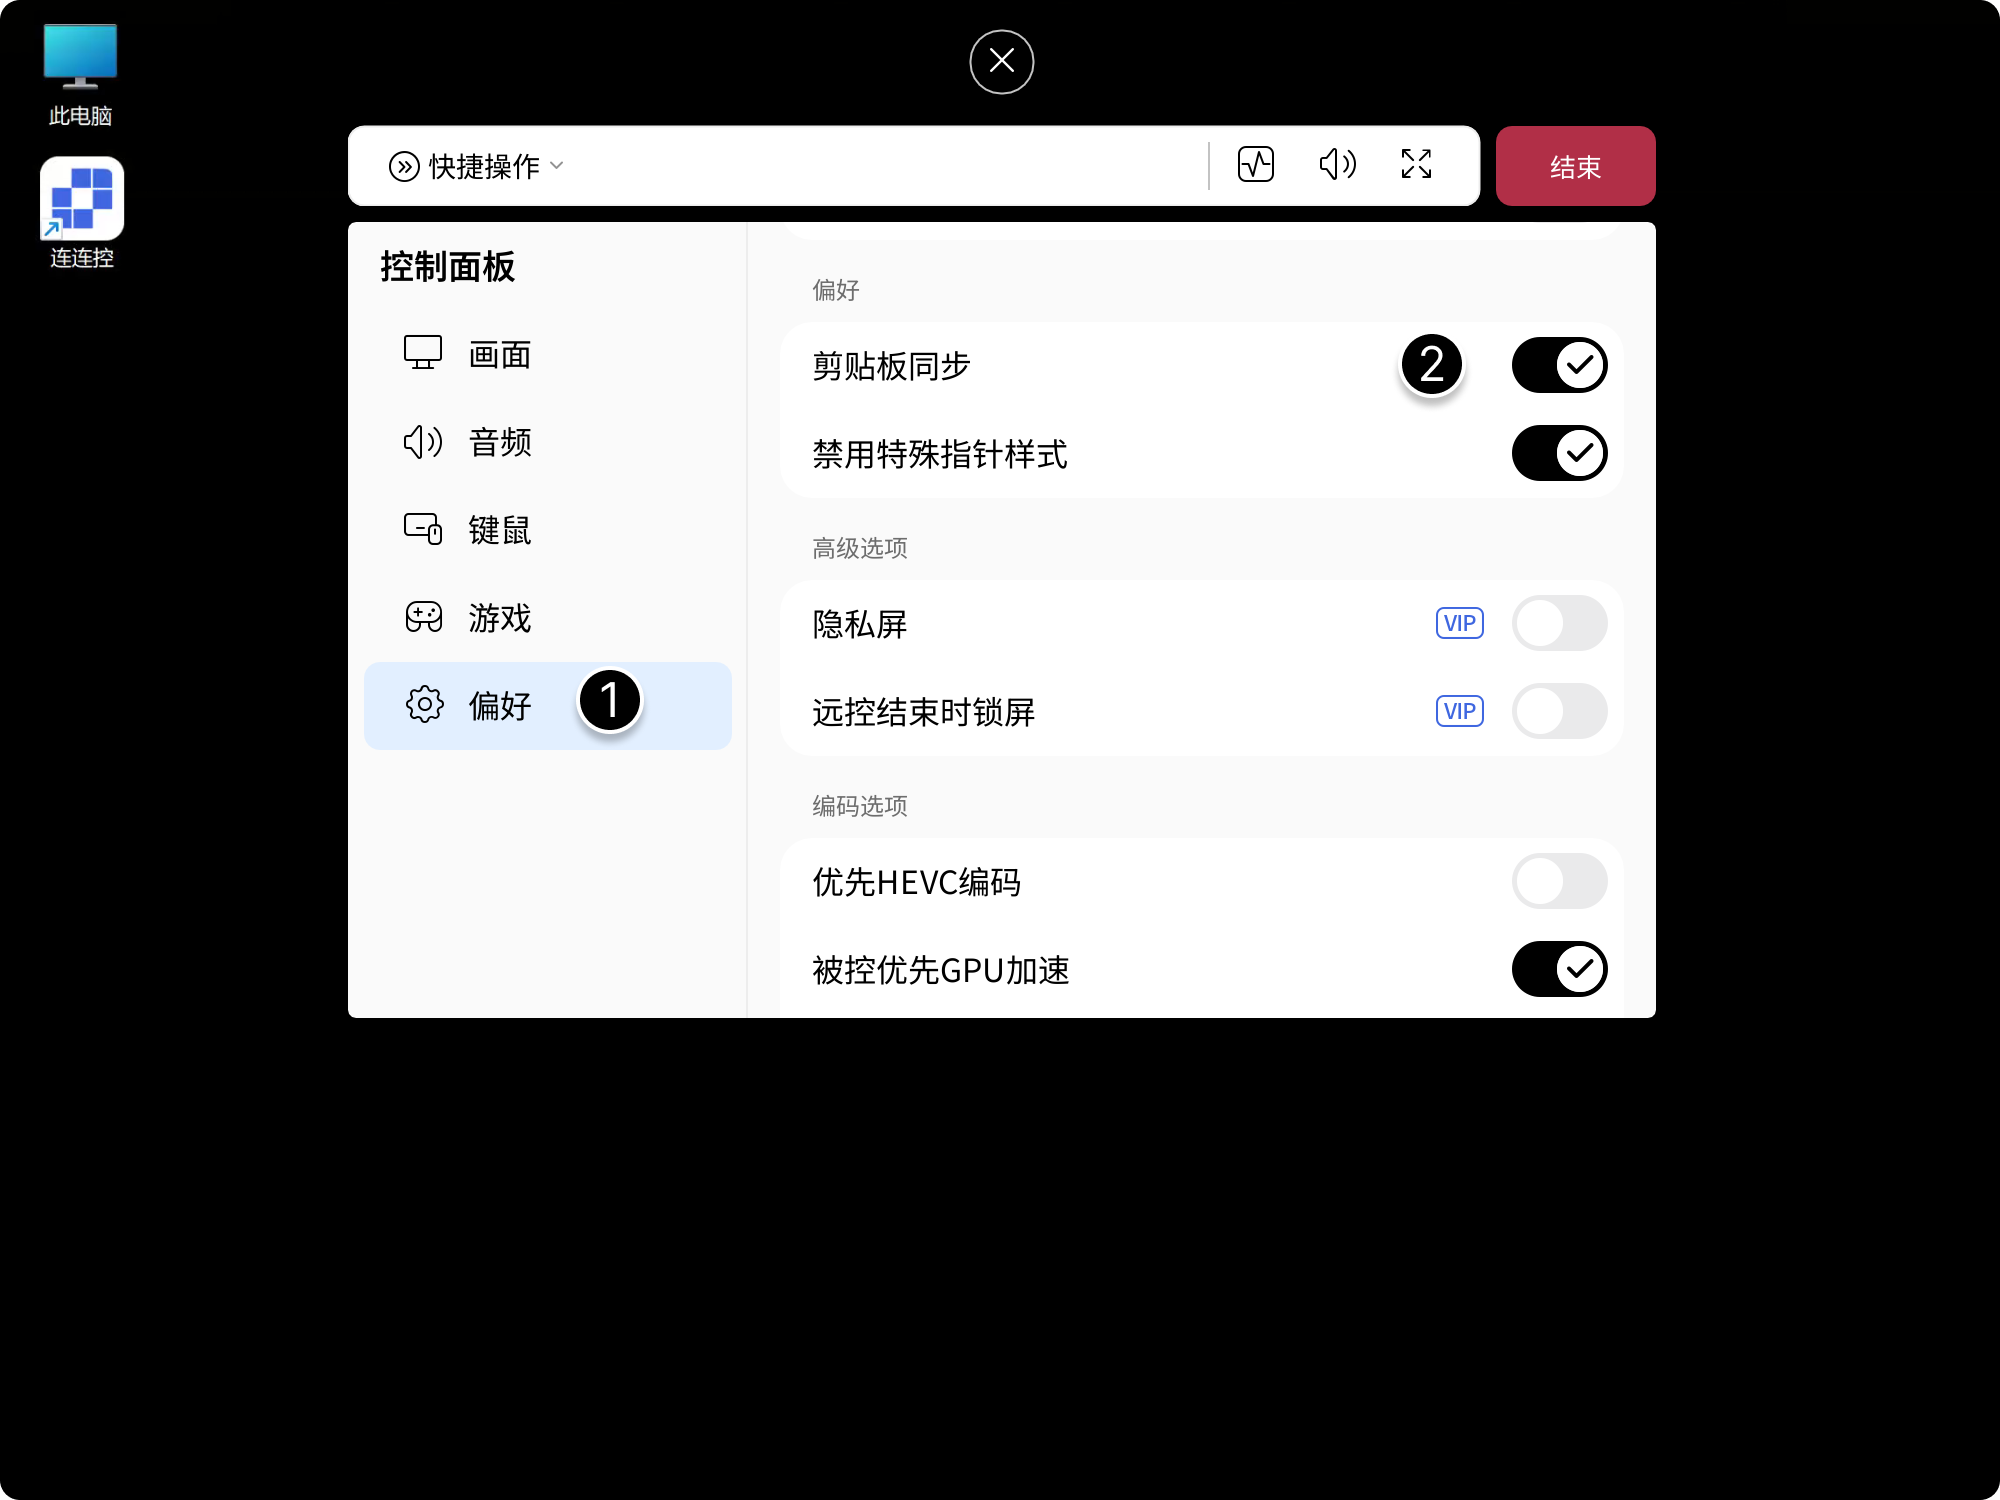
Clipboard Sync
After it is enabled, the clipboards of the Controller and Controlled can sync in real time.
Enable Clipboard Sync in the Preferences tab.
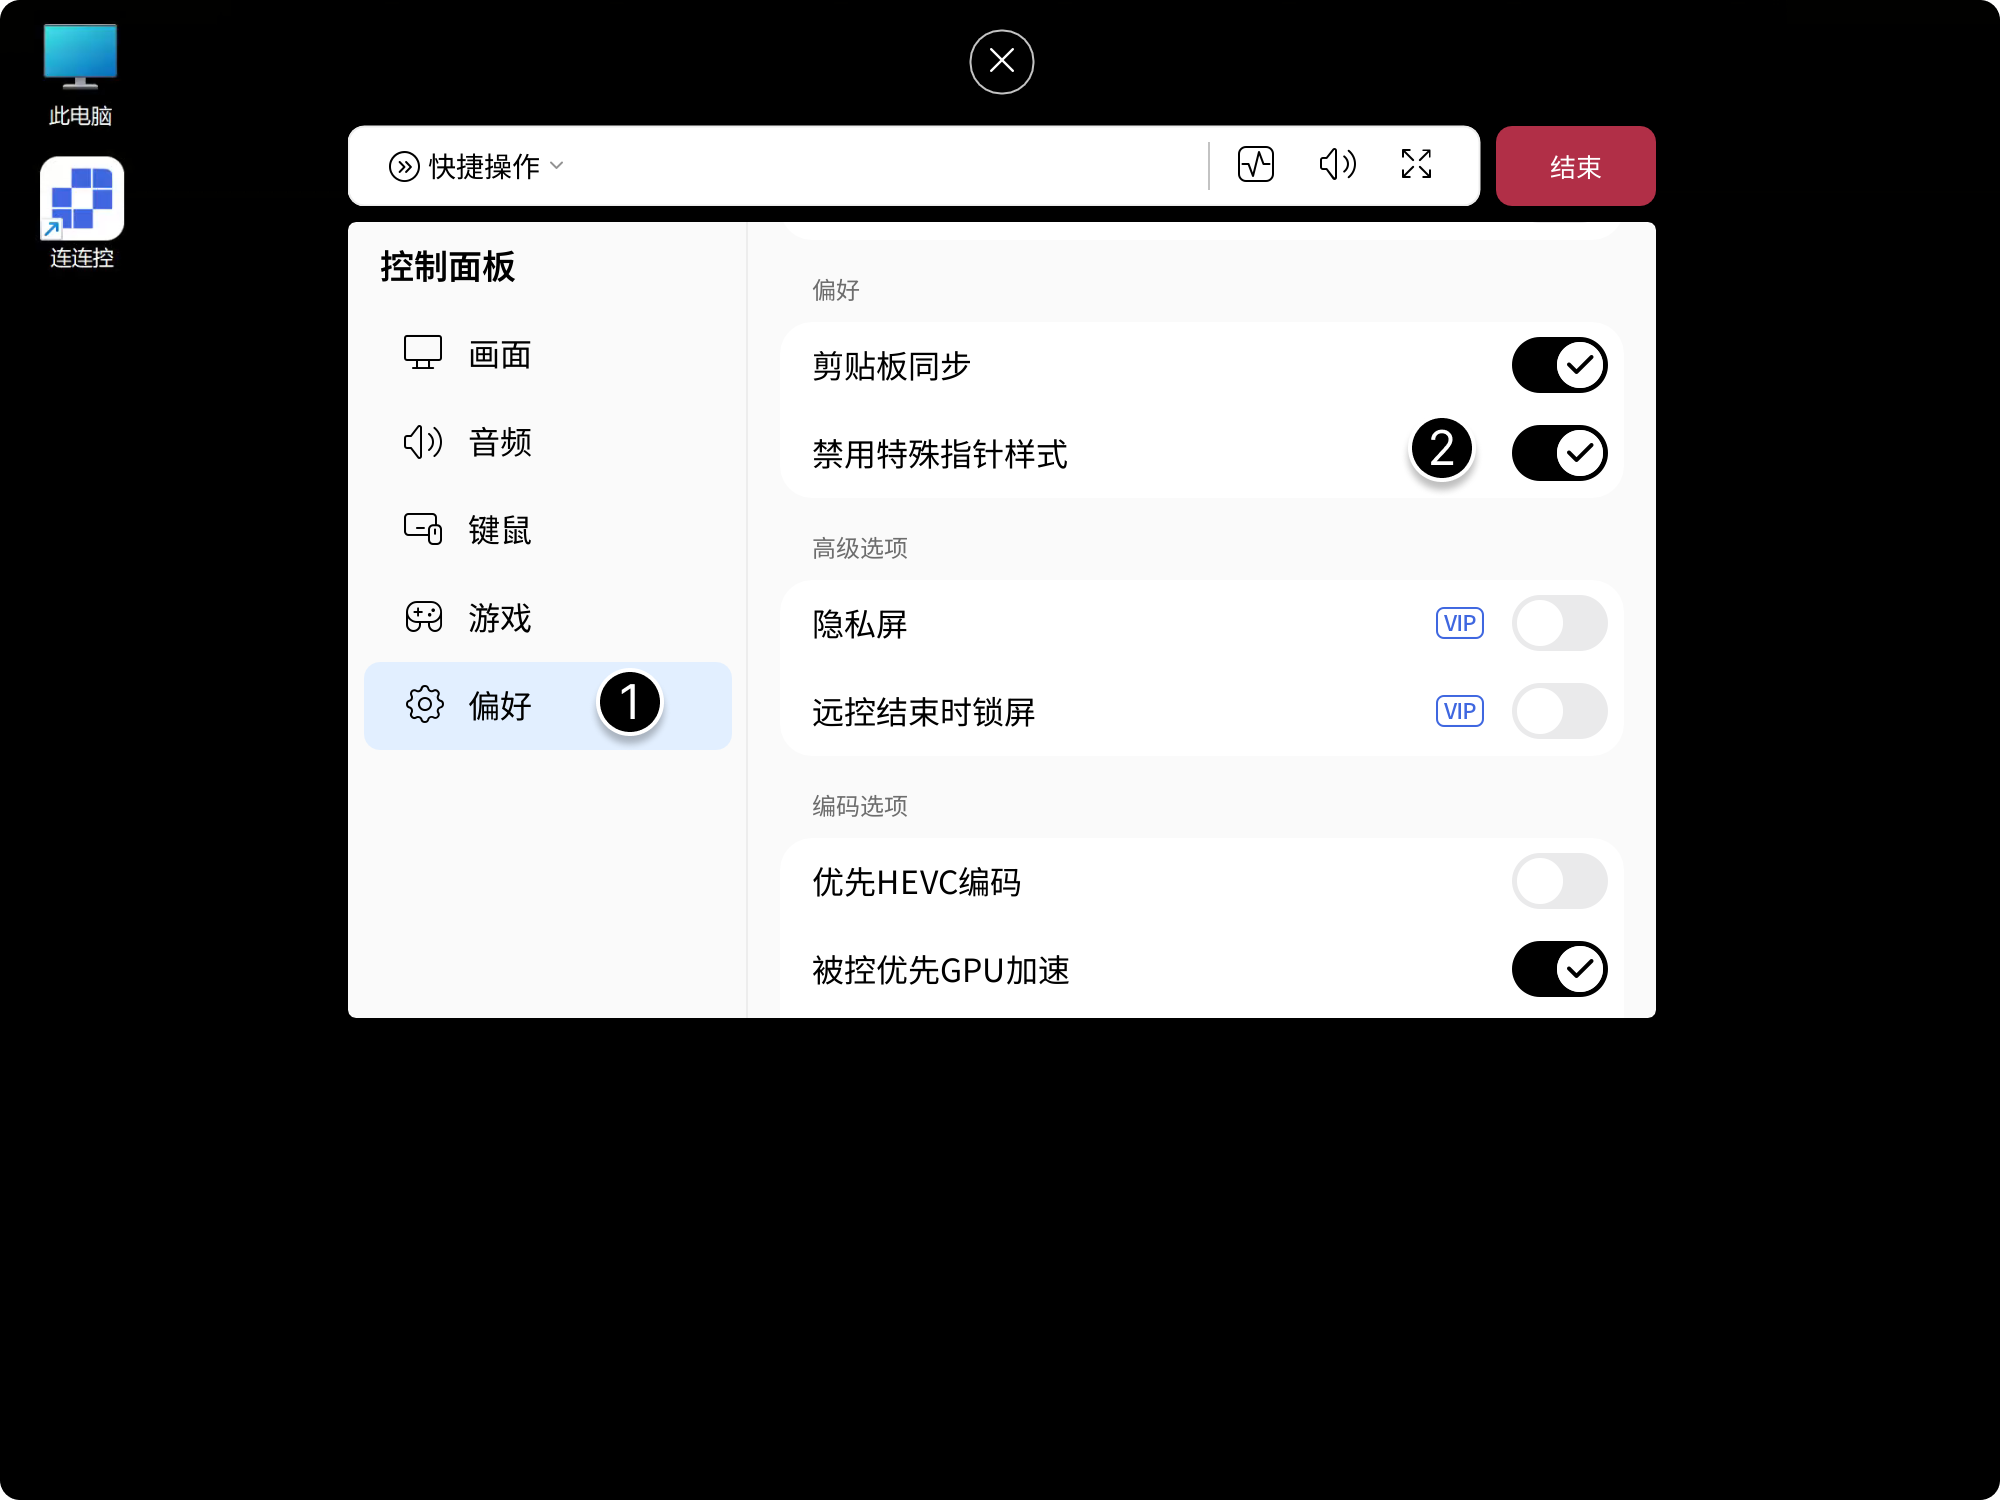
Disable Special Pointer Style
After it is enabled, when software on the Controlled uses a custom or special pointer, the system default pointer is forced.
Enable Disable Special Pointer Style in the Preferences tab.
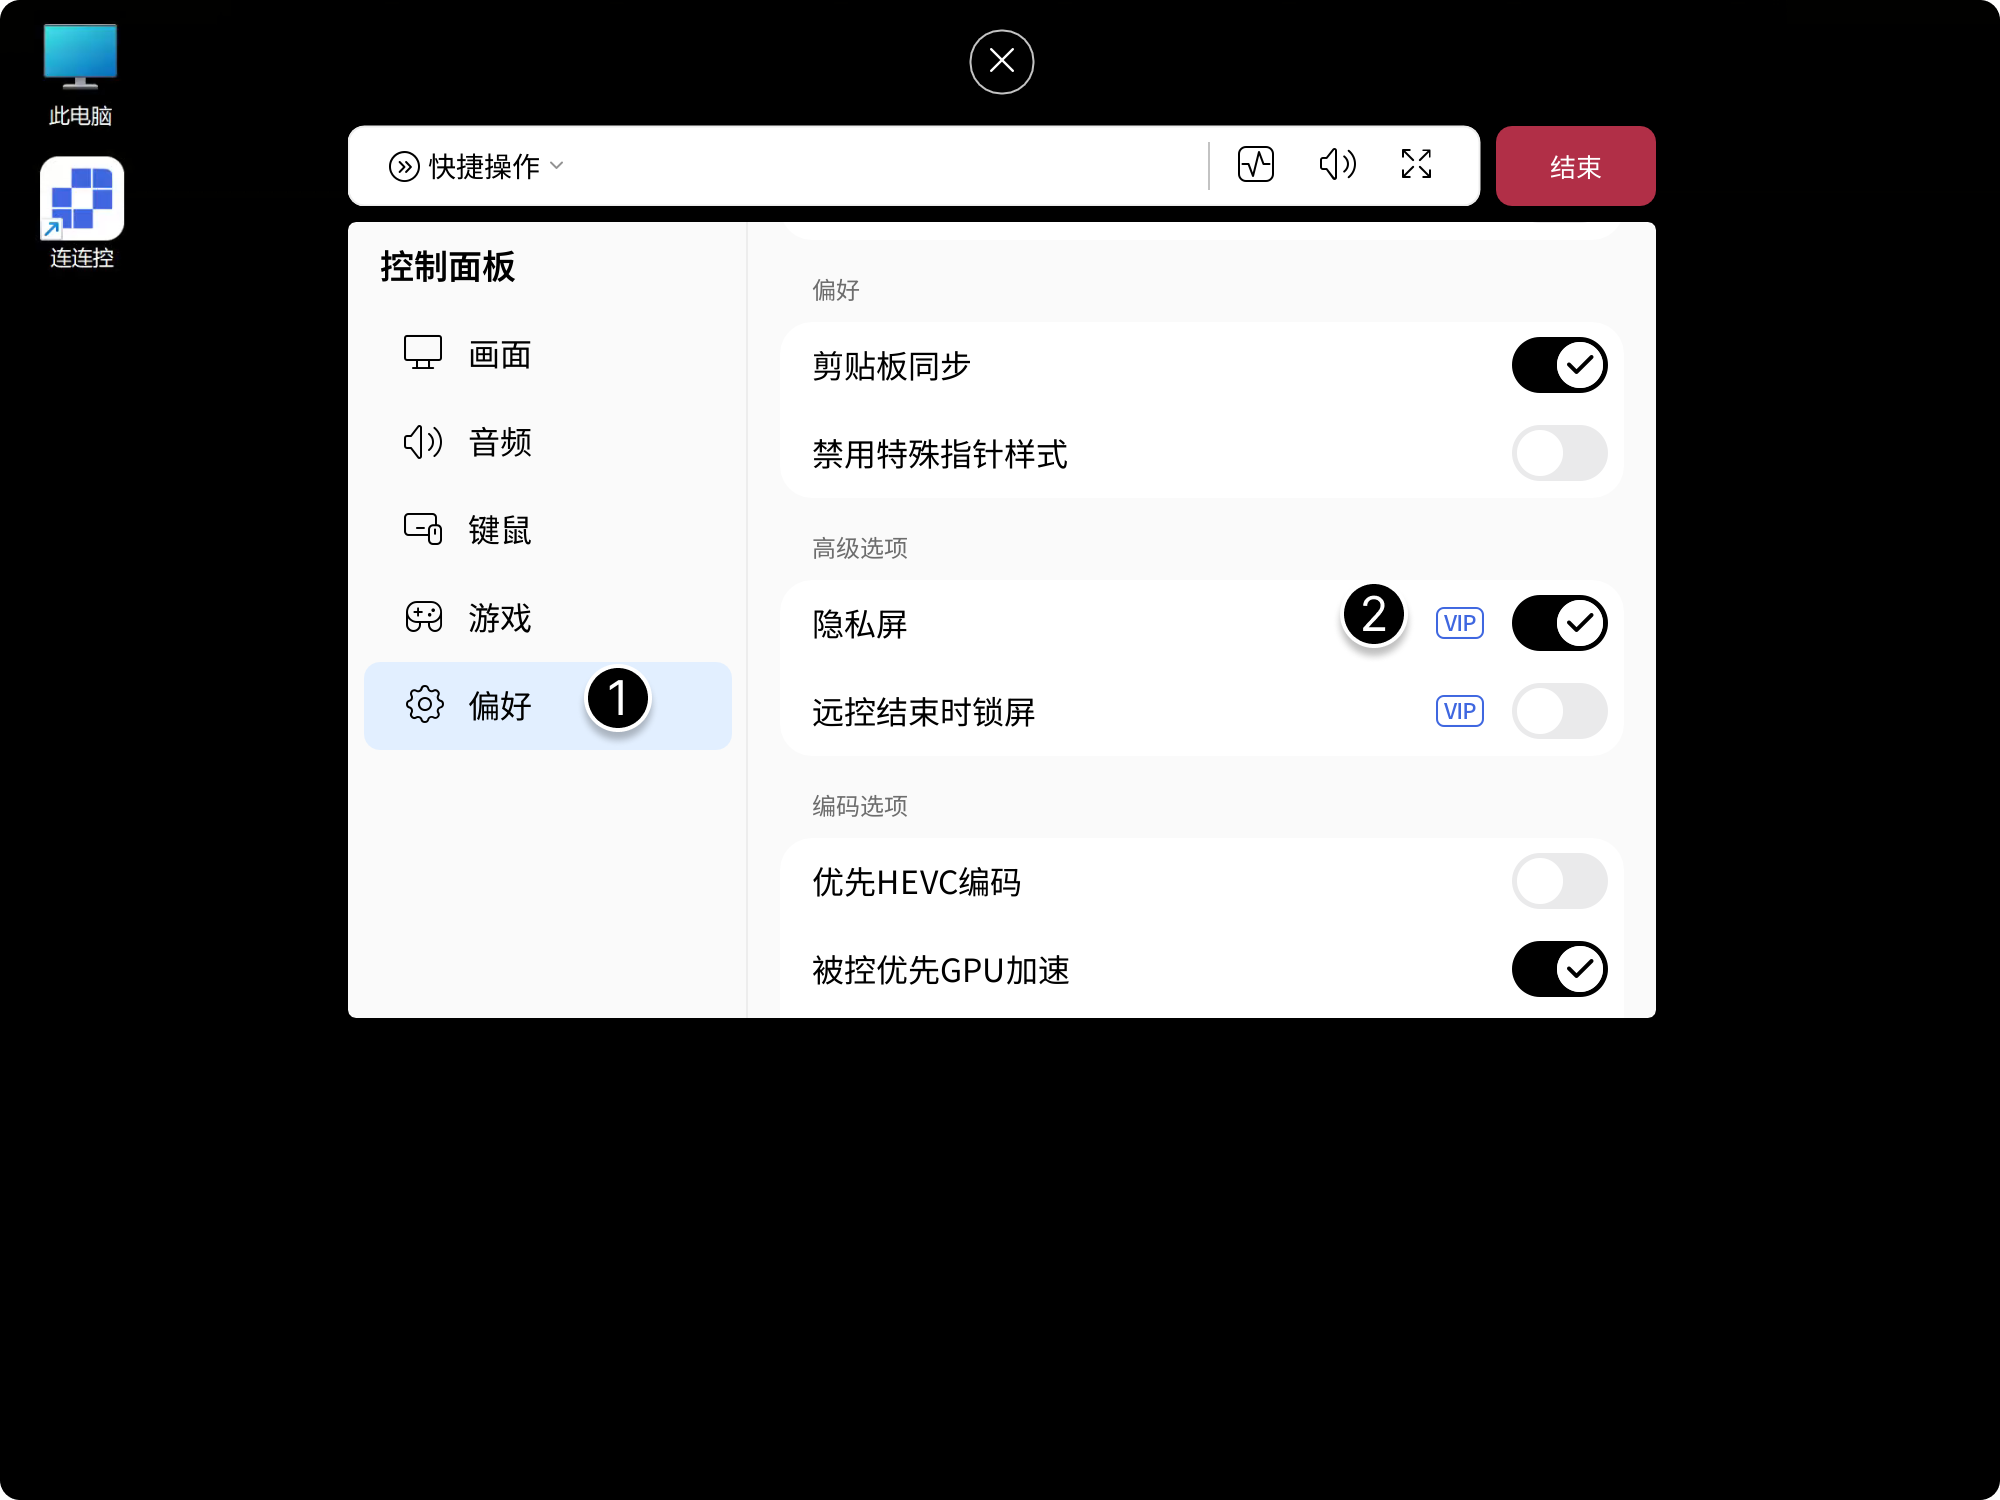
Privacy Screen and Lock Screen When Remote Control Ends
- After Privacy Screen is enabled, the physical screen of the Controlled device hides displayed content during remote control;
- After Lock Screen When Remote Control Ends is enabled, the Controlled is automatically locked when the session ends.
Enable Privacy Screen or Lock Screen When Remote Control Ends in the Preferences tab.
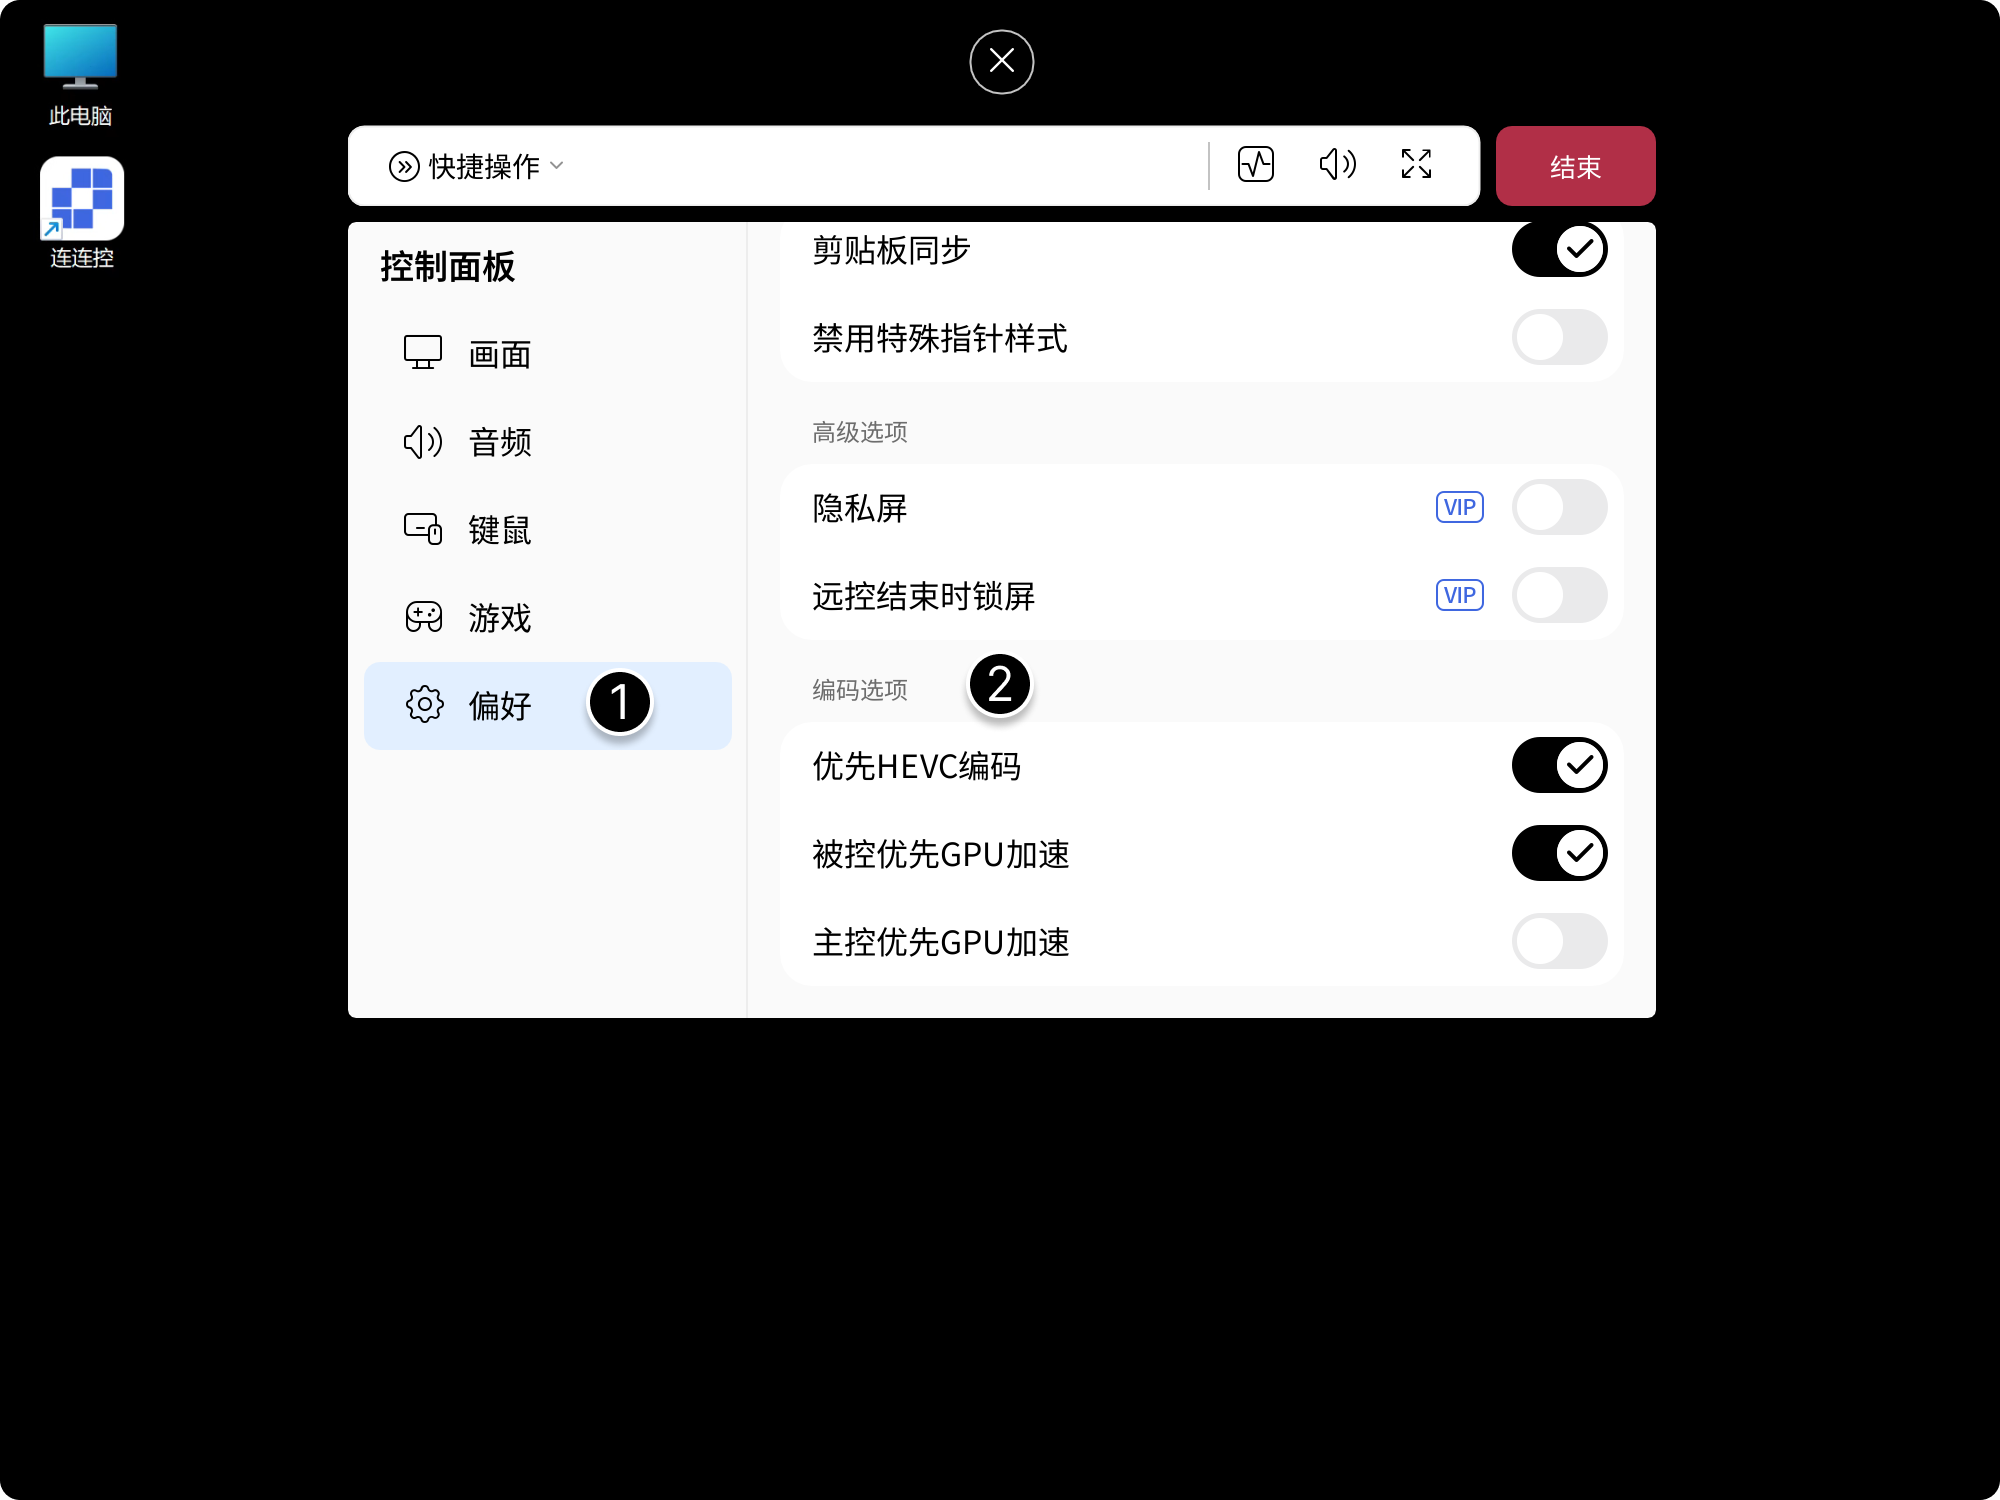
Encoding Options
HEVC-preferred encoding and GPU acceleration options for the Controller and Controlled are provided. You can choose according to device performance.
Enable the options under Encoding Options in the Preferences tab.
Performance Monitor
The Performance Monitor is used to quickly understand the current remote connection status and help determine the current network status and device performance.
Basic Information Area
You can view the basic status of the current connection.
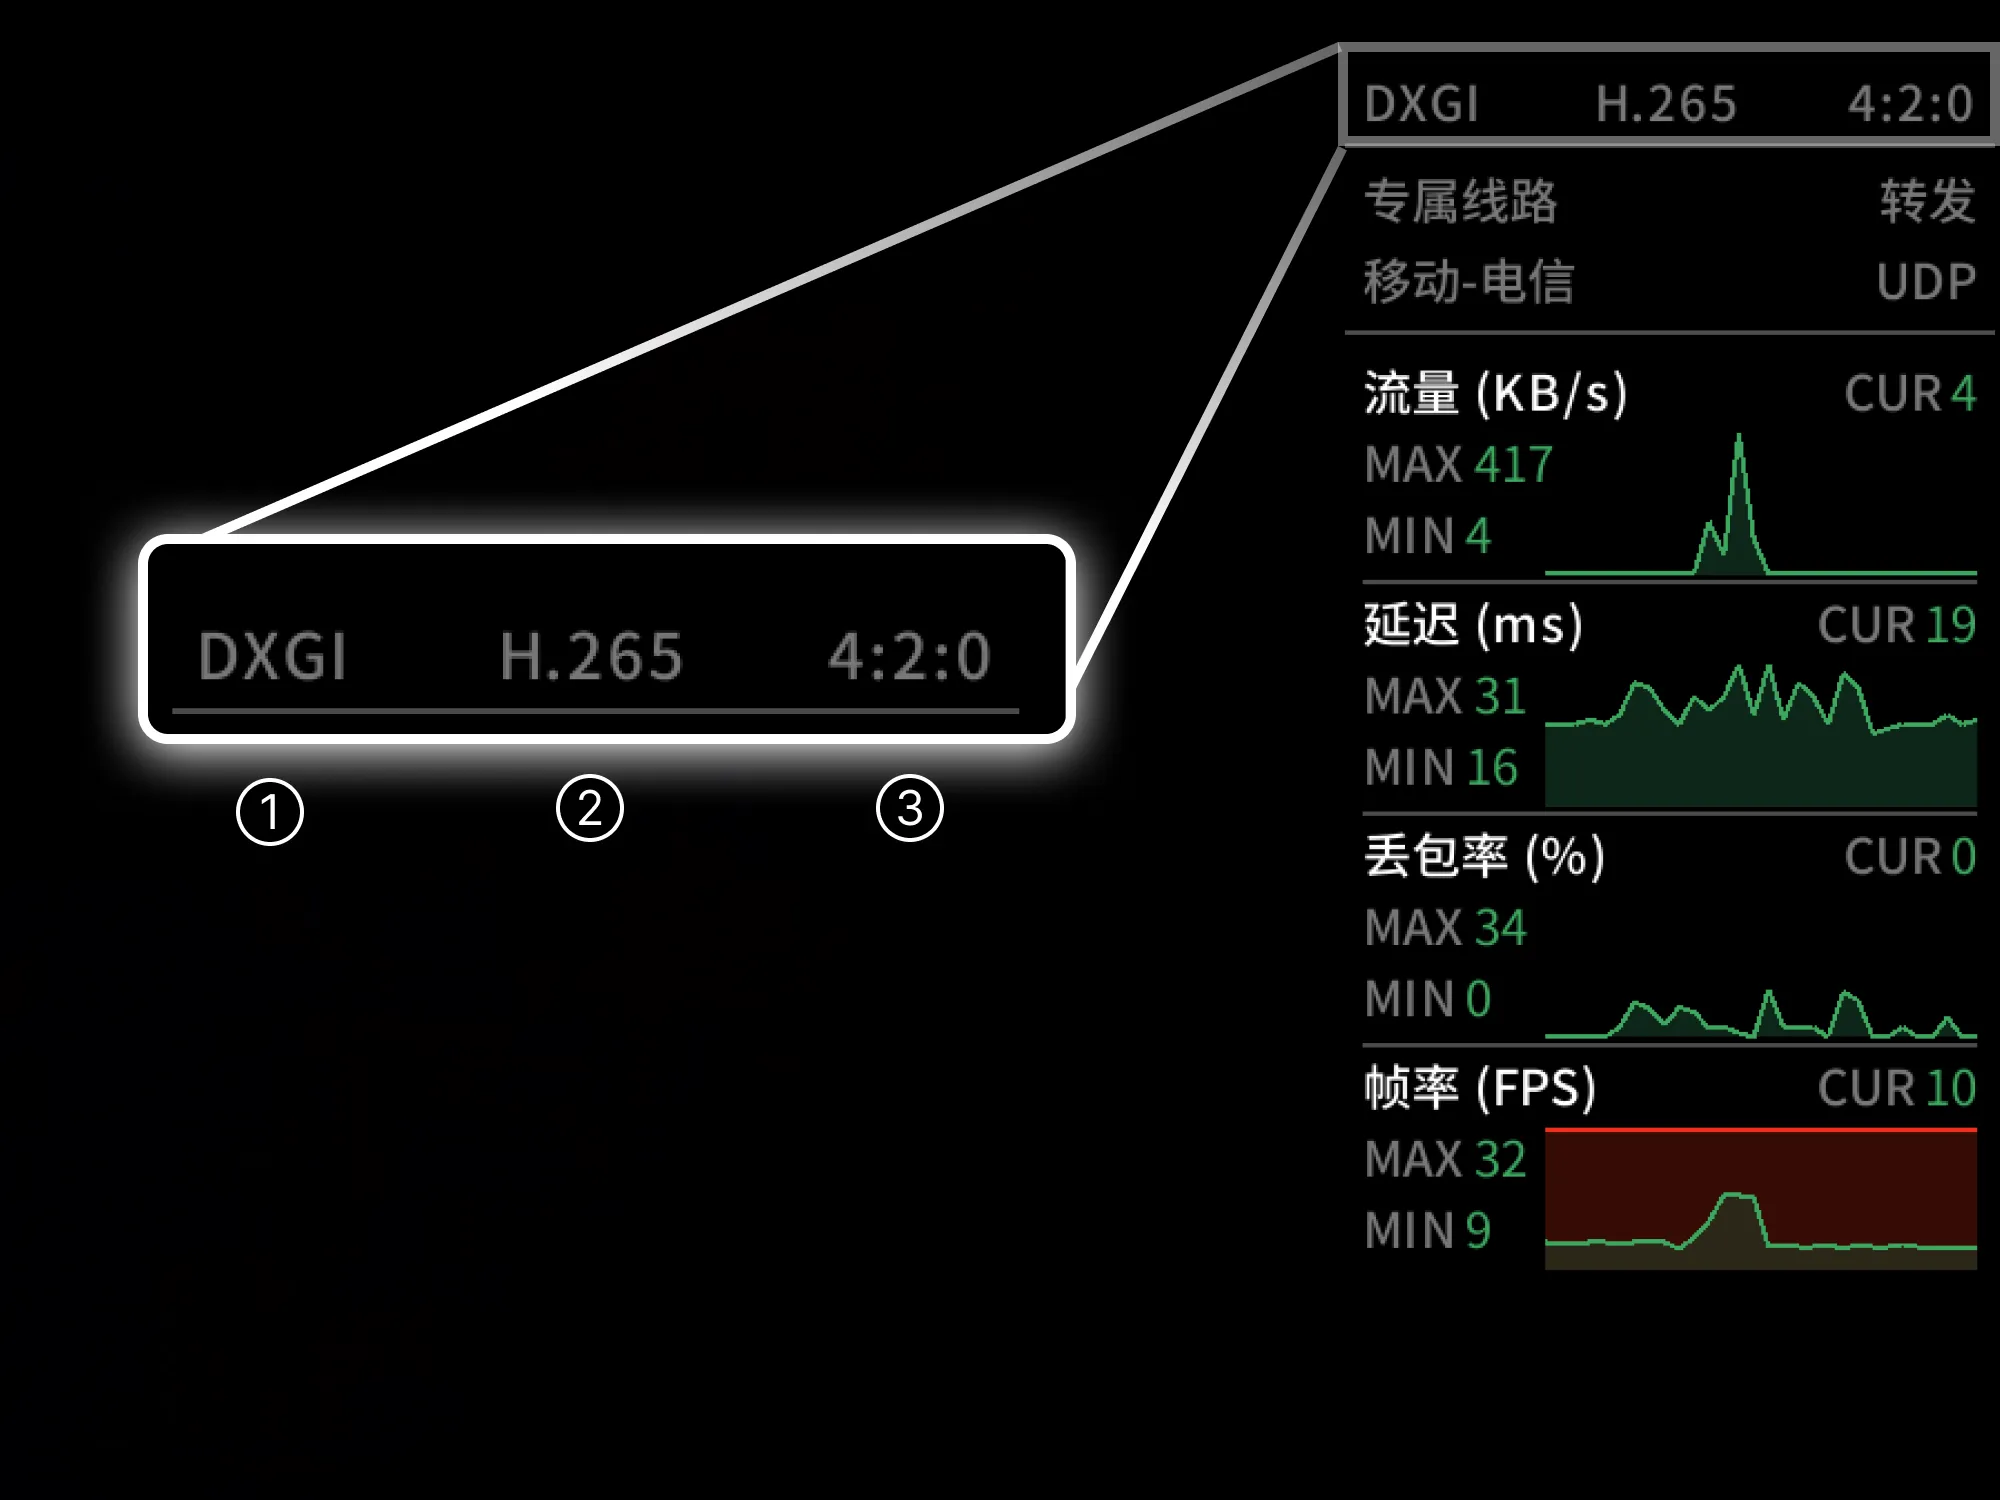
Controlled Screen Capture Method
- Windows: DXGI (Windows 8 and later) / GDI (Windows 7);
- macOS: Metal;
- Linux: X11;
- Android: MediaProjection;
- iOS: ReplayKit.
Encoding Method
Example: H.264 / HEVC (H.265).
Color
Example: 4:2:0 / 4:4:4.
Network Information Area
You can view the service level and network information of the current connection.
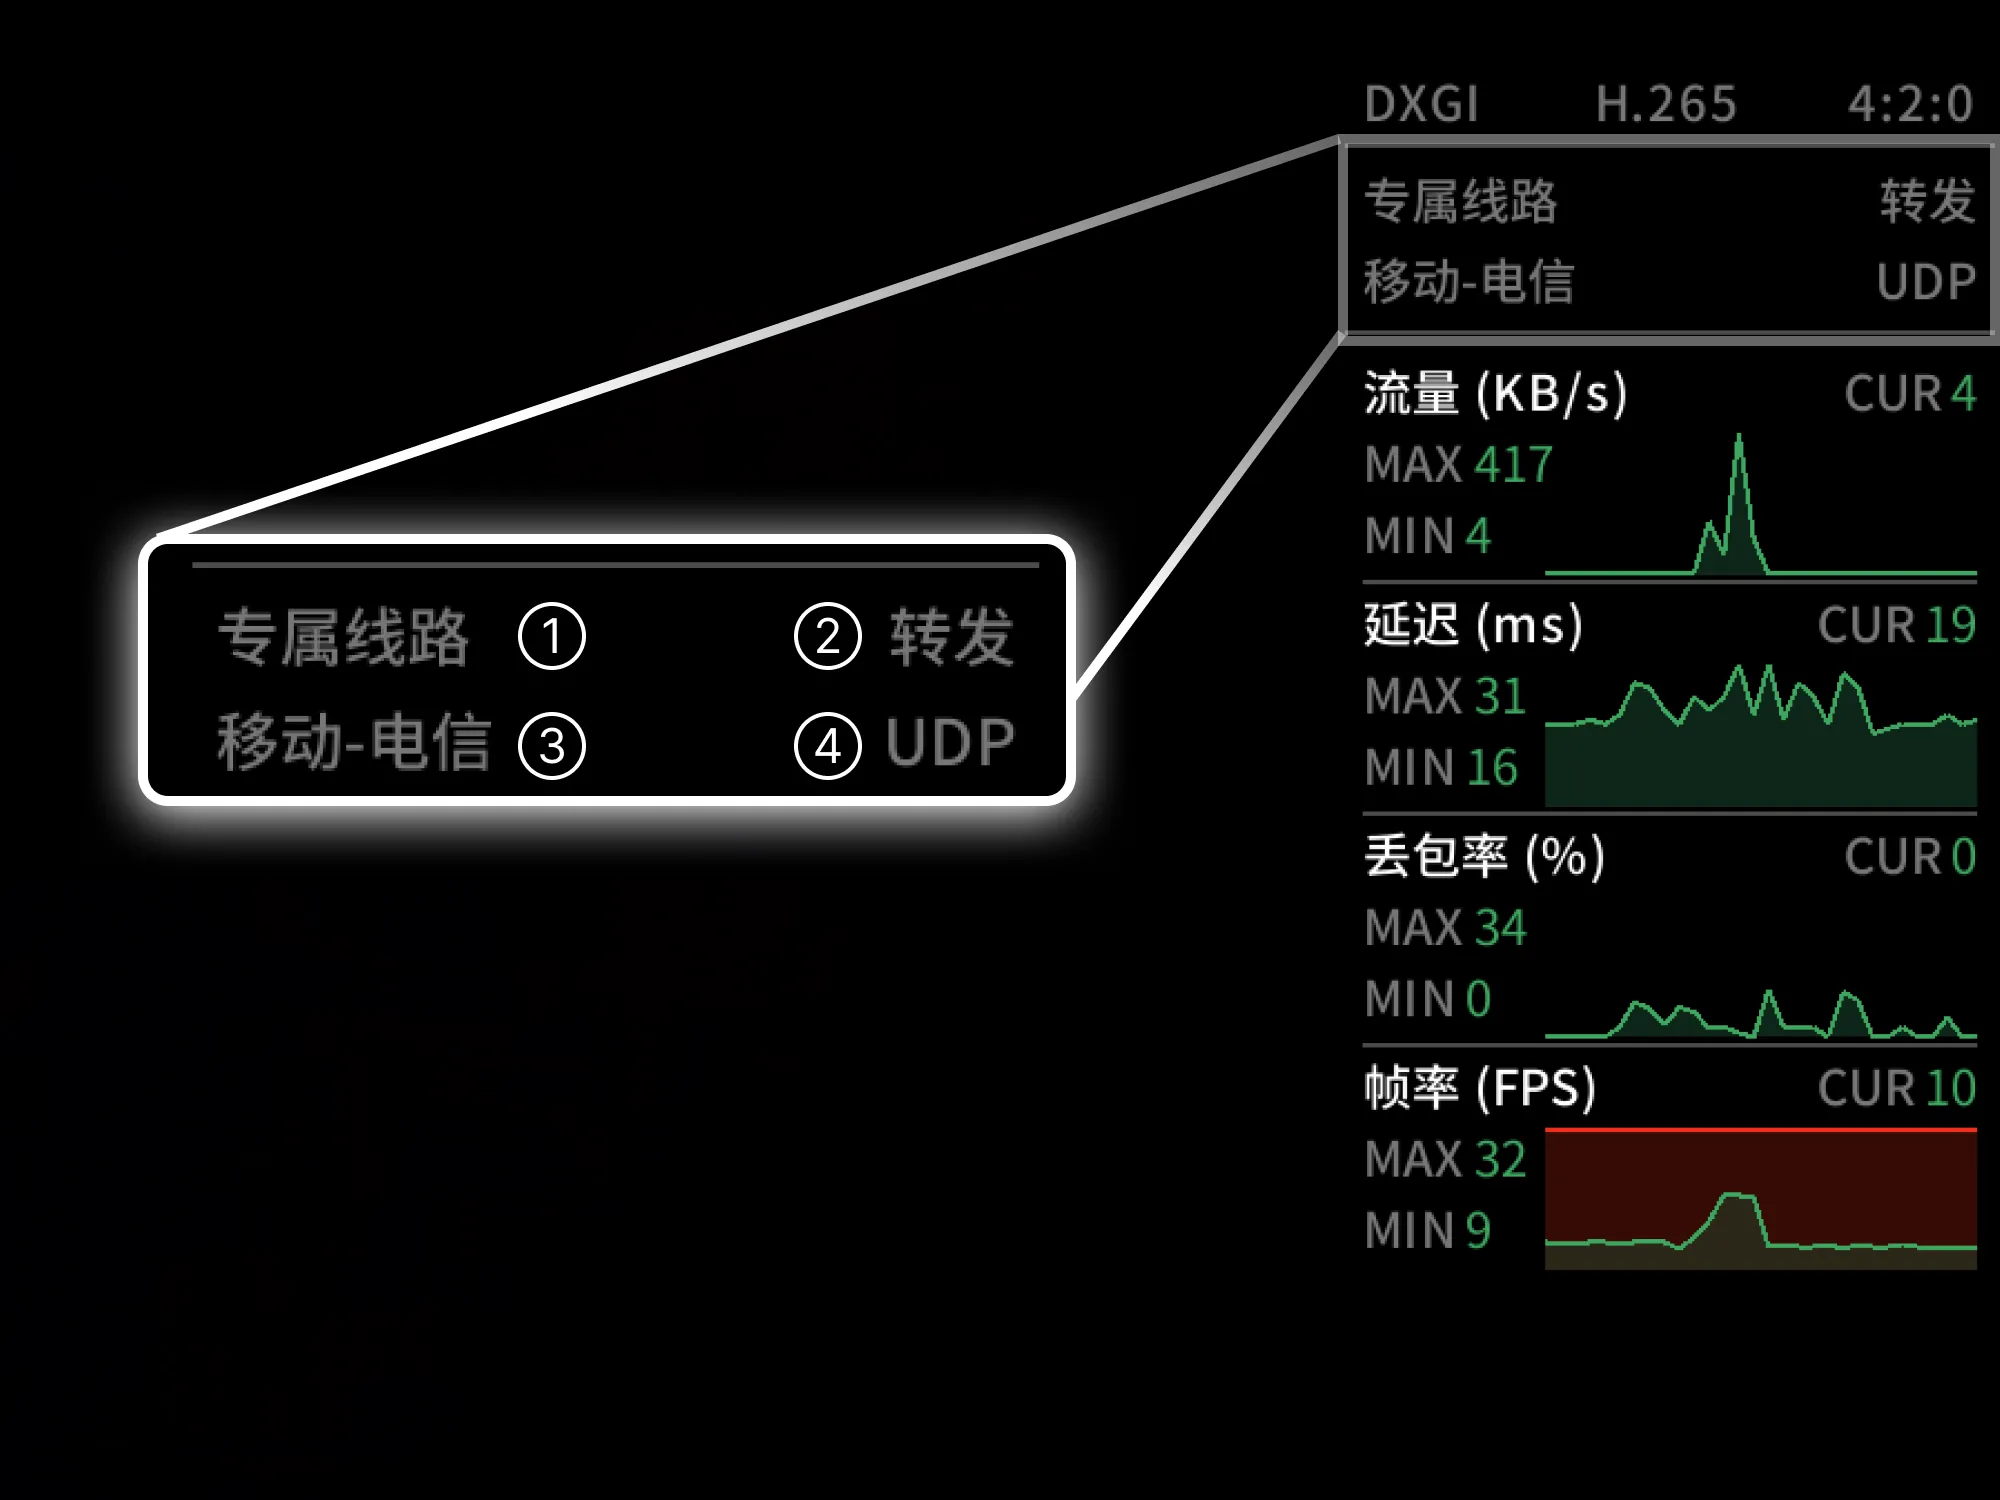
Route Level
- Free Route: Image quality up to 4K 30 FPS 8 Mbps; File Transfer 2 Mbps; no acceleration capability;
- High-Speed Route: Image quality up to 4K 60 FPS 16 Mbps; File Transfer 4 Mbps; when an unstable connection is detected, AskLink acceleration nodes are used automatically;
- Dedicated Route: Image quality up to 4K 165 FPS 24 Mbps; File Transfer 8 Mbps; when an unstable connection is detected, AskLink acceleration nodes are used automatically;
- Exclusive Route: Image quality up to 4K 165 FPS 32 Mbps; adapted and optimized for network environments such as CERNET, Dr. Peng, cable TV networks, and Wasu Media.
Connection Type
- LAN: Connect using the local area network;
- Direct Connection: Connect using P2P technology;
- Smart Acceleration: Connect using AskLink acceleration servers;
- Relay: Connect using AskLink free servers.
Carrier
- Left side: Controller carrier;
- Right side: Controlled carrier.
Connection Protocol
Currently, AskLink remote connections only support the UDP protocol.
Performance Area
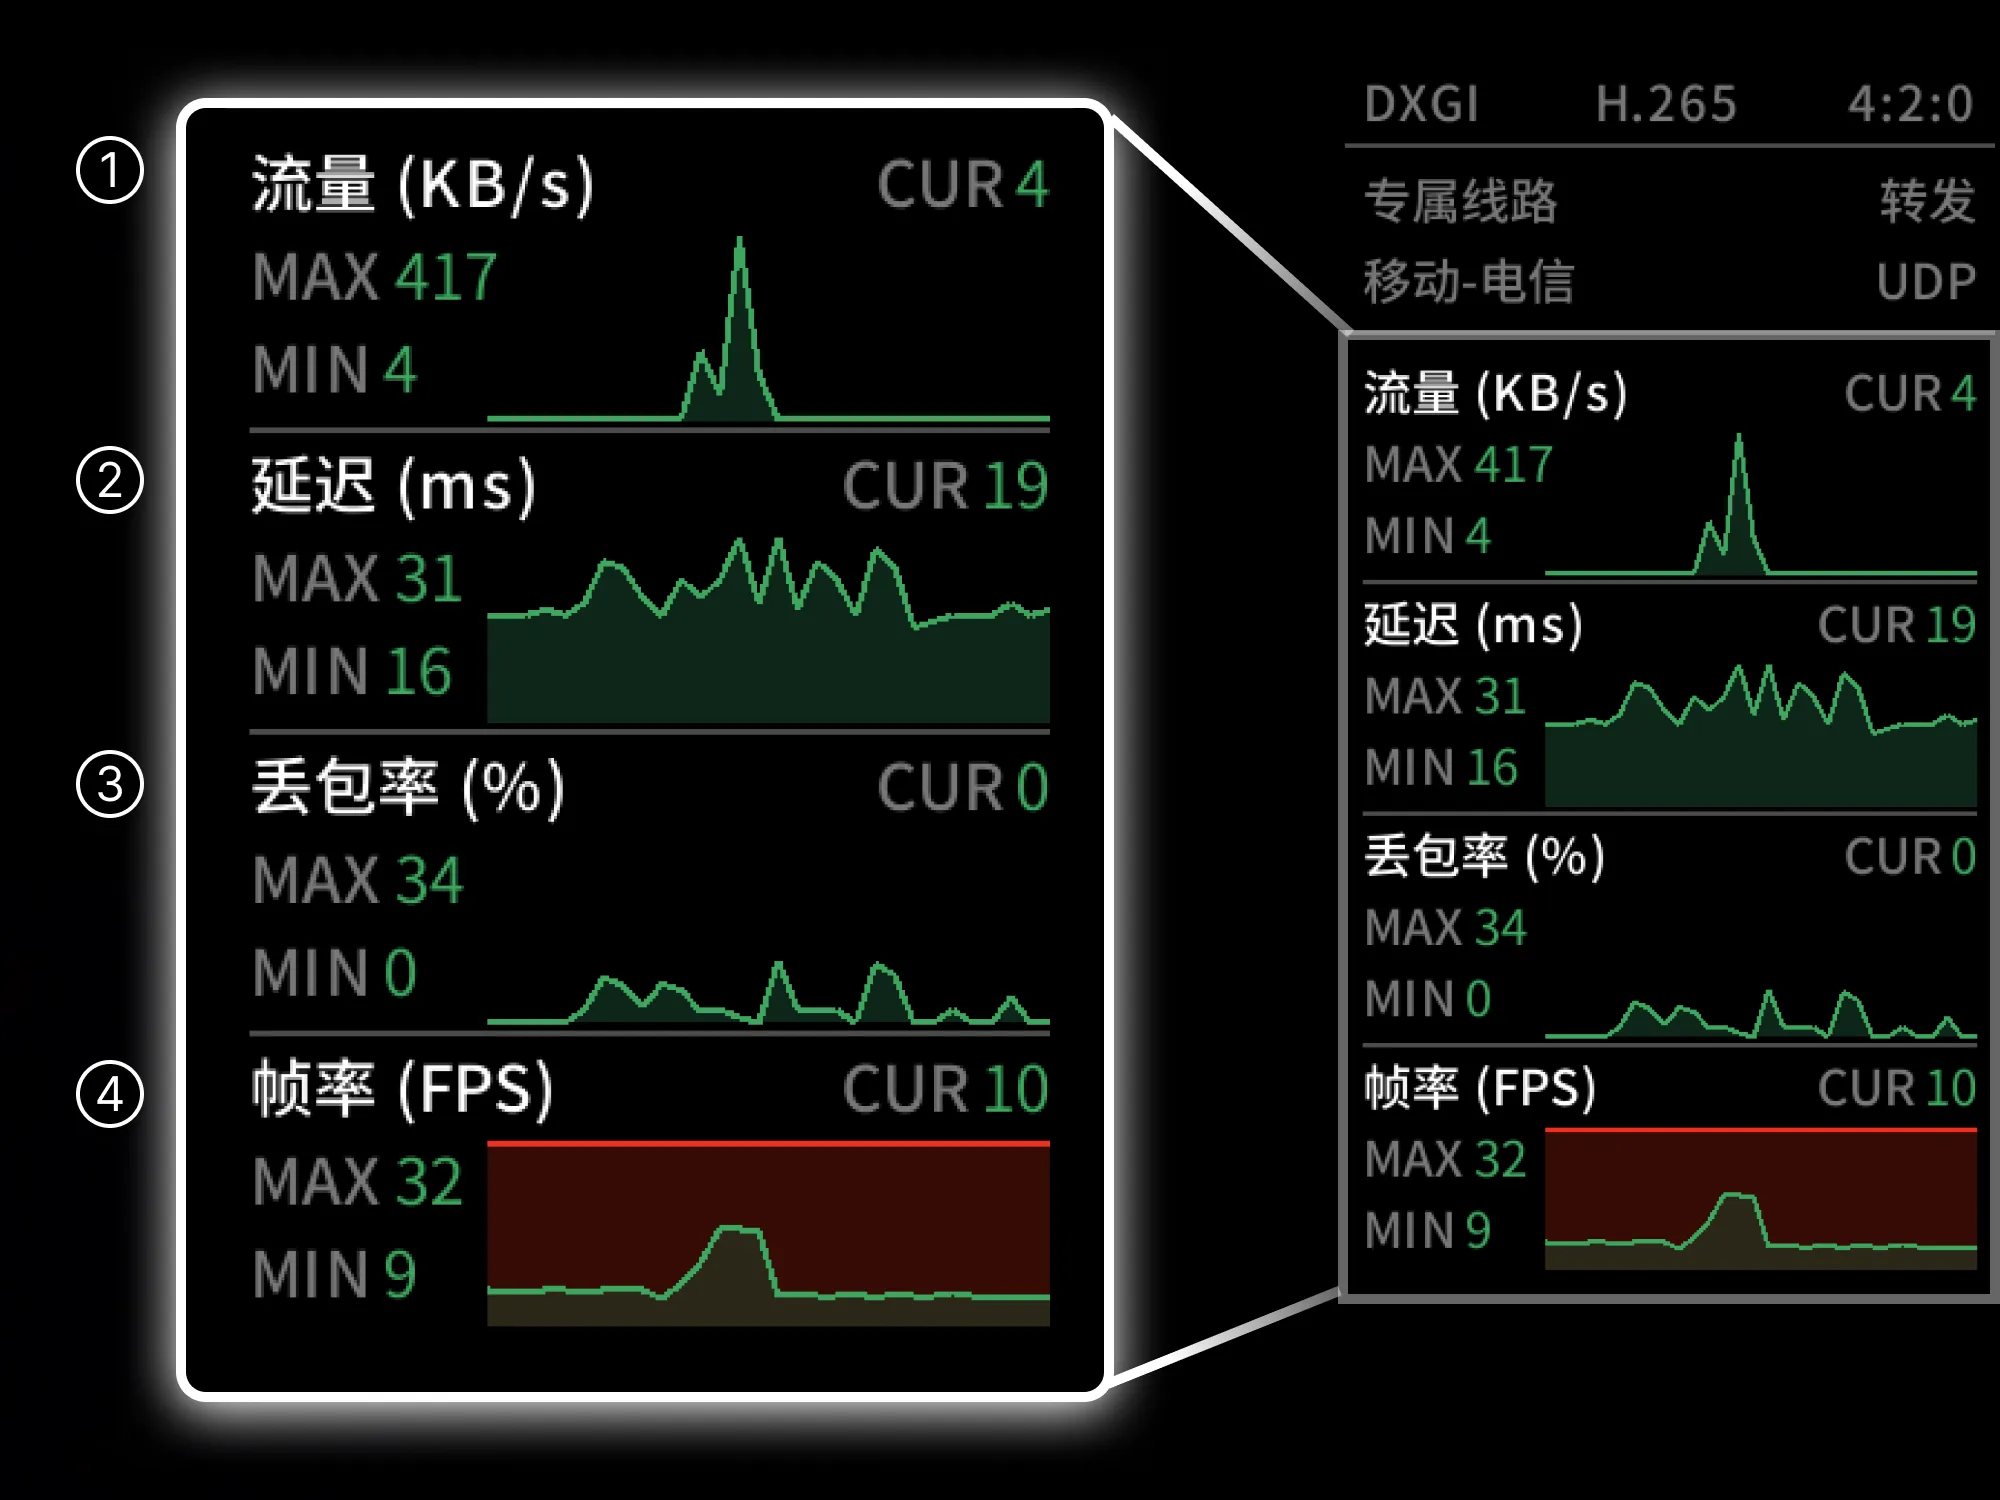
Traffic
Indicates the current remote connection data status, measured in KB/s.
Latency
Indicates the time from your operation to the other device's response, measured in ms.
Packet Loss Rate
Indicates the percentage of packets that fail to arrive successfully during network transmission out of the total sent packets. Packet loss may cause operation commands to be lost, or the screen to stutter or skip frames.
Effective Frame Rate
AskLink uses a dynamic frame rate strategy and only captures and transmits as needed when the screen changes. Therefore, the real-time frame rate of the Controlled device changes dynamically with screen content.
Other Term Explanations
HEVC / H.264
- H.264 (AVC): Strong versatility, best compatibility, balanced image quality and size;
- HEVC (H.265): Higher compression efficiency, lower bandwidth usage, and higher hardware requirements.
4:2:0 / 4:4:4
- 4:2:0: Default or common choice for video, saving bandwidth;
- 4:4:4: More precise color edges and clearer image, with higher hardware requirements.
MAX / MIN / CUR
- MAX: Maximum value in the last 30 seconds;
- MIN: Minimum value in the last 30 seconds;
- CUR: Real-time value.
How to Enable Performance Monitor
Enable by Default
- Go to My in the AskLink Business Controller;
- Click Other;
- Enable the Performance Monitor option.
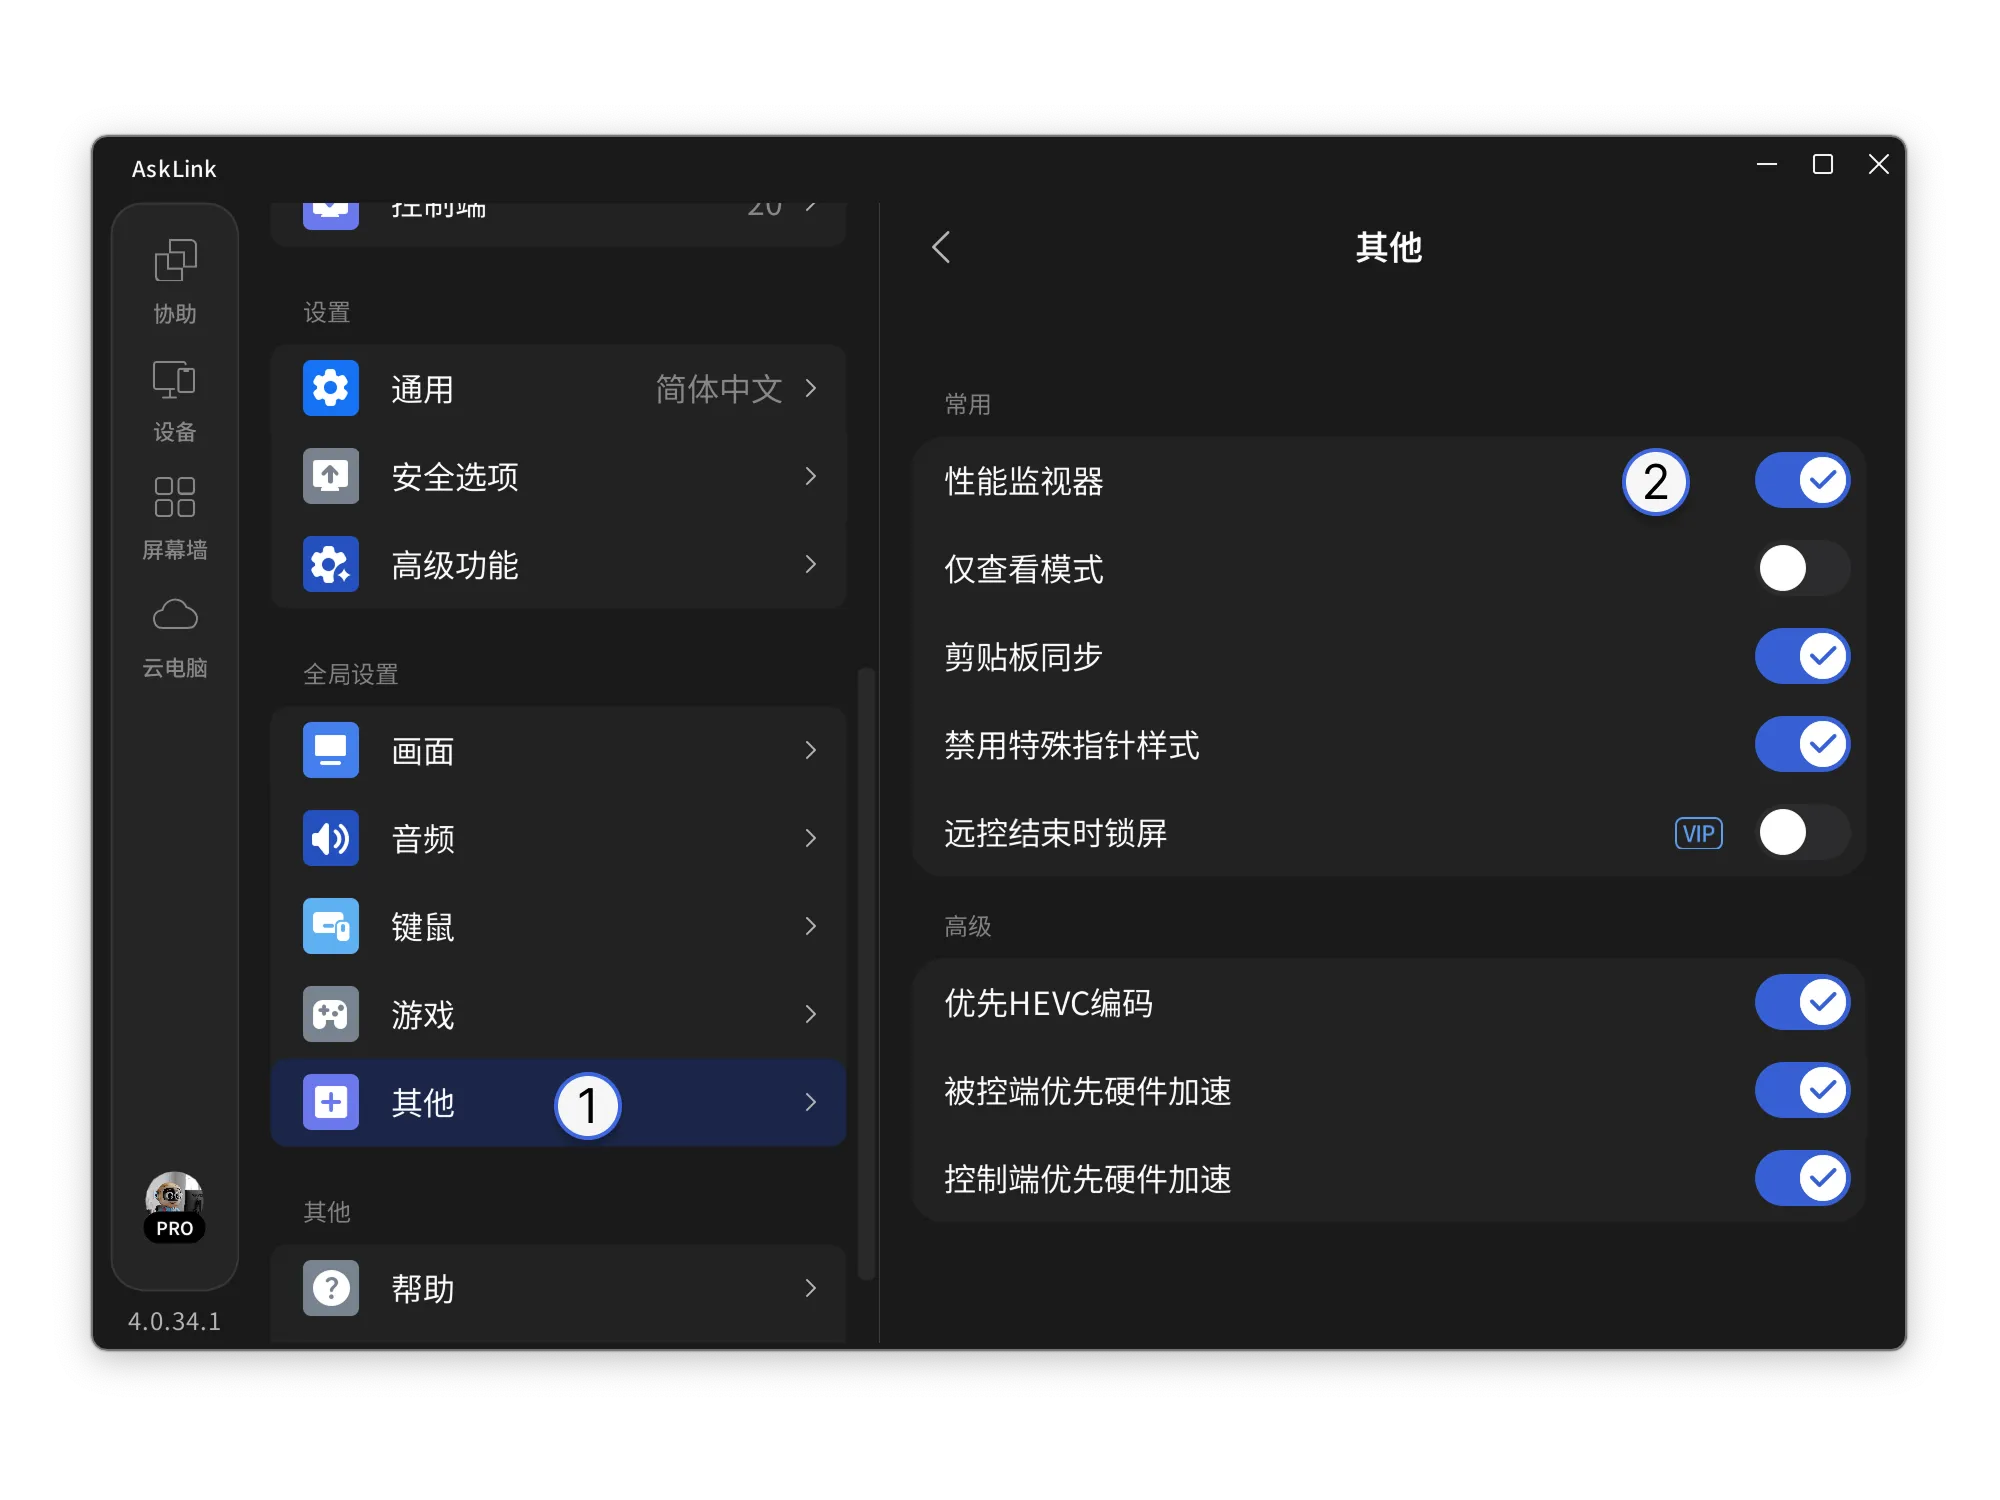
Enable Only When Needed
- Enable Performance Monitor in Other;
- You can also open it through the shortcut bar icon.
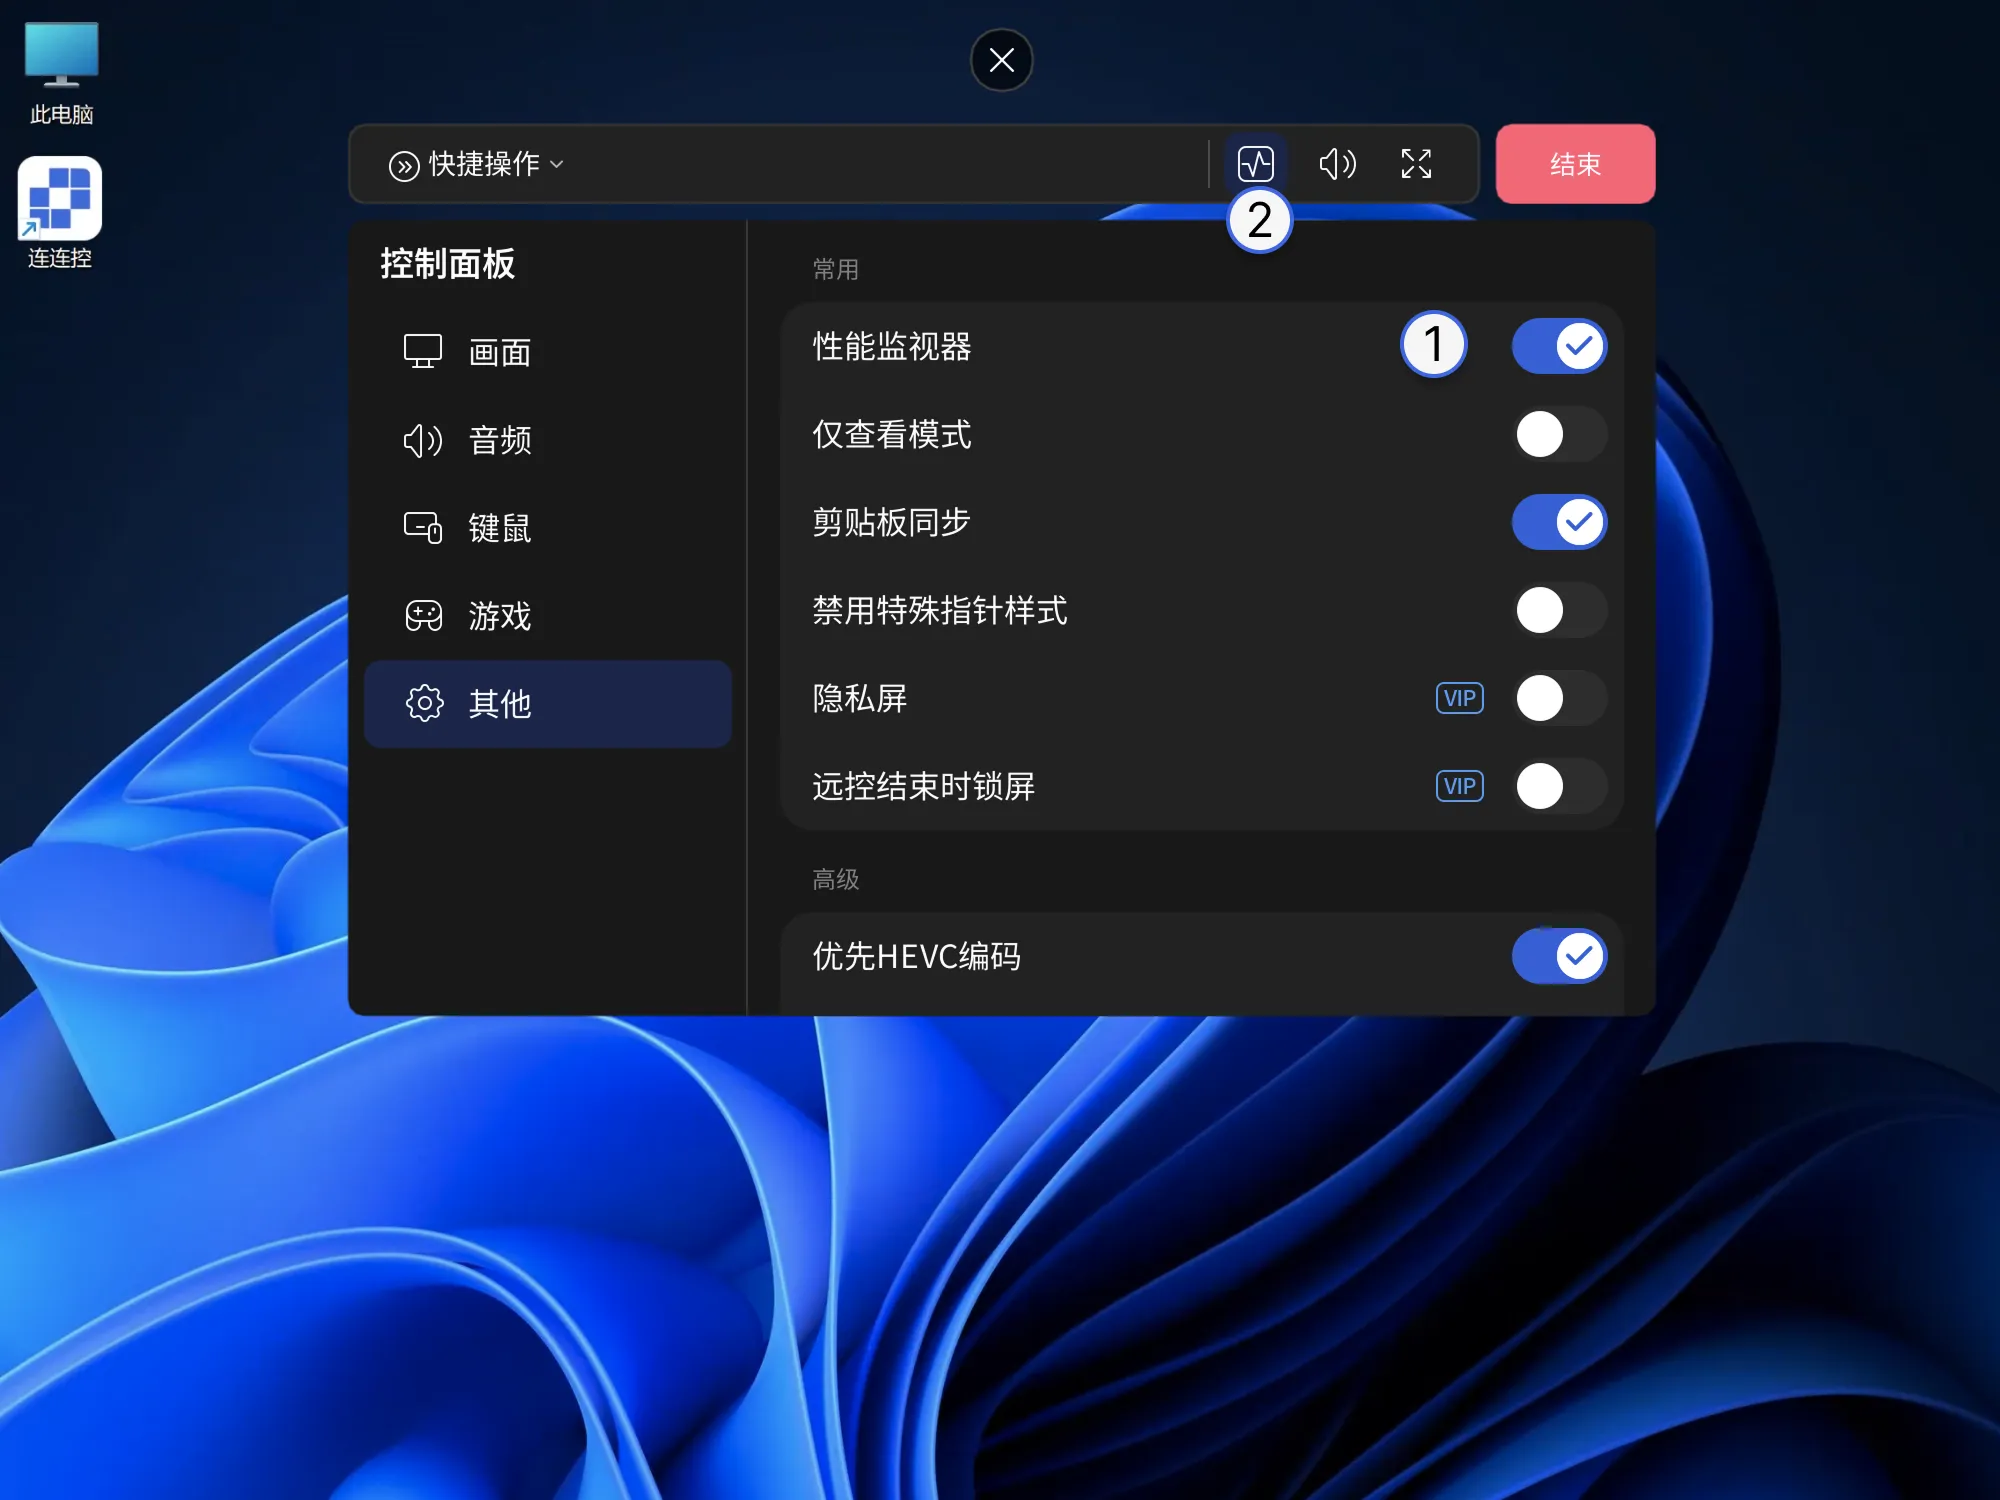
Notes
- If a feature entry is not visible, it usually means the administrator has not enabled the corresponding permission, or the current device or system does not support the feature;
- High resolution, high refresh rate, high image quality, remote audio, and screen extension increase network bandwidth and device performance consumption;
- Features such as driver-level keyboard and mouse, privacy screen, and virtual display may require the Controlled device to have the corresponding system permissions.