






'%3e%3cpath%20d='M7.48145%2024H3.74023C1.67456%2023.9999%204.09854e-05%2022.3467%200%2020.3076V16.6152H7.48145V24ZM15.8955%2024H8.41406V16.6152H15.8955V24ZM7.48145%2015.6924H0V8.30762H7.48145V15.6924ZM24%2015.6924H16.5195V8.30762H24V15.6924ZM15.5859%207.38477H8.10547V0H15.5859V7.38477ZM20.2598%200C22.3256%200%2024%201.65318%2024%203.69238V7.38477H16.5195V0H20.2598Z'%20fill='white'/%3e%3cpath%20d='M108.786%2019.0507L105.767%2014.2636H104.397L108.397%208.80874H111.915L108.119%2013.9483V12.3155L112.544%2019.0507H108.786ZM101.527%2019.0507V5.5061H104.897V19.0507H101.527Z'%20fill='white'/%3e%3cpath%20d='M88.8242%2019.0505V8.80858H91.4908V13.2059H91.3421C91.3421%2012.1422%2091.4779%2011.264%2091.7499%2010.5712C92.0214%209.86618%2092.4224%209.34052%2092.953%208.99418C93.4965%208.64778%2094.1506%208.47461%2094.9158%208.47461H95.0644C96.2245%208.47461%2097.1193%208.86427%2097.7488%209.64353C98.3911%2010.4104%2098.7117%2011.5917%2098.7117%2013.1874V19.0505H95.342V13.0946C95.342%2012.6246%2095.2001%2012.2411%2094.9158%2011.9443C94.6443%2011.635%2094.2679%2011.4804%2093.7864%2011.4804C93.3049%2011.4804%2092.9162%2011.635%2092.6202%2011.9443C92.3358%2012.2411%2092.194%2012.6369%2092.194%2013.1317V19.0505H88.8242Z'%20fill='white'/%3e%3cpath%20d='M82.4214%2019.0506V8.80875H85.7912V19.0506H82.4214ZM81.125%2011.2579V8.80875H85.7912V11.2579H81.125ZM83.81%207.99232C83.1928%207.99232%2082.7359%207.83773%2082.4398%207.5285C82.1561%207.2069%2082.0137%206.79872%2082.0137%206.30388C82.0137%205.80913%2082.1561%205.40713%2082.4398%205.09789C82.7359%204.77628%2083.1866%204.61548%2083.7916%204.61548C84.4088%204.61548%2084.8595%204.77628%2085.1433%205.09789C85.427%205.40713%2085.5688%205.80913%2085.5688%206.30388C85.5688%206.79872%2085.427%207.2069%2085.1433%207.5285C84.8595%207.83773%2084.4149%207.99232%2083.81%207.99232Z'%20fill='white'/%3e%3cpath%20d='M71.1328%2019.0507V5.5061H74.5769V19.0507H71.1328ZM74.2065%2019.0507V16.0449H79.6876V19.0507H74.2065Z'%20fill='white'/%3e%3cpath%20d='M65.4458%2019.0507L62.428%2014.2636H61.0576L65.0571%208.80874H68.5755L64.7795%2013.9483V12.3155L69.2049%2019.0507H65.4458ZM58.1875%2019.0507V5.5061H61.5578V19.0507H58.1875Z'%20fill='white'/%3e%3cpath%20d='M51.2917%2019.3845C49.8103%2019.3845%2048.6438%2019.0814%2047.7921%2018.4753C46.9403%2017.8568%2046.4836%2016.991%2046.4219%2015.8777H49.3844C49.4339%2016.1869%2049.6252%2016.4529%2049.9585%2016.6755C50.2918%2016.8982%2050.7608%2017.0095%2051.3657%2017.0095C51.7978%2017.0095%2052.1681%2016.9477%2052.4767%2016.824C52.7977%2016.6879%2052.9581%2016.4715%2052.9581%2016.1745C52.9581%2015.9148%2052.8347%2015.7045%2052.5878%2015.5437C52.3409%2015.3705%2051.8903%2015.2531%2051.2361%2015.1912L50.5325%2015.117C49.224%2014.9809%2048.2611%2014.6222%2047.6439%2014.0408C47.0267%2013.4595%2046.7181%2012.7297%2046.7181%2011.8515C46.7181%2011.0969%2046.9033%2010.4784%2047.2736%209.99603C47.6439%209.50126%2048.1562%209.13018%2048.8105%208.8828C49.4647%208.63541%2050.2115%208.51172%2051.0509%208.51172C52.4211%208.51172%2053.526%208.81473%2054.3653%209.42089C55.2048%2010.0146%2055.6492%2010.8743%2055.6986%2011.9999H52.7359C52.6866%2011.6907%2052.5199%2011.4309%2052.236%2011.2206C51.9521%2010.998%2051.5447%2010.8867%2051.0139%2010.8867C50.6312%2010.8867%2050.3164%2010.9547%2050.0696%2011.0907C49.835%2011.2268%2049.7178%2011.4185%2049.7178%2011.6659C49.7178%2011.9257%2049.8289%2012.1174%2050.0511%2012.2411C50.2856%2012.3648%2050.6559%2012.4576%2051.162%2012.5194L51.8657%2012.5936C53.1741%2012.7297%2054.1802%2013.0946%2054.8838%2013.6883C55.5998%2014.2697%2055.9578%2015.0366%2055.9578%2015.989C55.9578%2016.6941%2055.7664%2017.3002%2055.3838%2017.8073C55.0134%2018.3145%2054.4764%2018.7041%2053.7728%2018.9763C53.0816%2019.2484%2052.2545%2019.3845%2051.2917%2019.3845Z'%20fill='white'/%3e%3cpath%20d='M31.0117%2019.0507L35.3445%205.5061H40.8624L45.3434%2019.0507H41.7882L38.3072%207.91816L39.2885%208.28924H36.8444L37.8442%207.91816L34.4558%2019.0507H31.0117ZM34.5483%2015.915L35.5853%2013.0948H40.7143L41.7512%2015.915H34.5483Z'%20fill='white'/%3e%3c/g%3e%3cdefs%3e%3cclipPath%20id='clip0_5596_142775'%3e%3crect%20width='113'%20height='24'%20fill='white'/%3e%3c/clipPath%3e%3c/defs%3e%3c/svg%3e "AskLink")
Monitor Wall
Monitor Wall can view or control multiple devices at the same time and provides three modes: Single Control, Group Control, and View.
Prerequisites
- The member has joined the enterprise;
- The administrator has authorized the target devices for the member;
- The target devices are online;
- The current member has Monitor Wall or related operation permissions.
If the Monitor Wall entry is not visible, or target devices do not appear in Monitor Wall, contact the enterprise administrator to confirm permissions.
Quick Start
Establish Connection
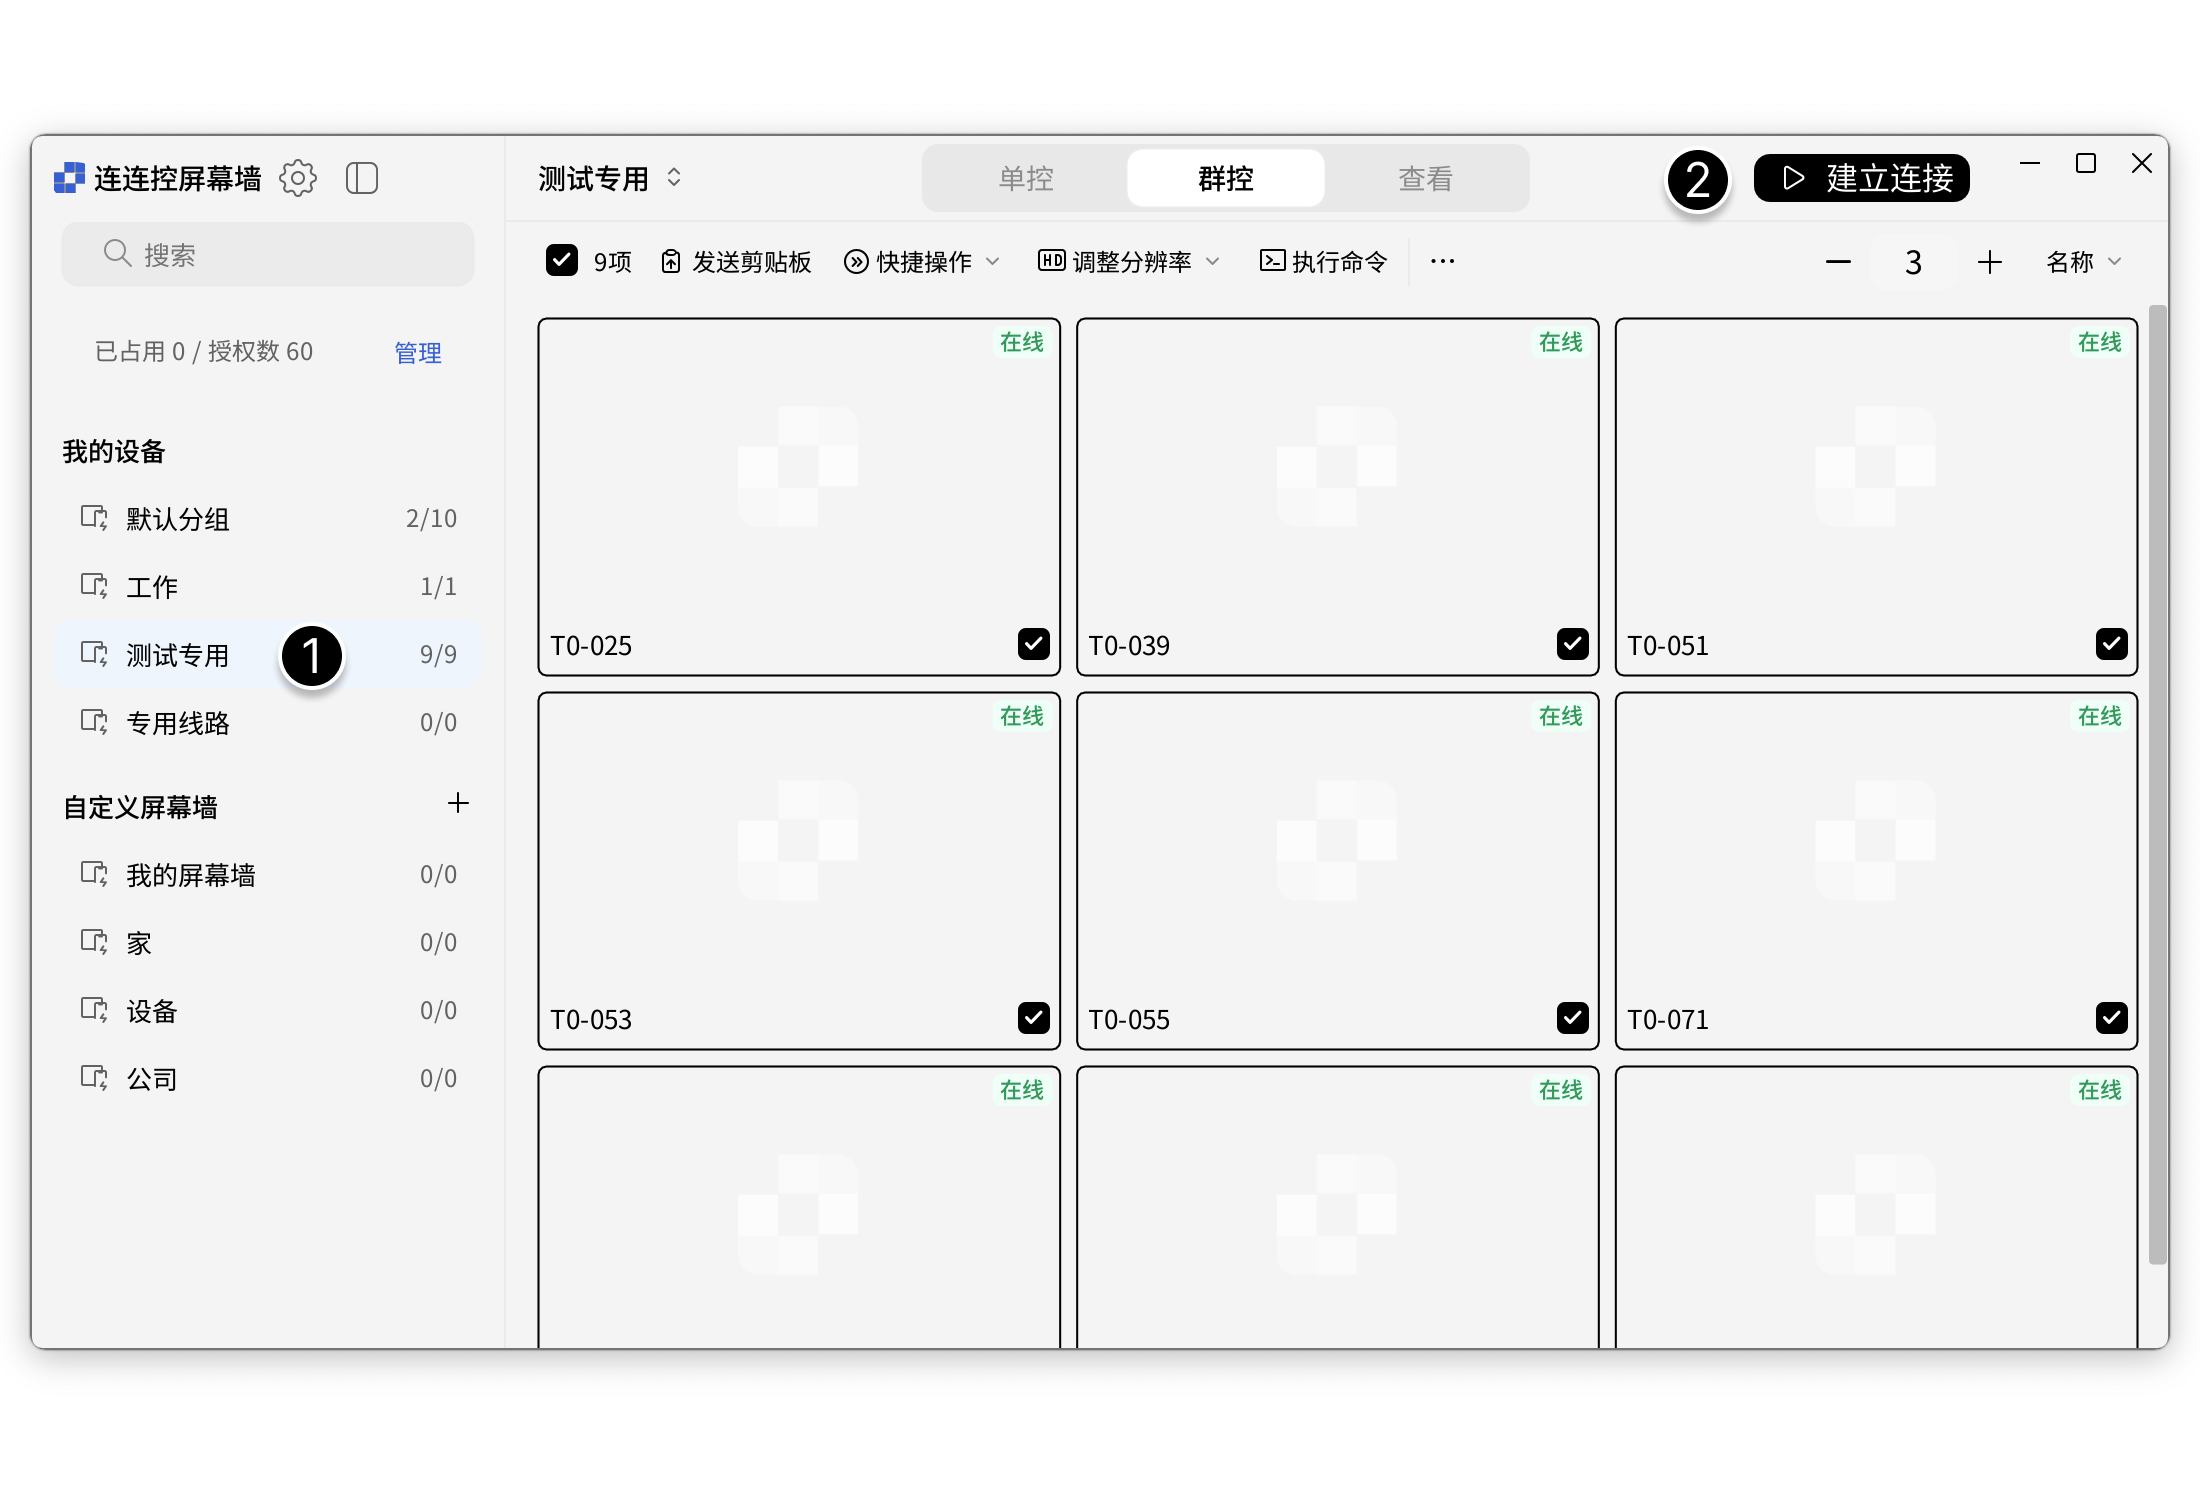
After a connection is established, the real-time status of devices can be displayed in Monitor Wall.
- Select a Monitor Wall group;
- Click Establish Connection in the upper-right corner to start using Monitor Wall.
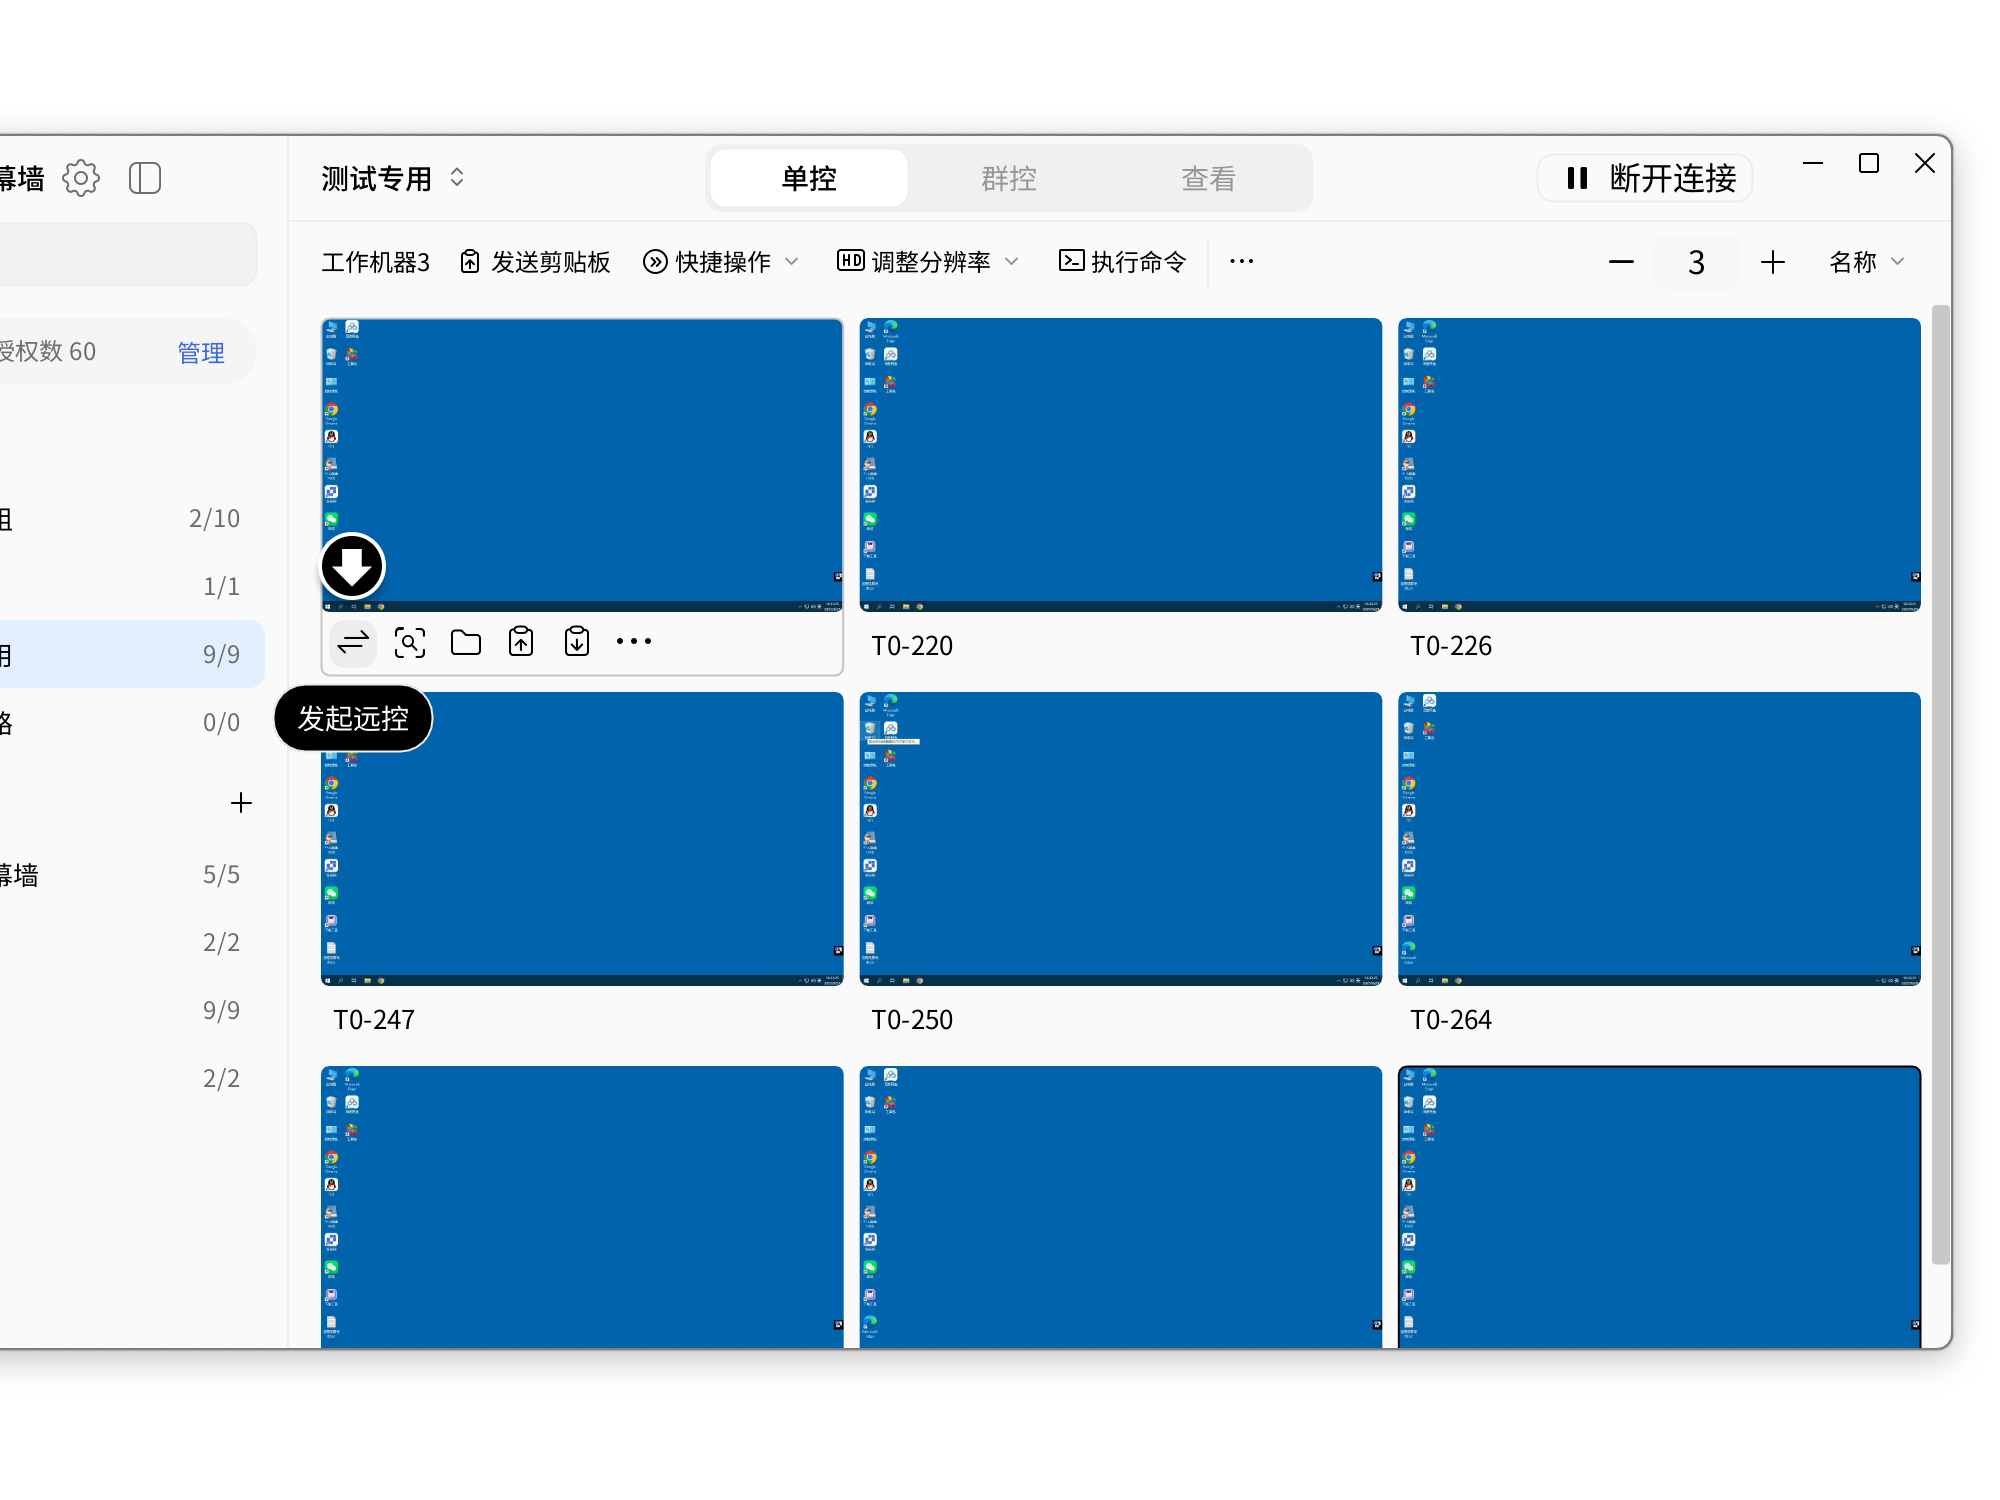
Initiate Remote Control
You can initiate remote control directly in Monitor Wall. This is suitable for long-duration, precise, and complex operations.
Click Initiate Remote Control below the target device screen.
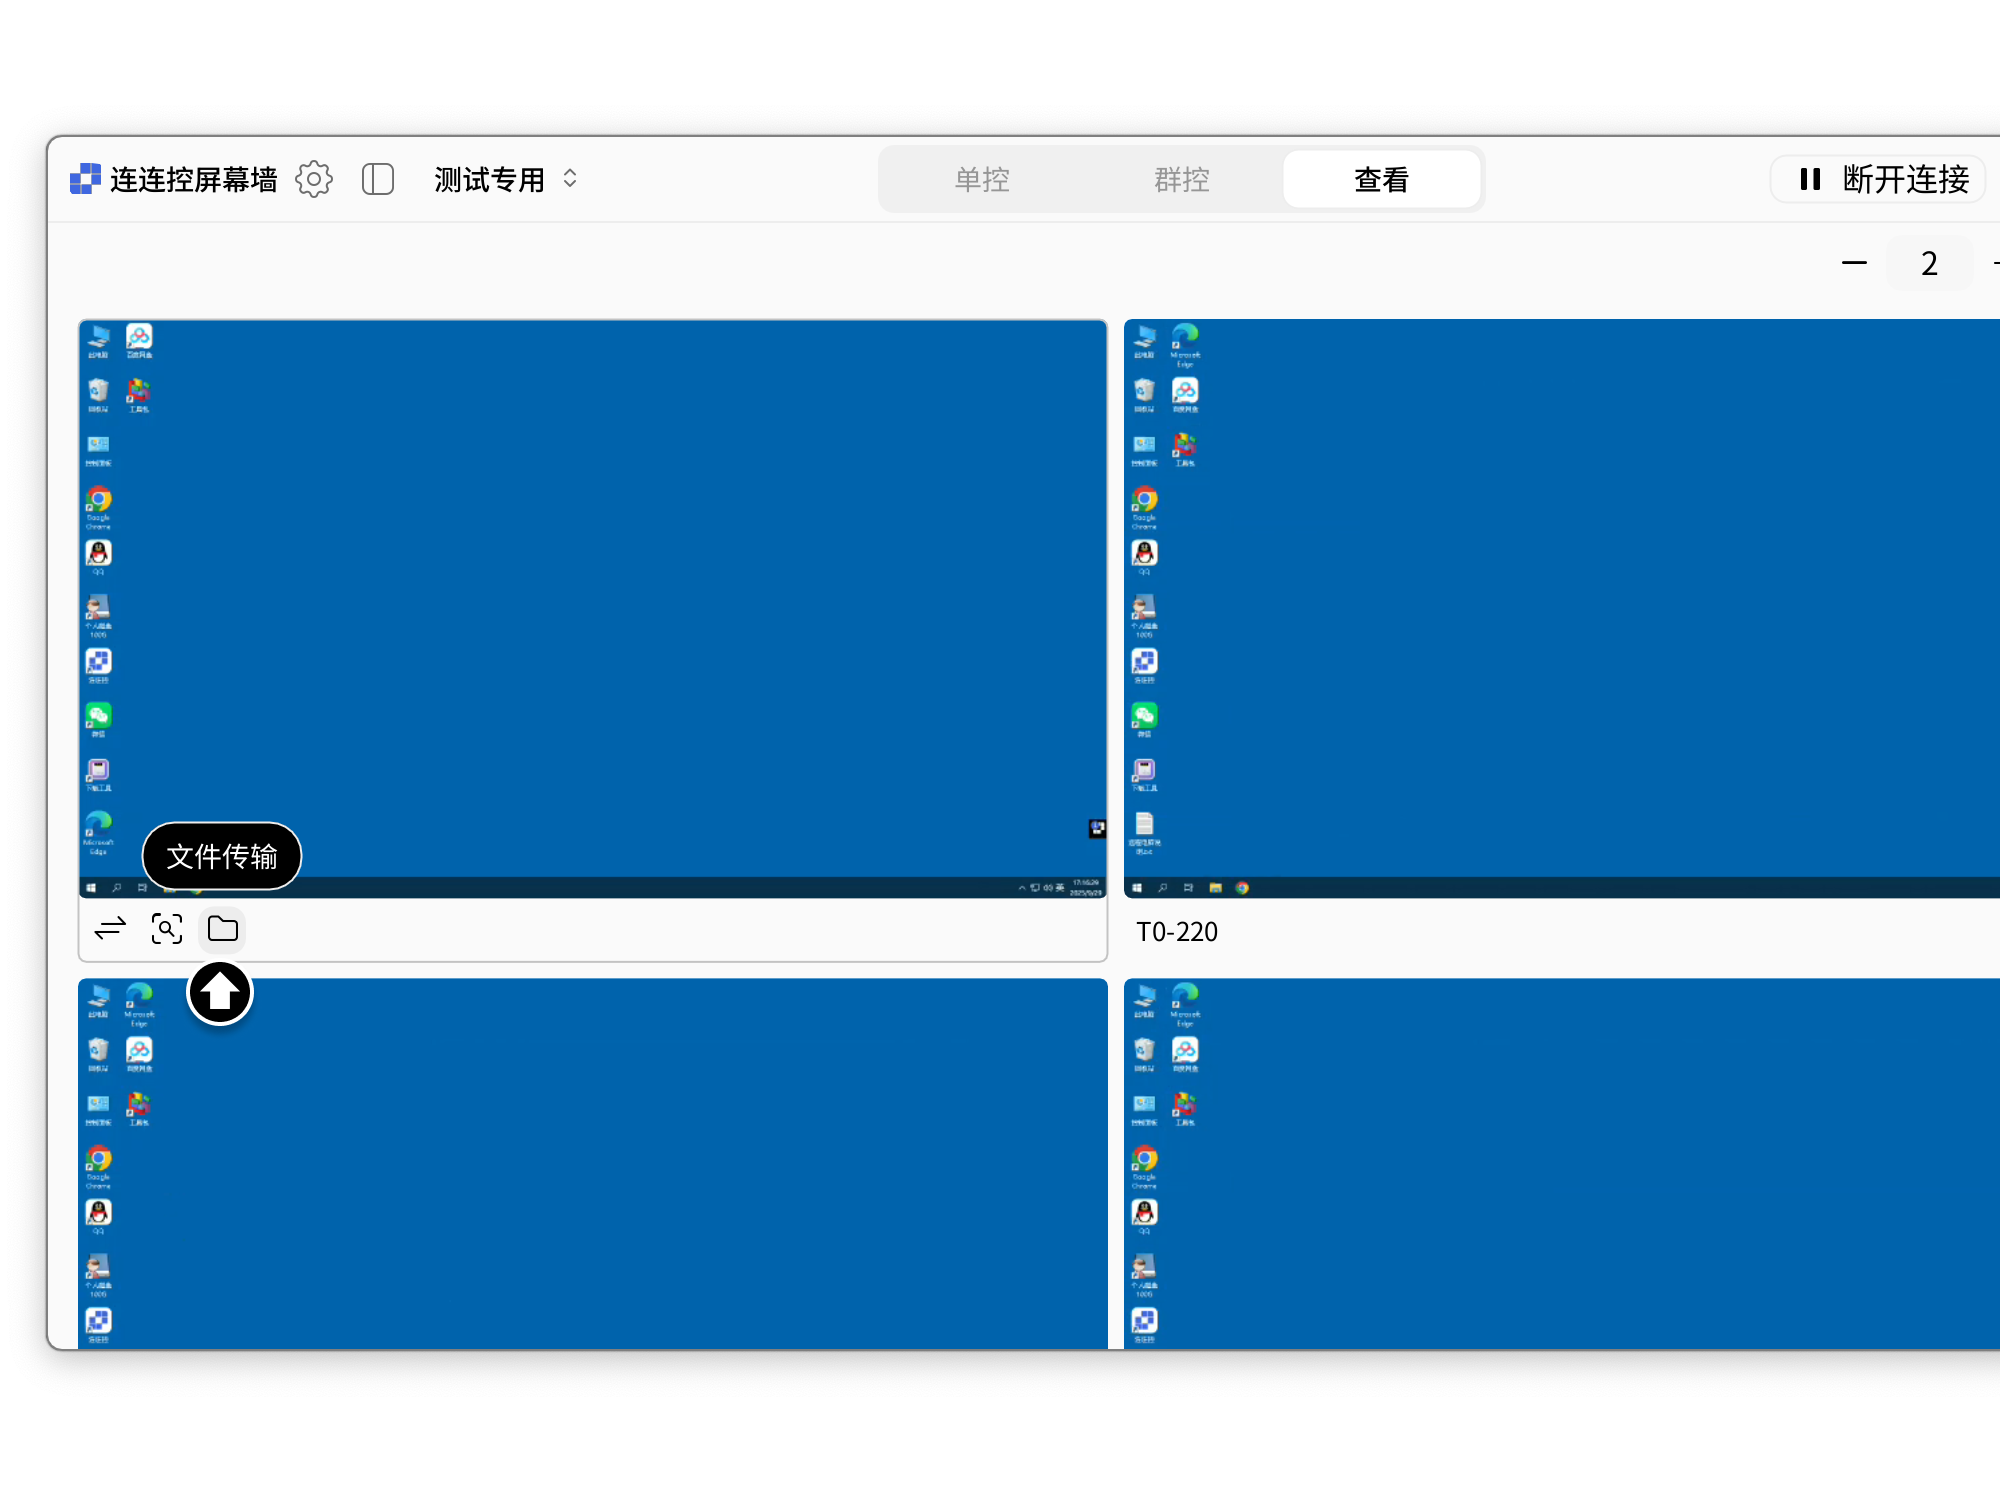
File Transfer
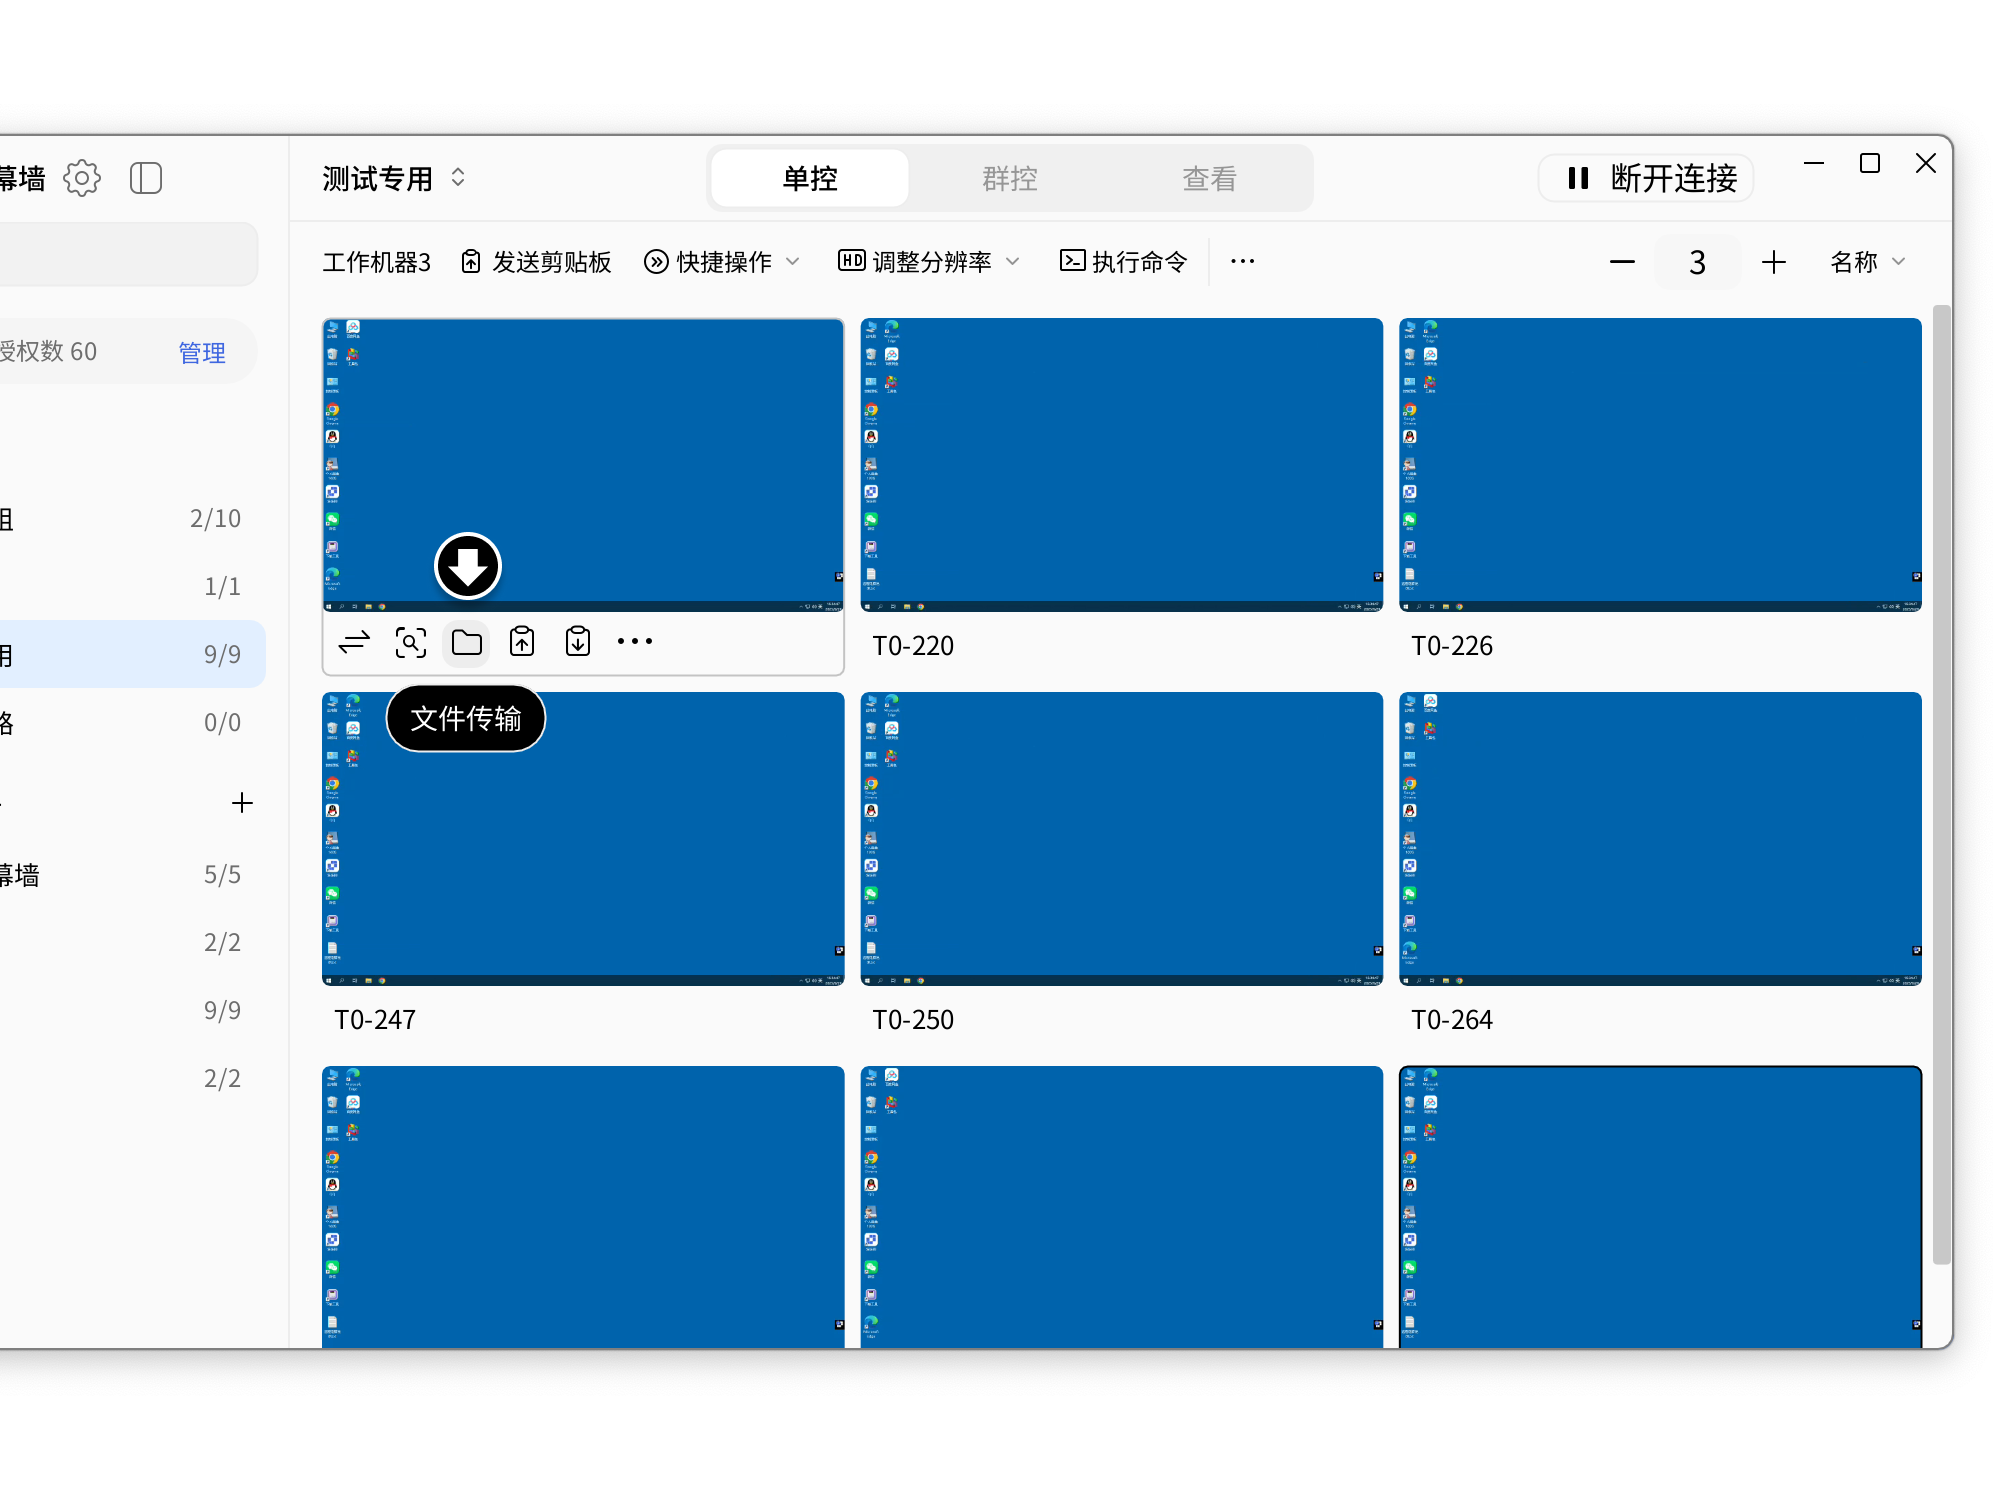
You can initiate File Transfer for a target device directly in Monitor Wall.
Click the File Transfer button below the device.
Adjust Window Size
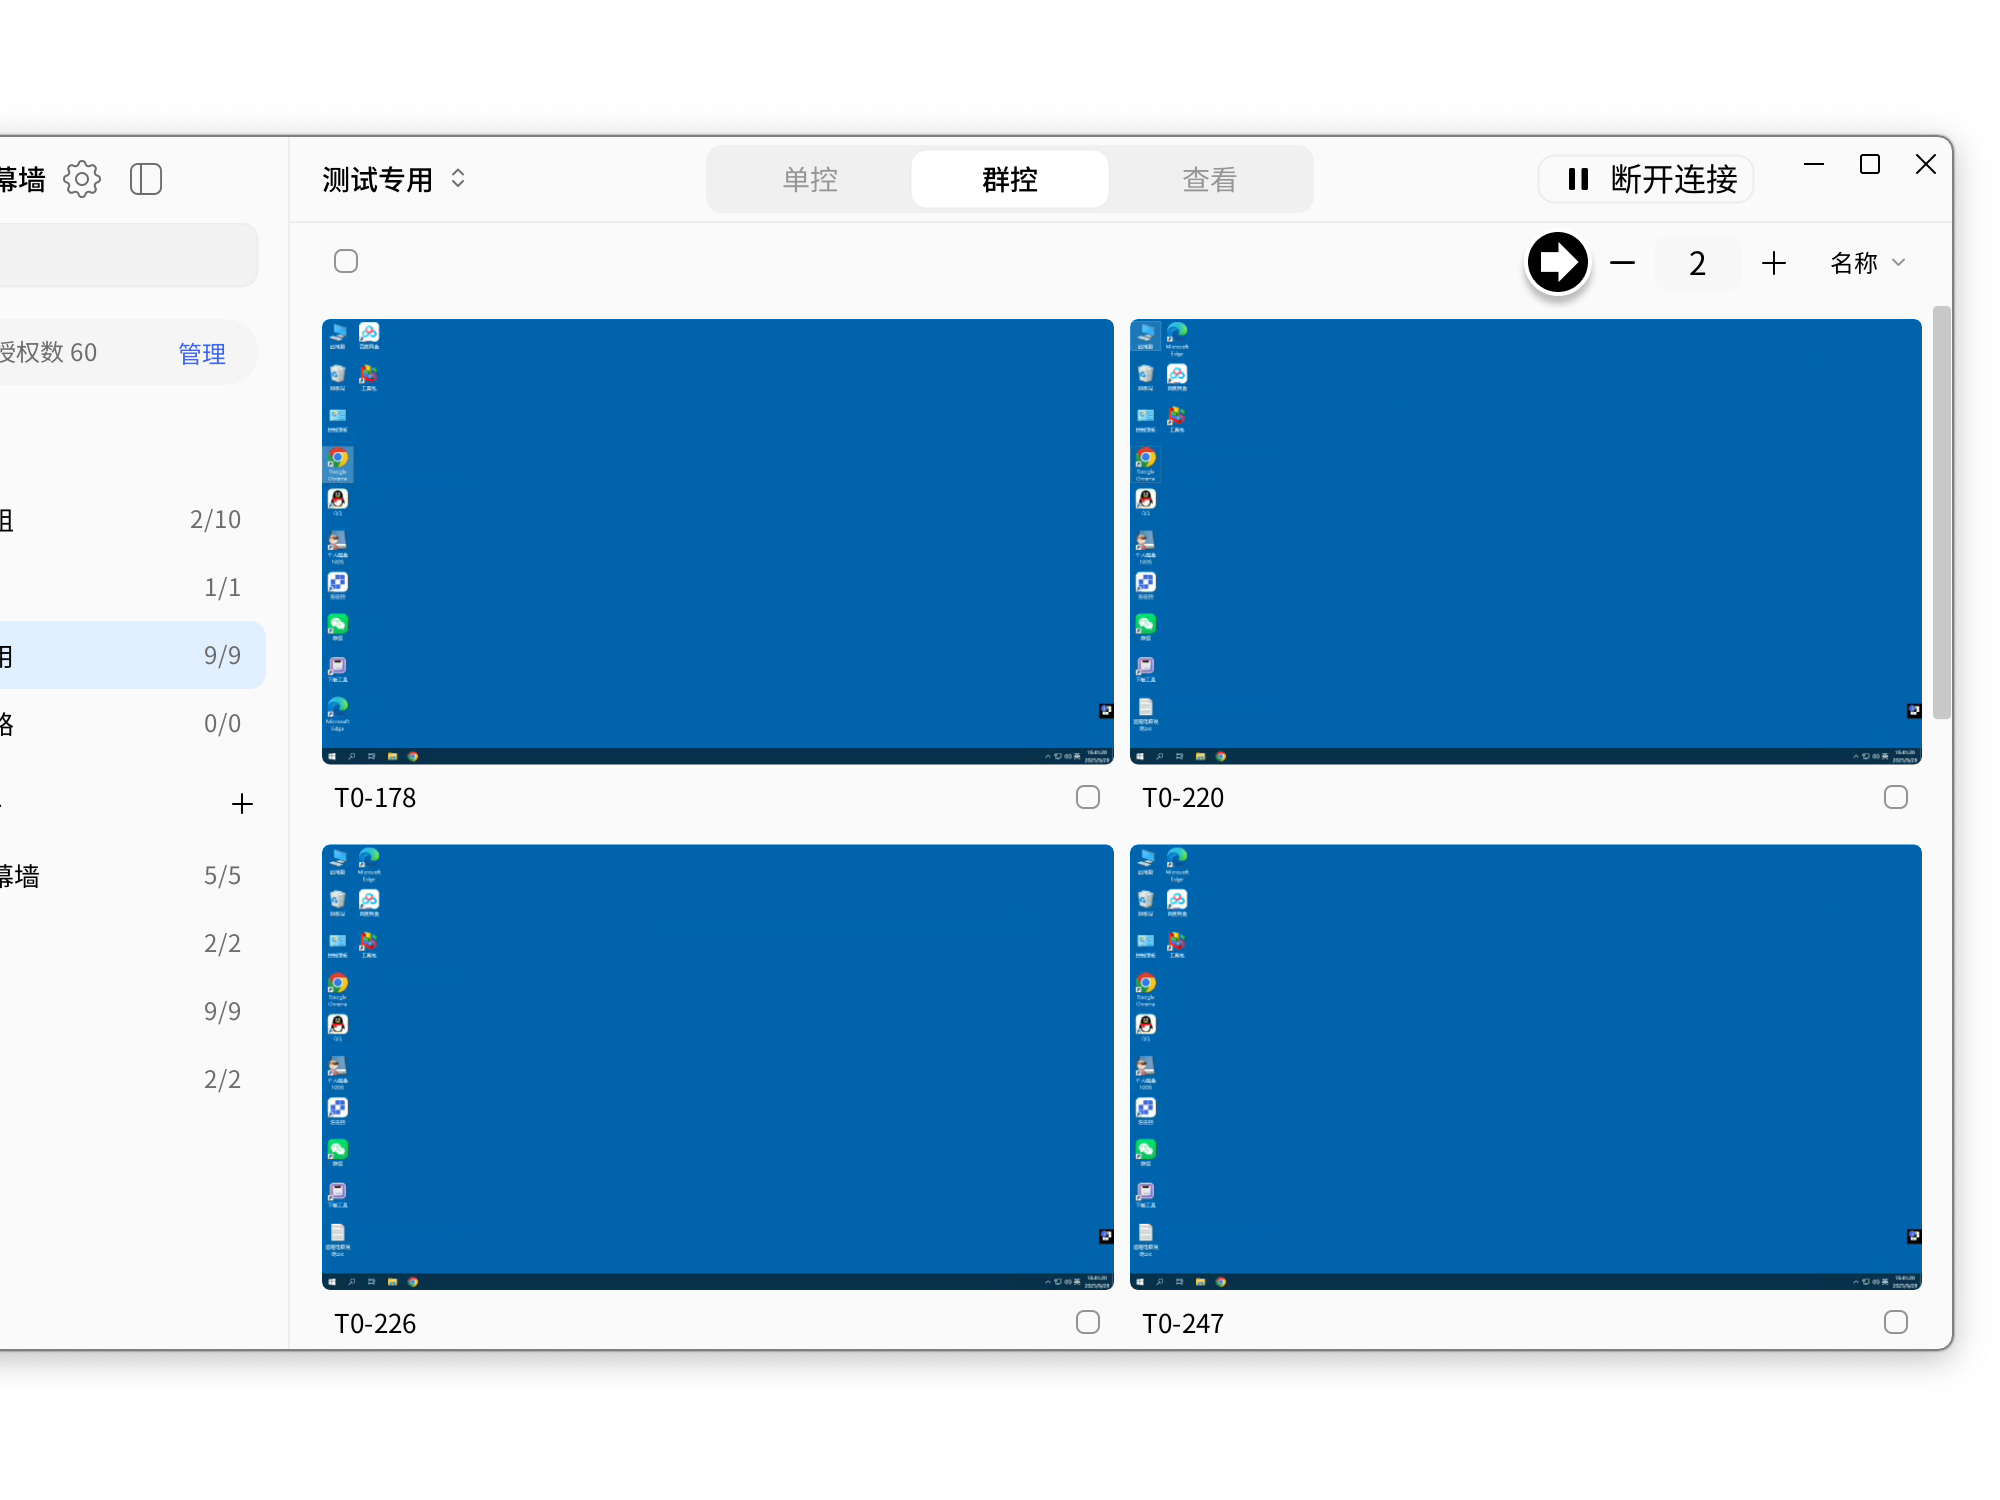
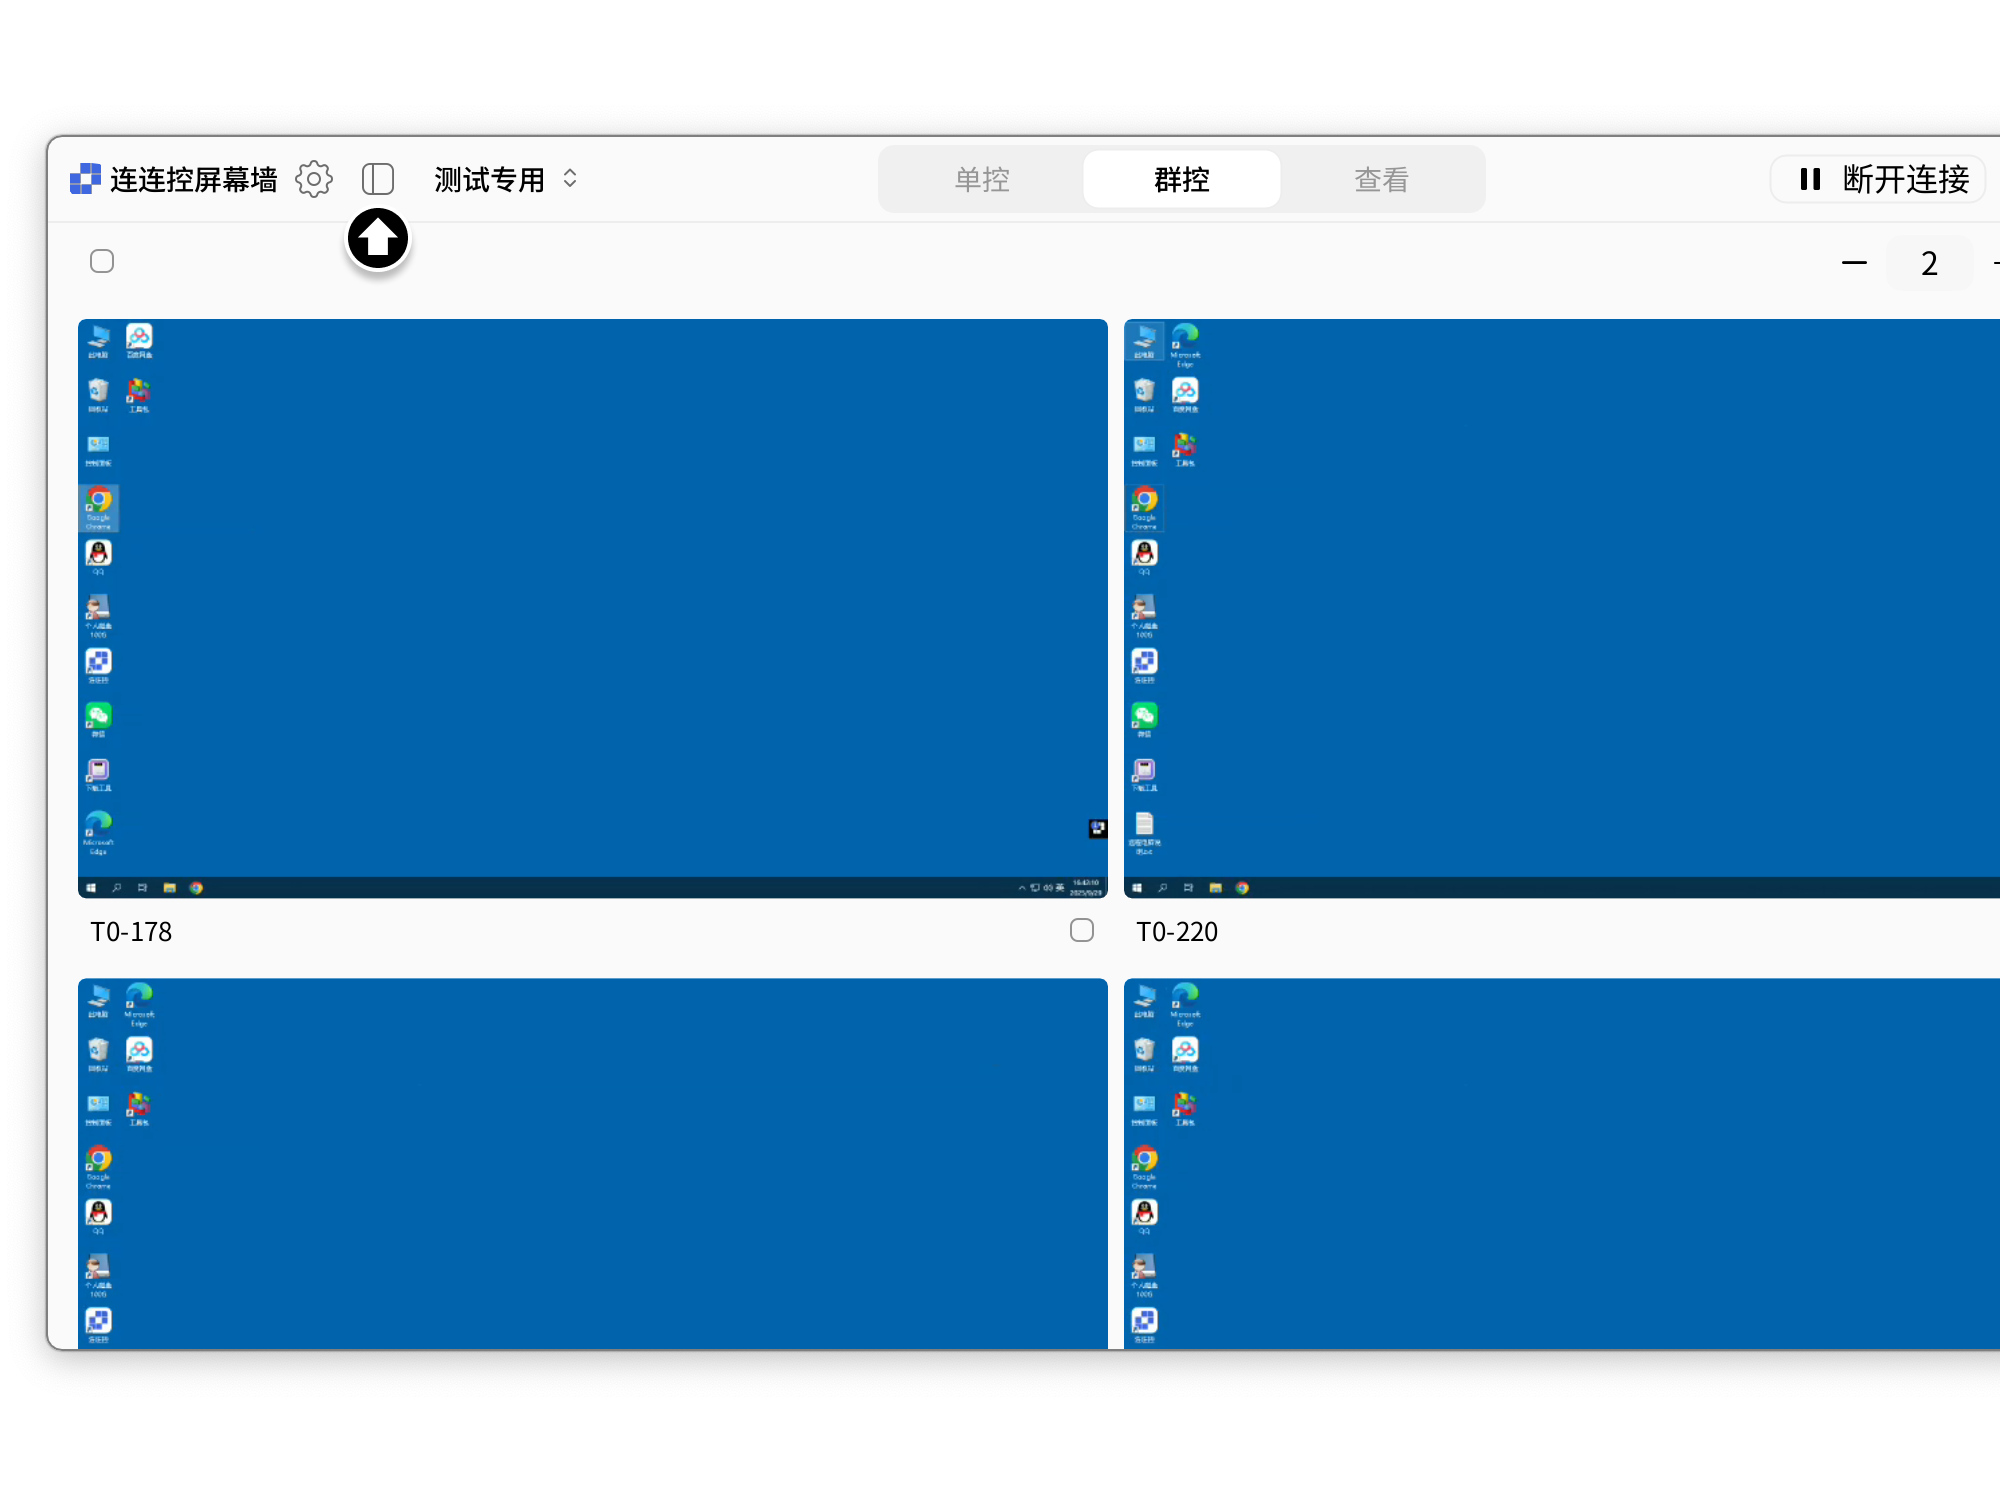
The window size of each device in Monitor Wall can be adjusted as needed.
- Click + or - in the upper-right corner to adjust the number of screens displayed per row;
- Click the hide group bar icon in the upper-left corner to hide the group bar and get a larger view.
Inspection
After enlarging one screen, you can switch left or right between devices for quick inspection.
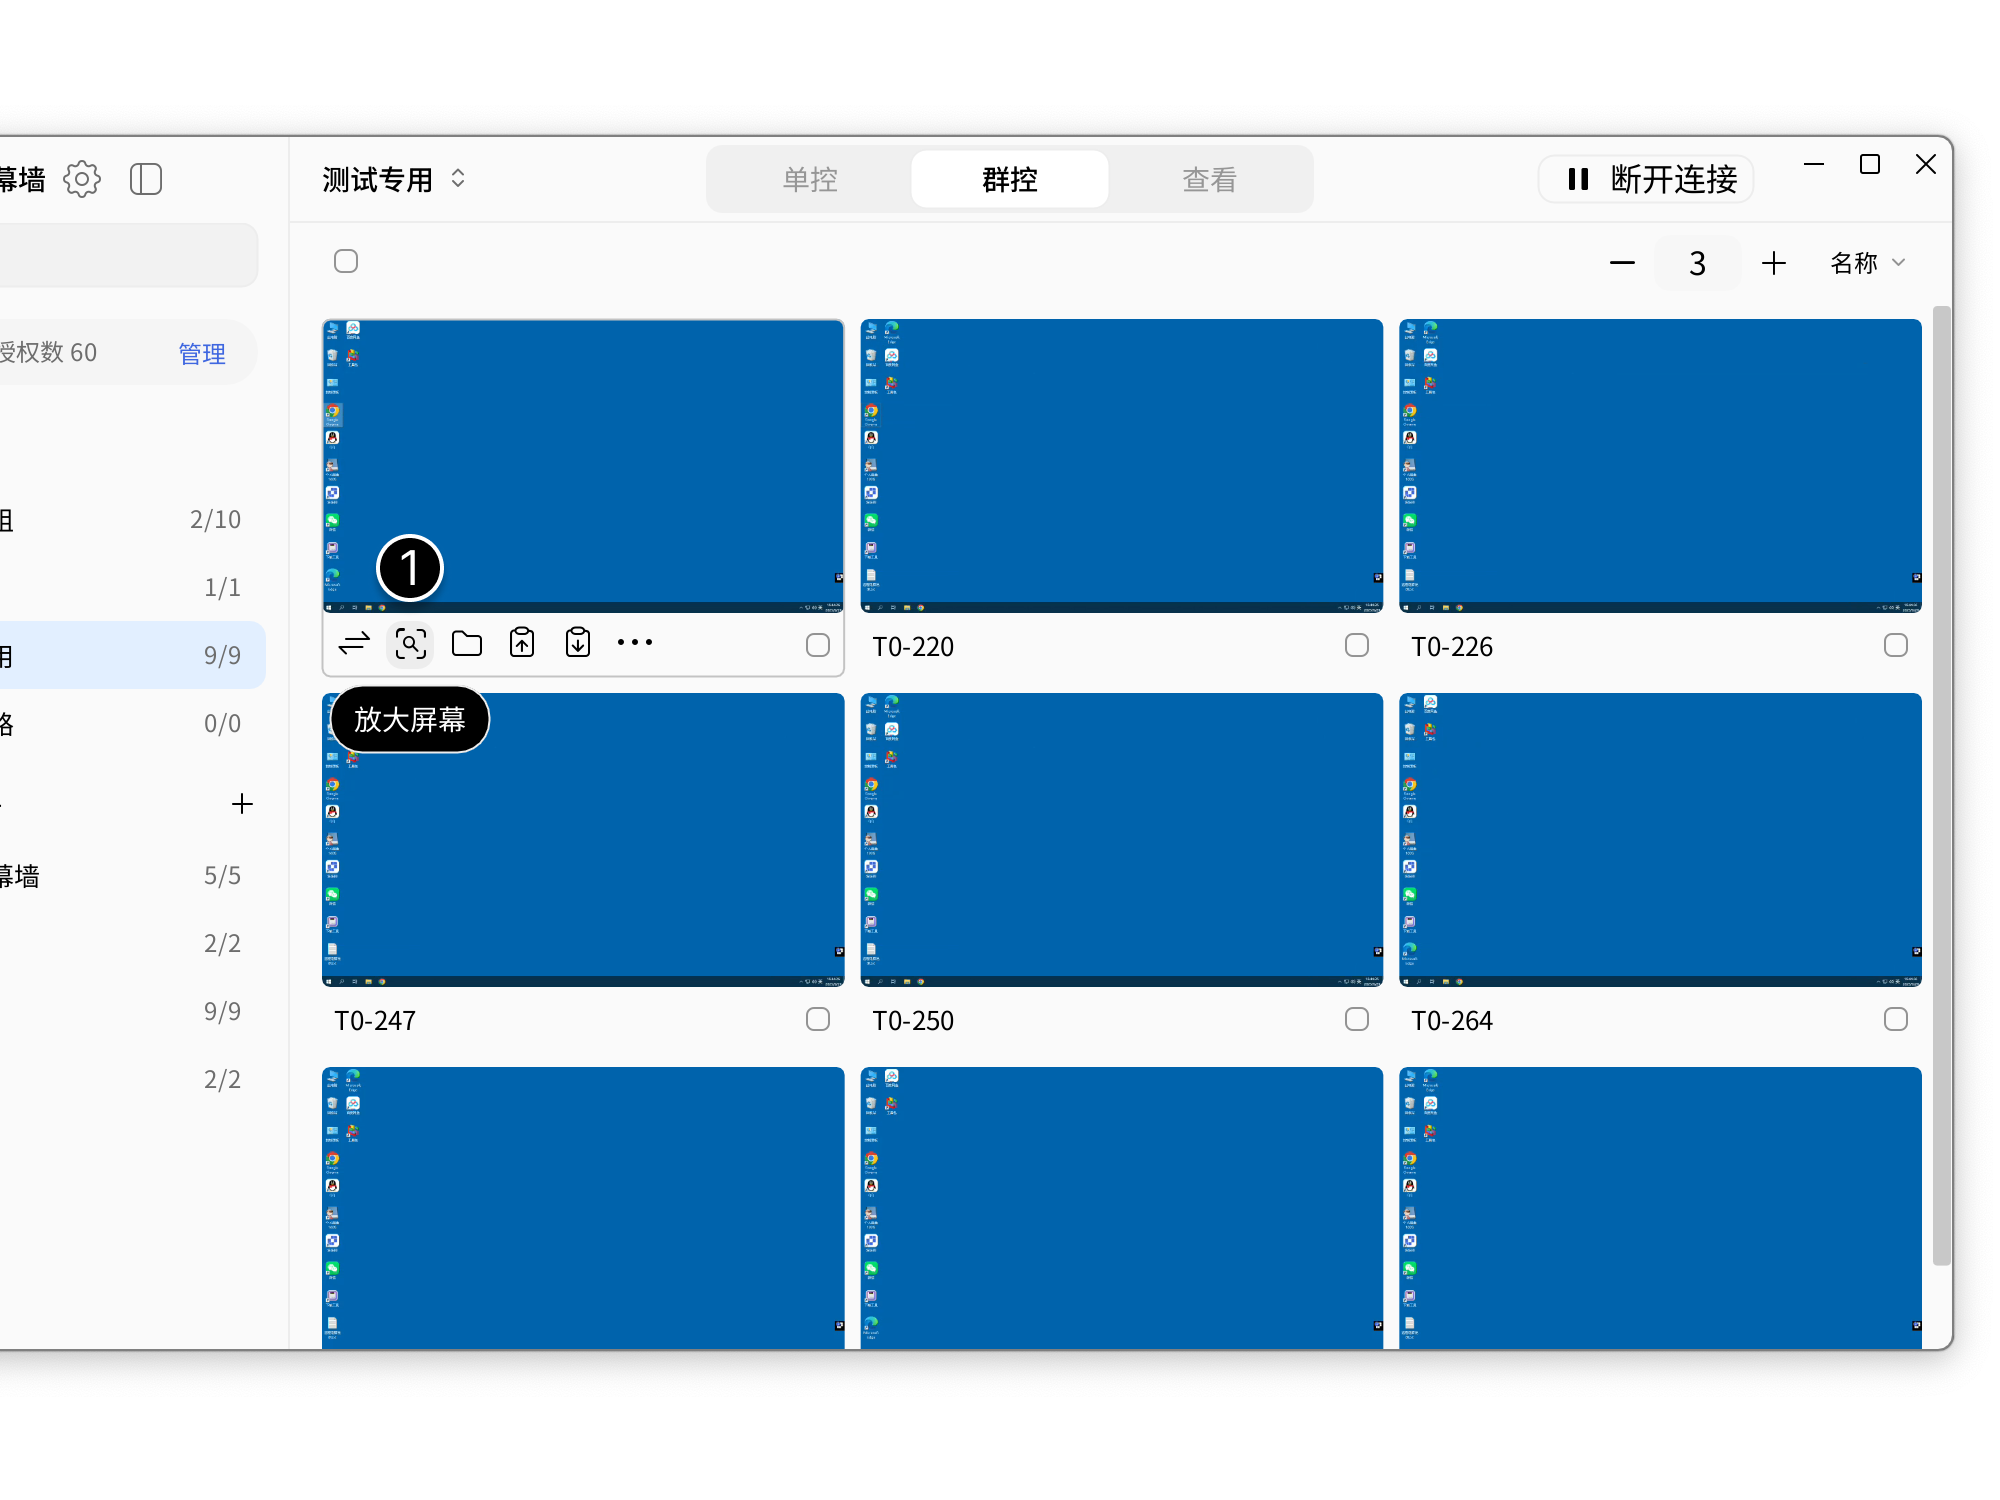
- Click the Enlarge Screen button below a window to enlarge one device screen separately;
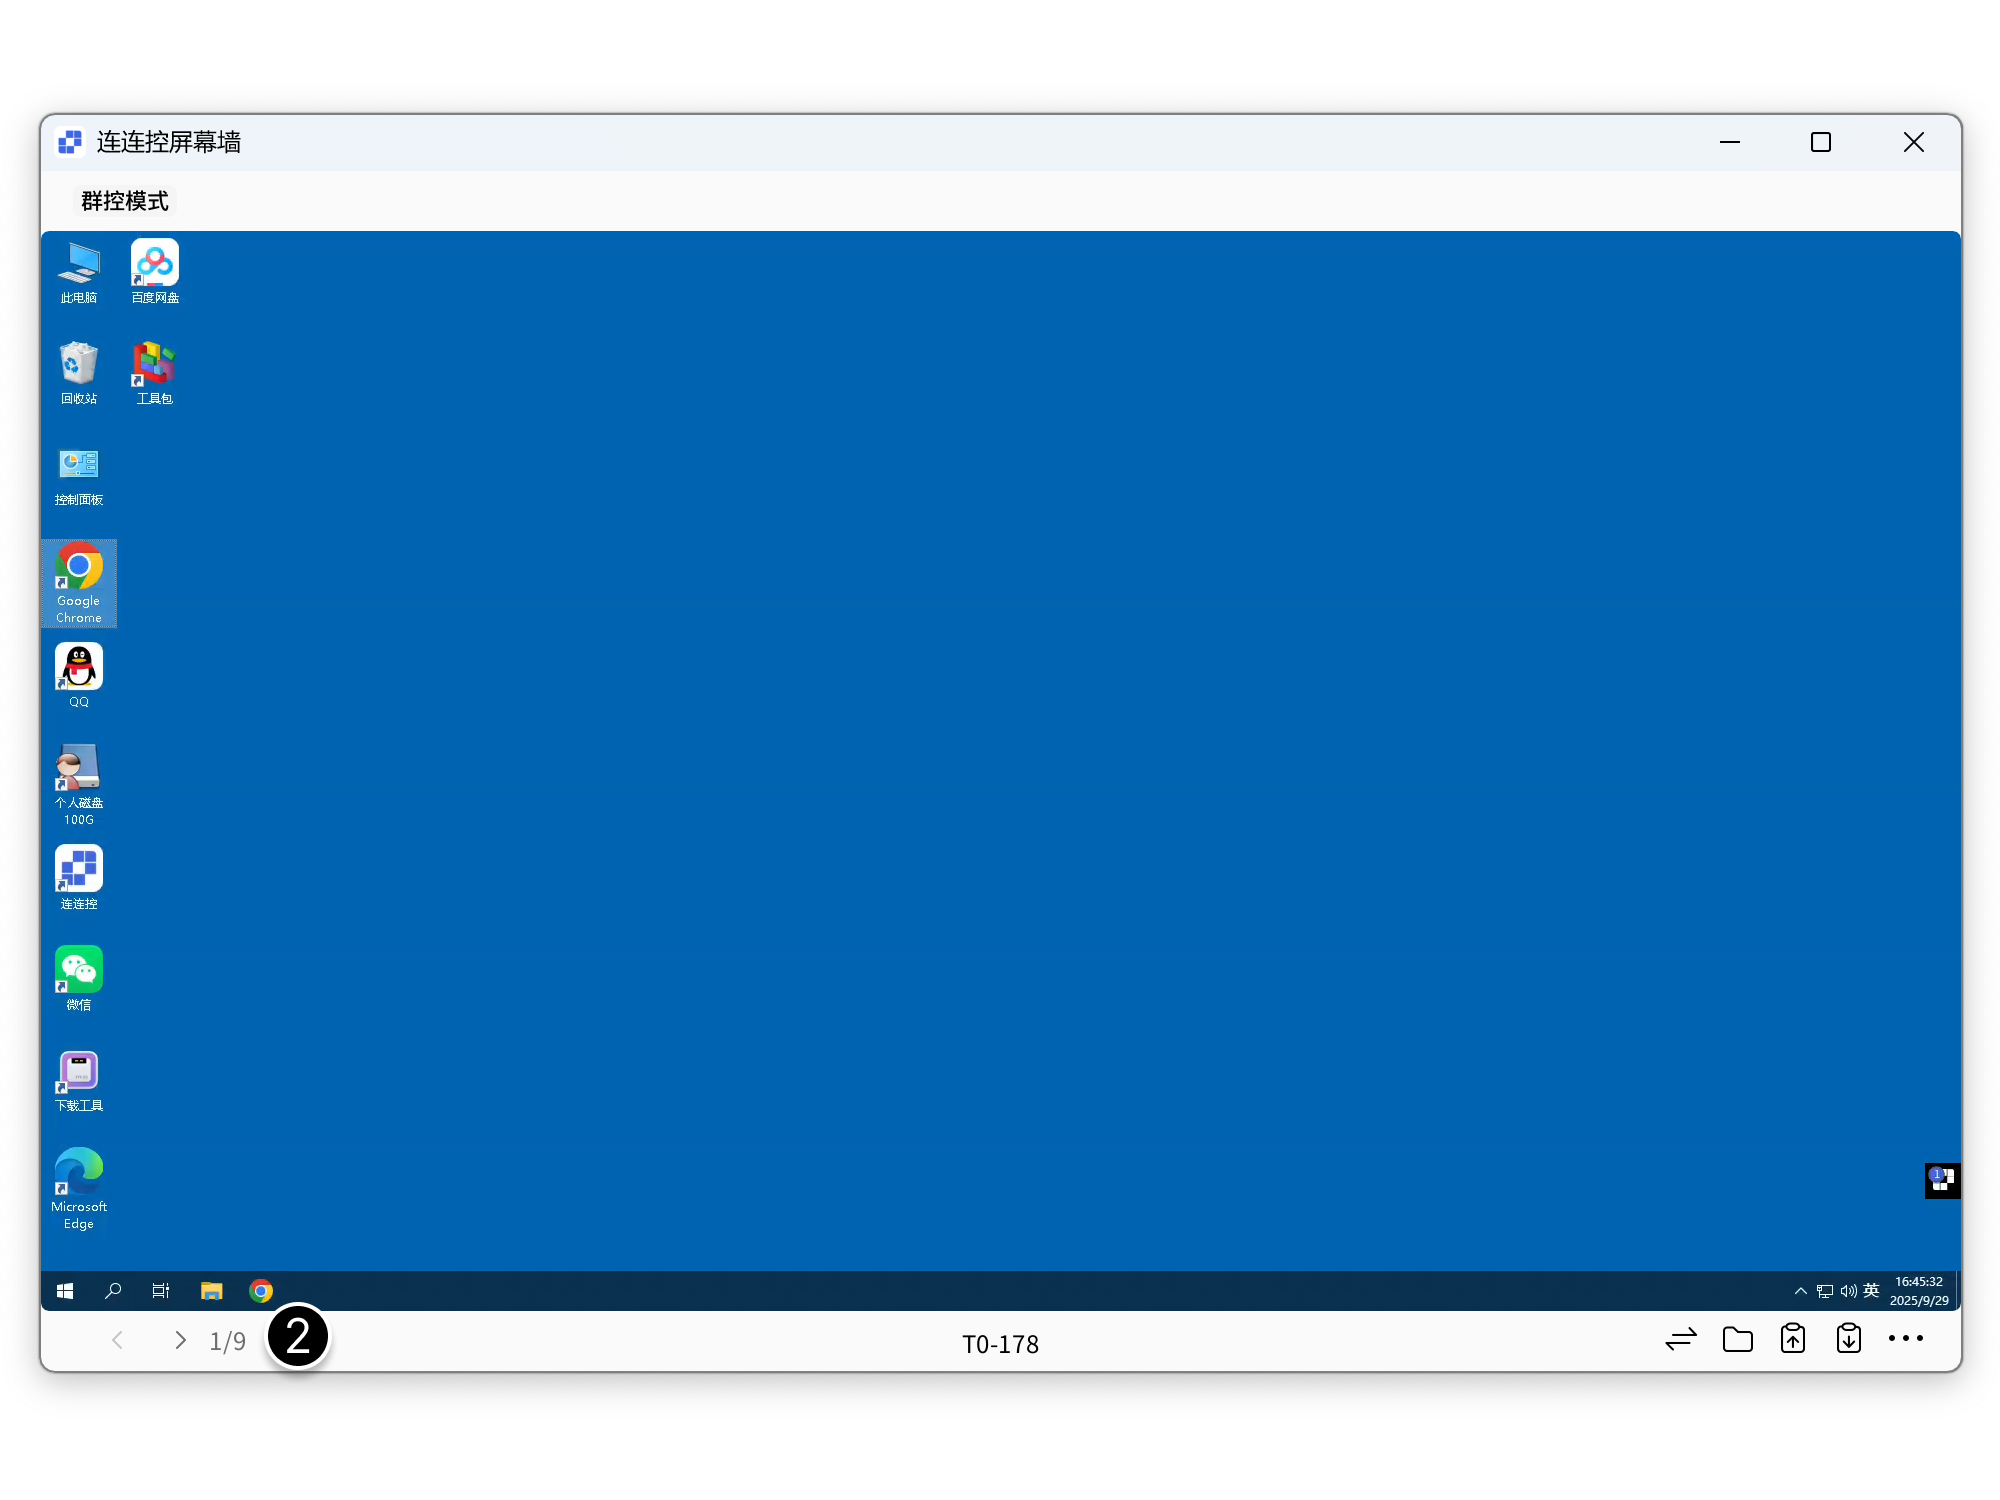
- Click the left or right arrow buttons below the enlarged window to quickly inspect each device.
Single Control Mode
In Single Control mode, you can perform detailed operations on a single device. It supports batch viewing while also allowing you to focus on independent management.
Initiate Remote Control
Click the Initiate Remote Control button below the screen.
Enlarge Screen
You can enlarge the selected device, which is suitable for temporary viewing, simple operations, and quick inspection.
- Click the Enlarge Screen button below the screen to enlarge and view or operate it in the main view;
- Click the small arrow below the main view window for quick inspection.
File Transfer
Click the File Transfer button below the screen.
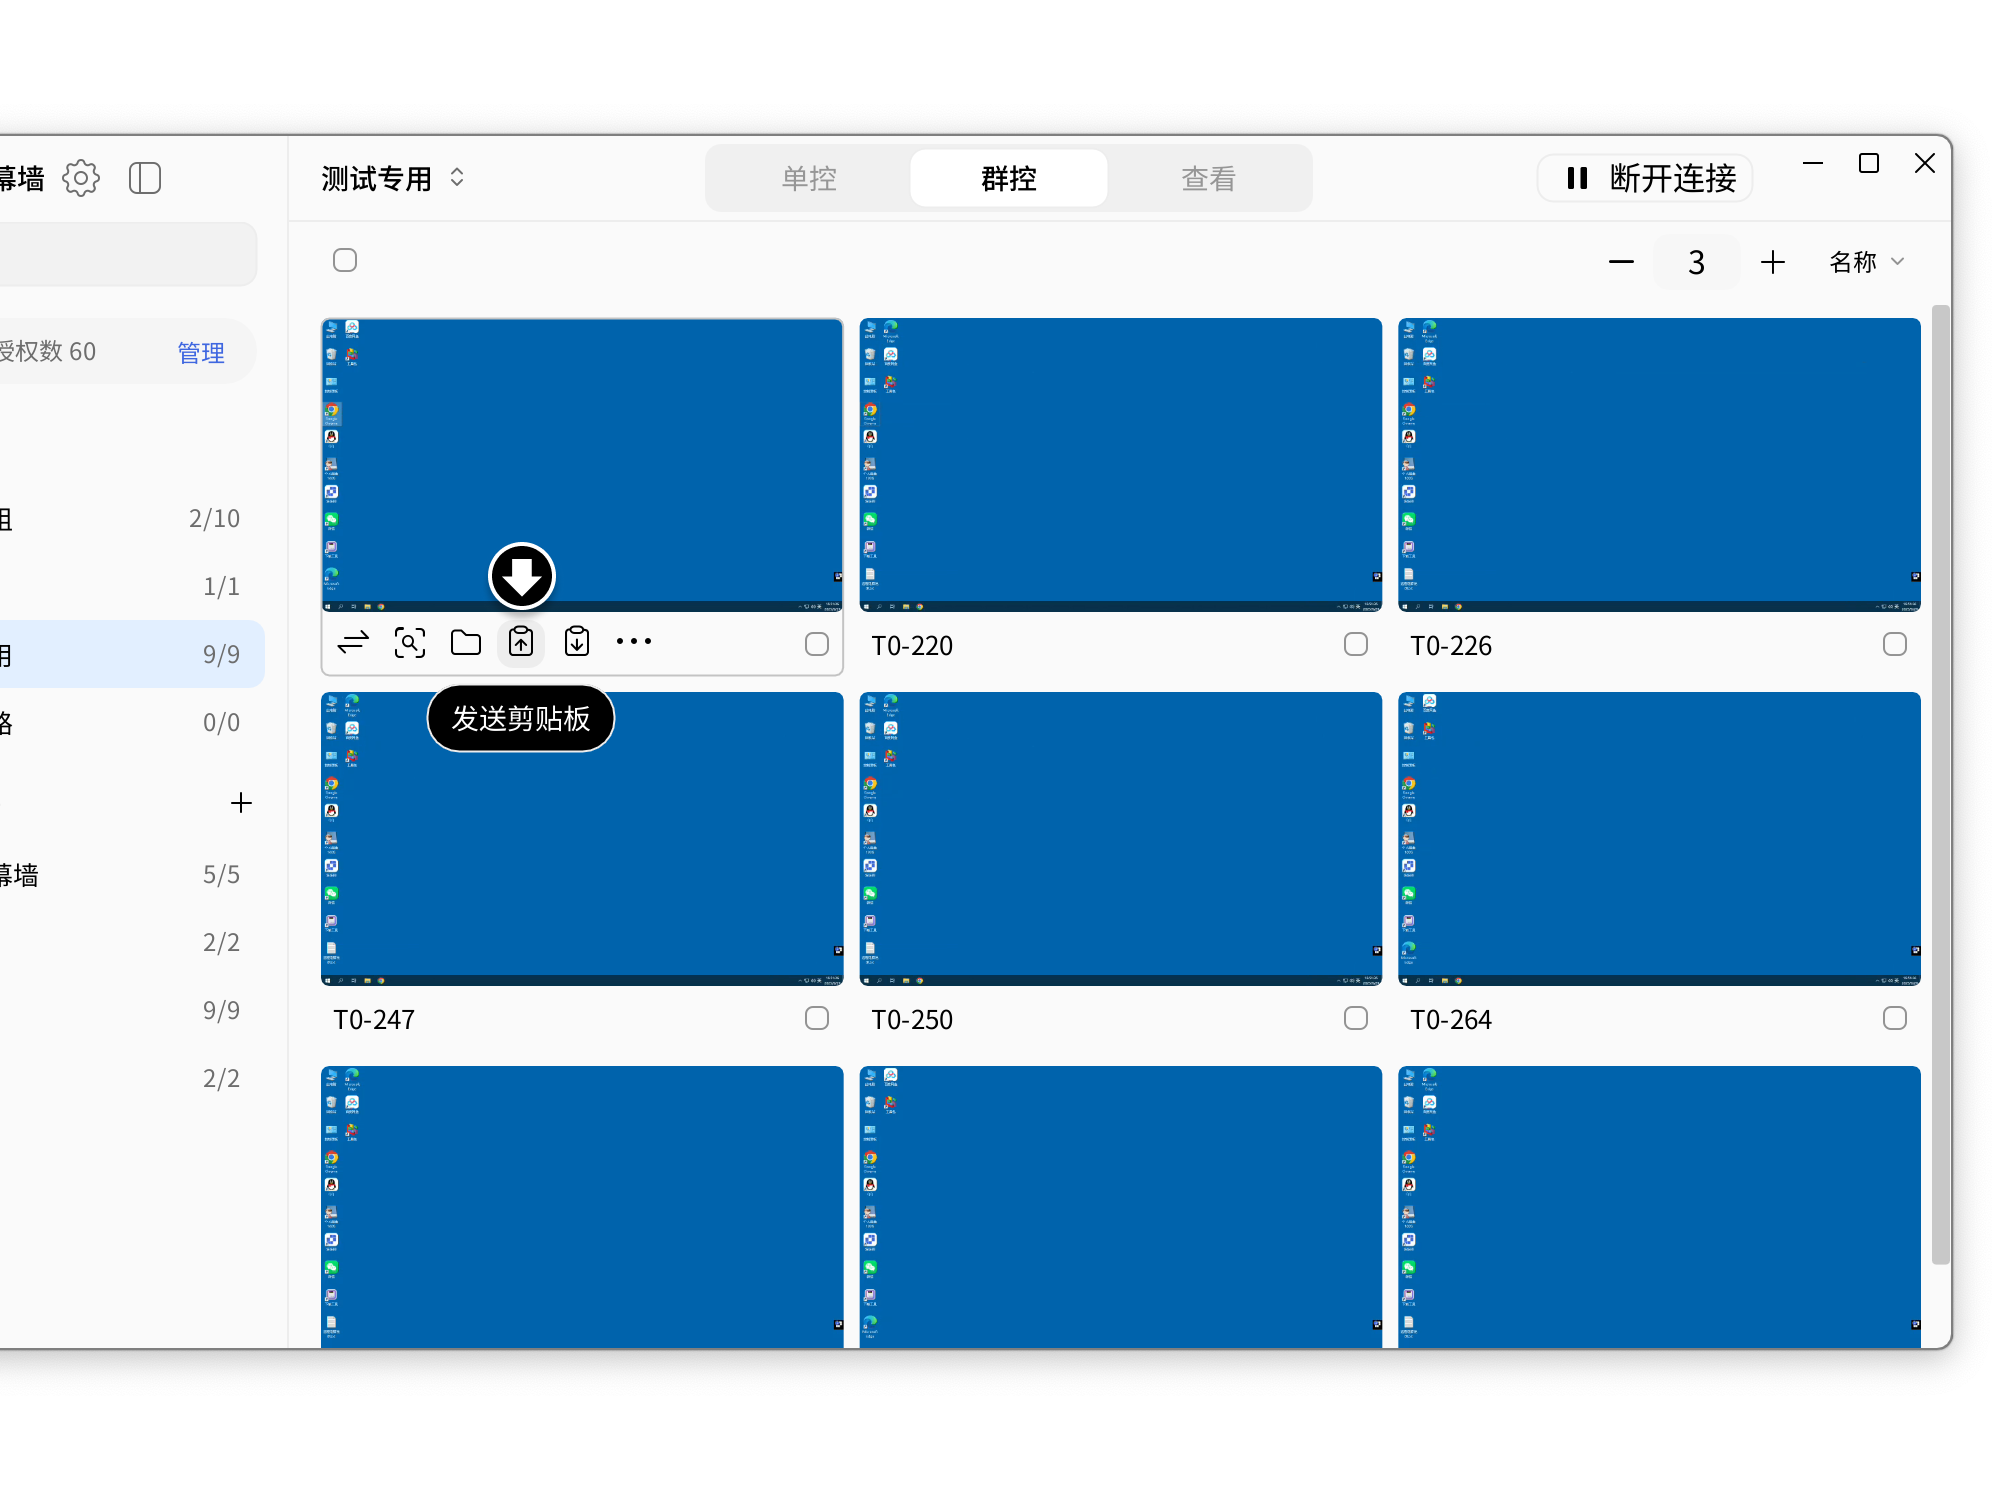
Send Clipboard
Send Clipboard can paste local text to the device.
- Select local text and use the shortcut Ctrl + C, or right-click and select Copy;
- Click Send Clipboard below the target device;
- At the location where you need to paste on the target device, use the shortcut Ctrl + V, or right-click and select Paste.
Get Clipboard
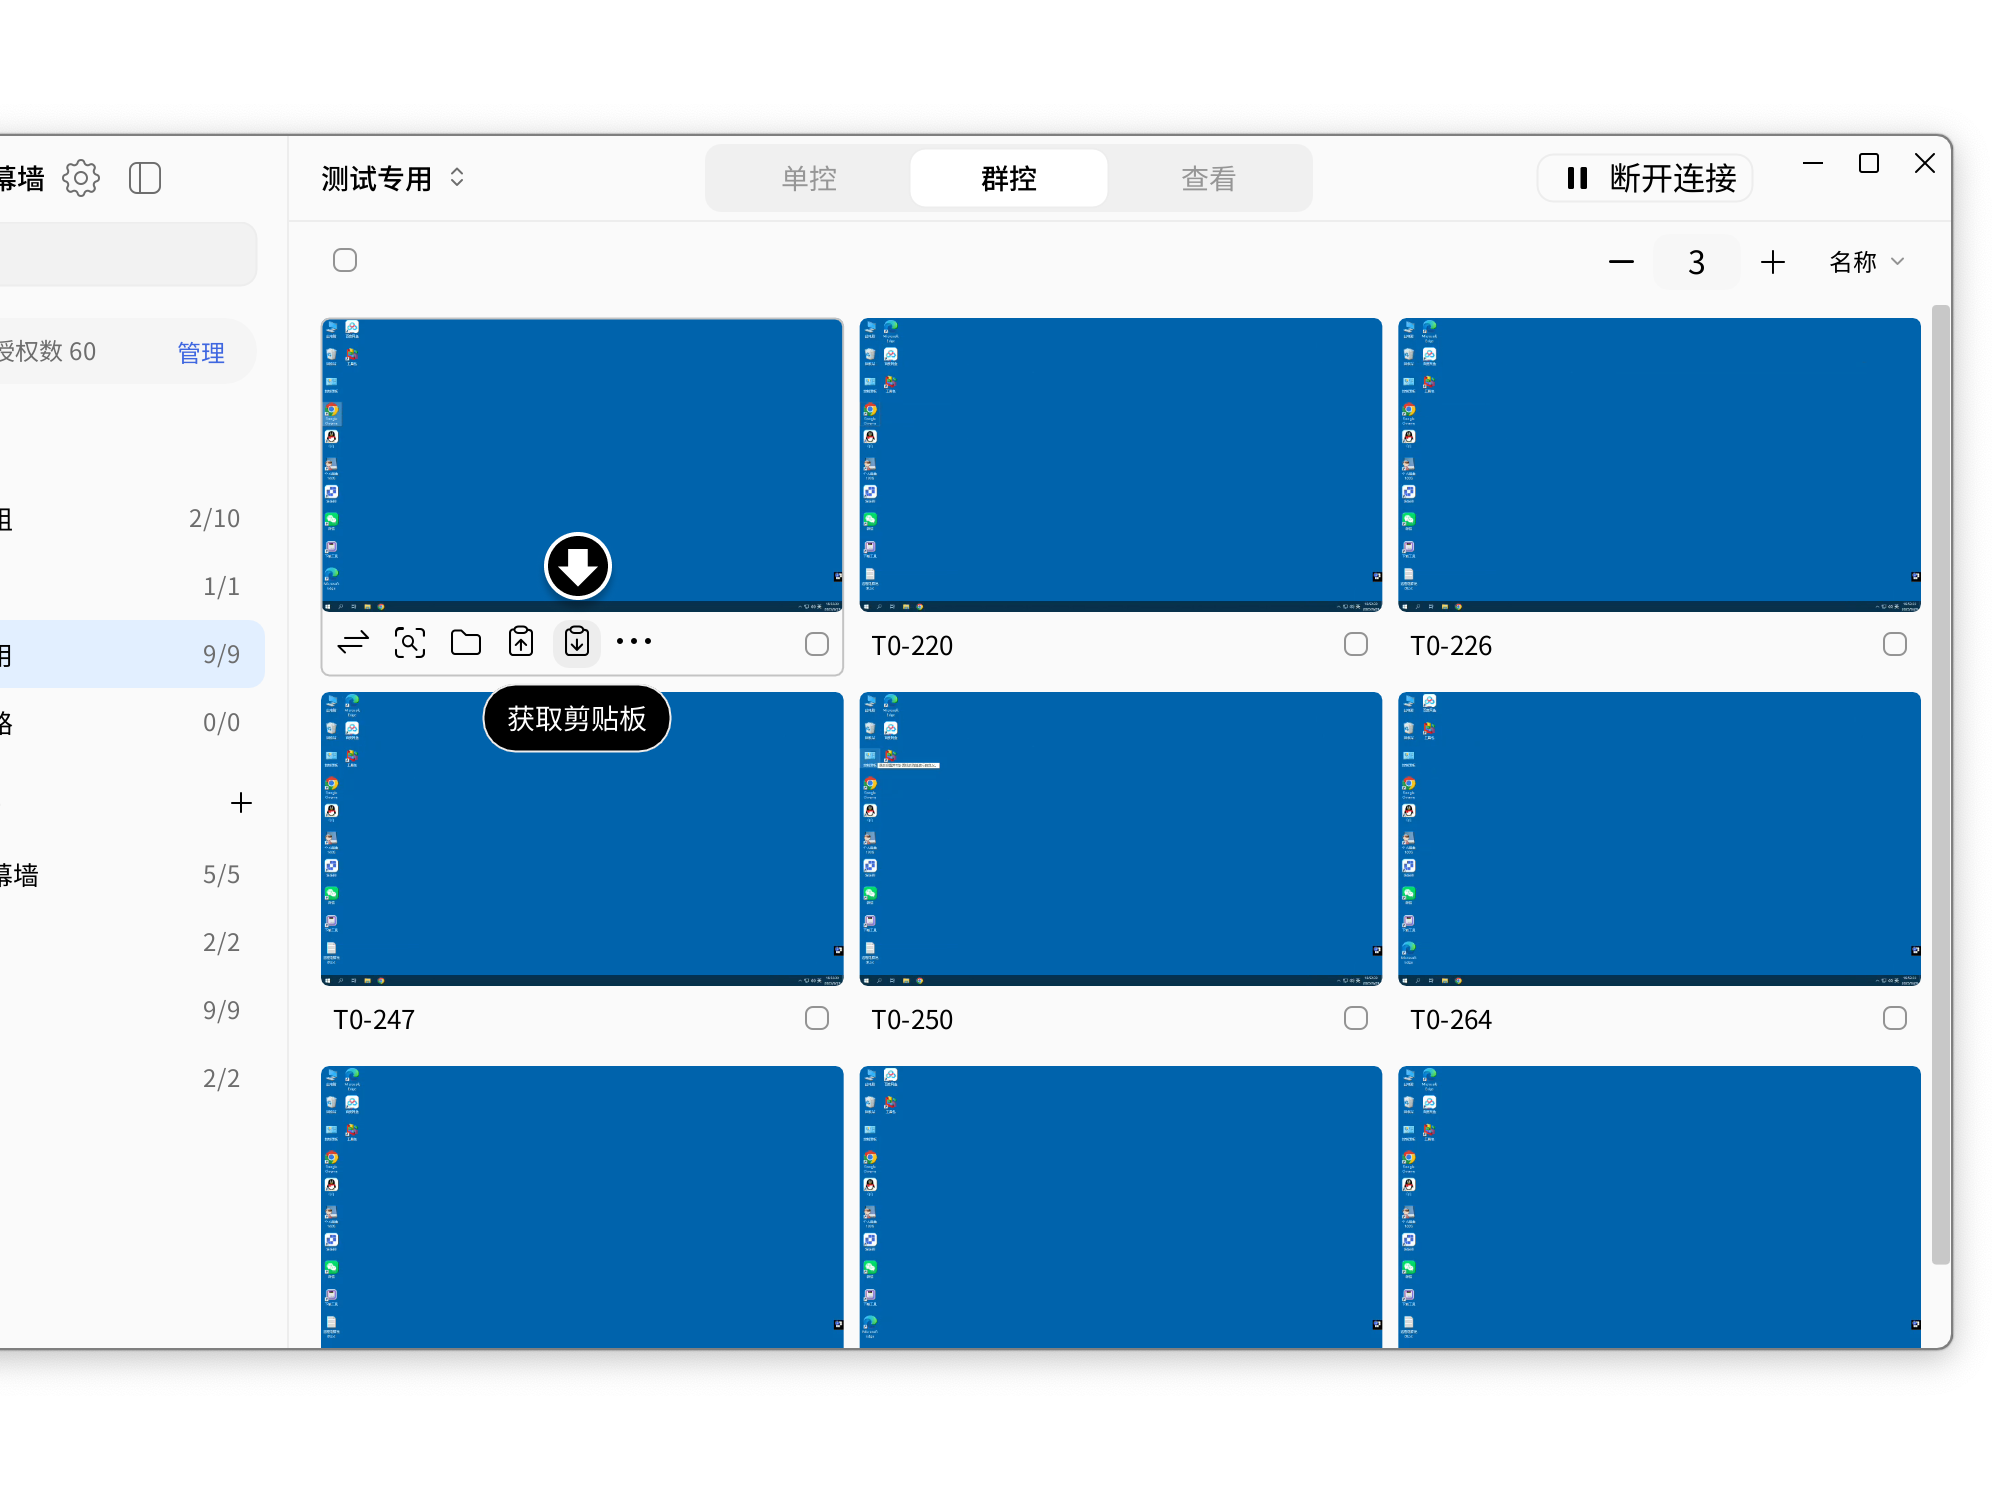
Get Clipboard can copy text from the target device and paste it to the local device.
- Select text on the target device and use the shortcut Ctrl + C, or right-click and select Copy;
- Click Get Clipboard below the target device;
- At the location where you need to paste on the local device, use the shortcut Ctrl + V, or right-click and select Paste.
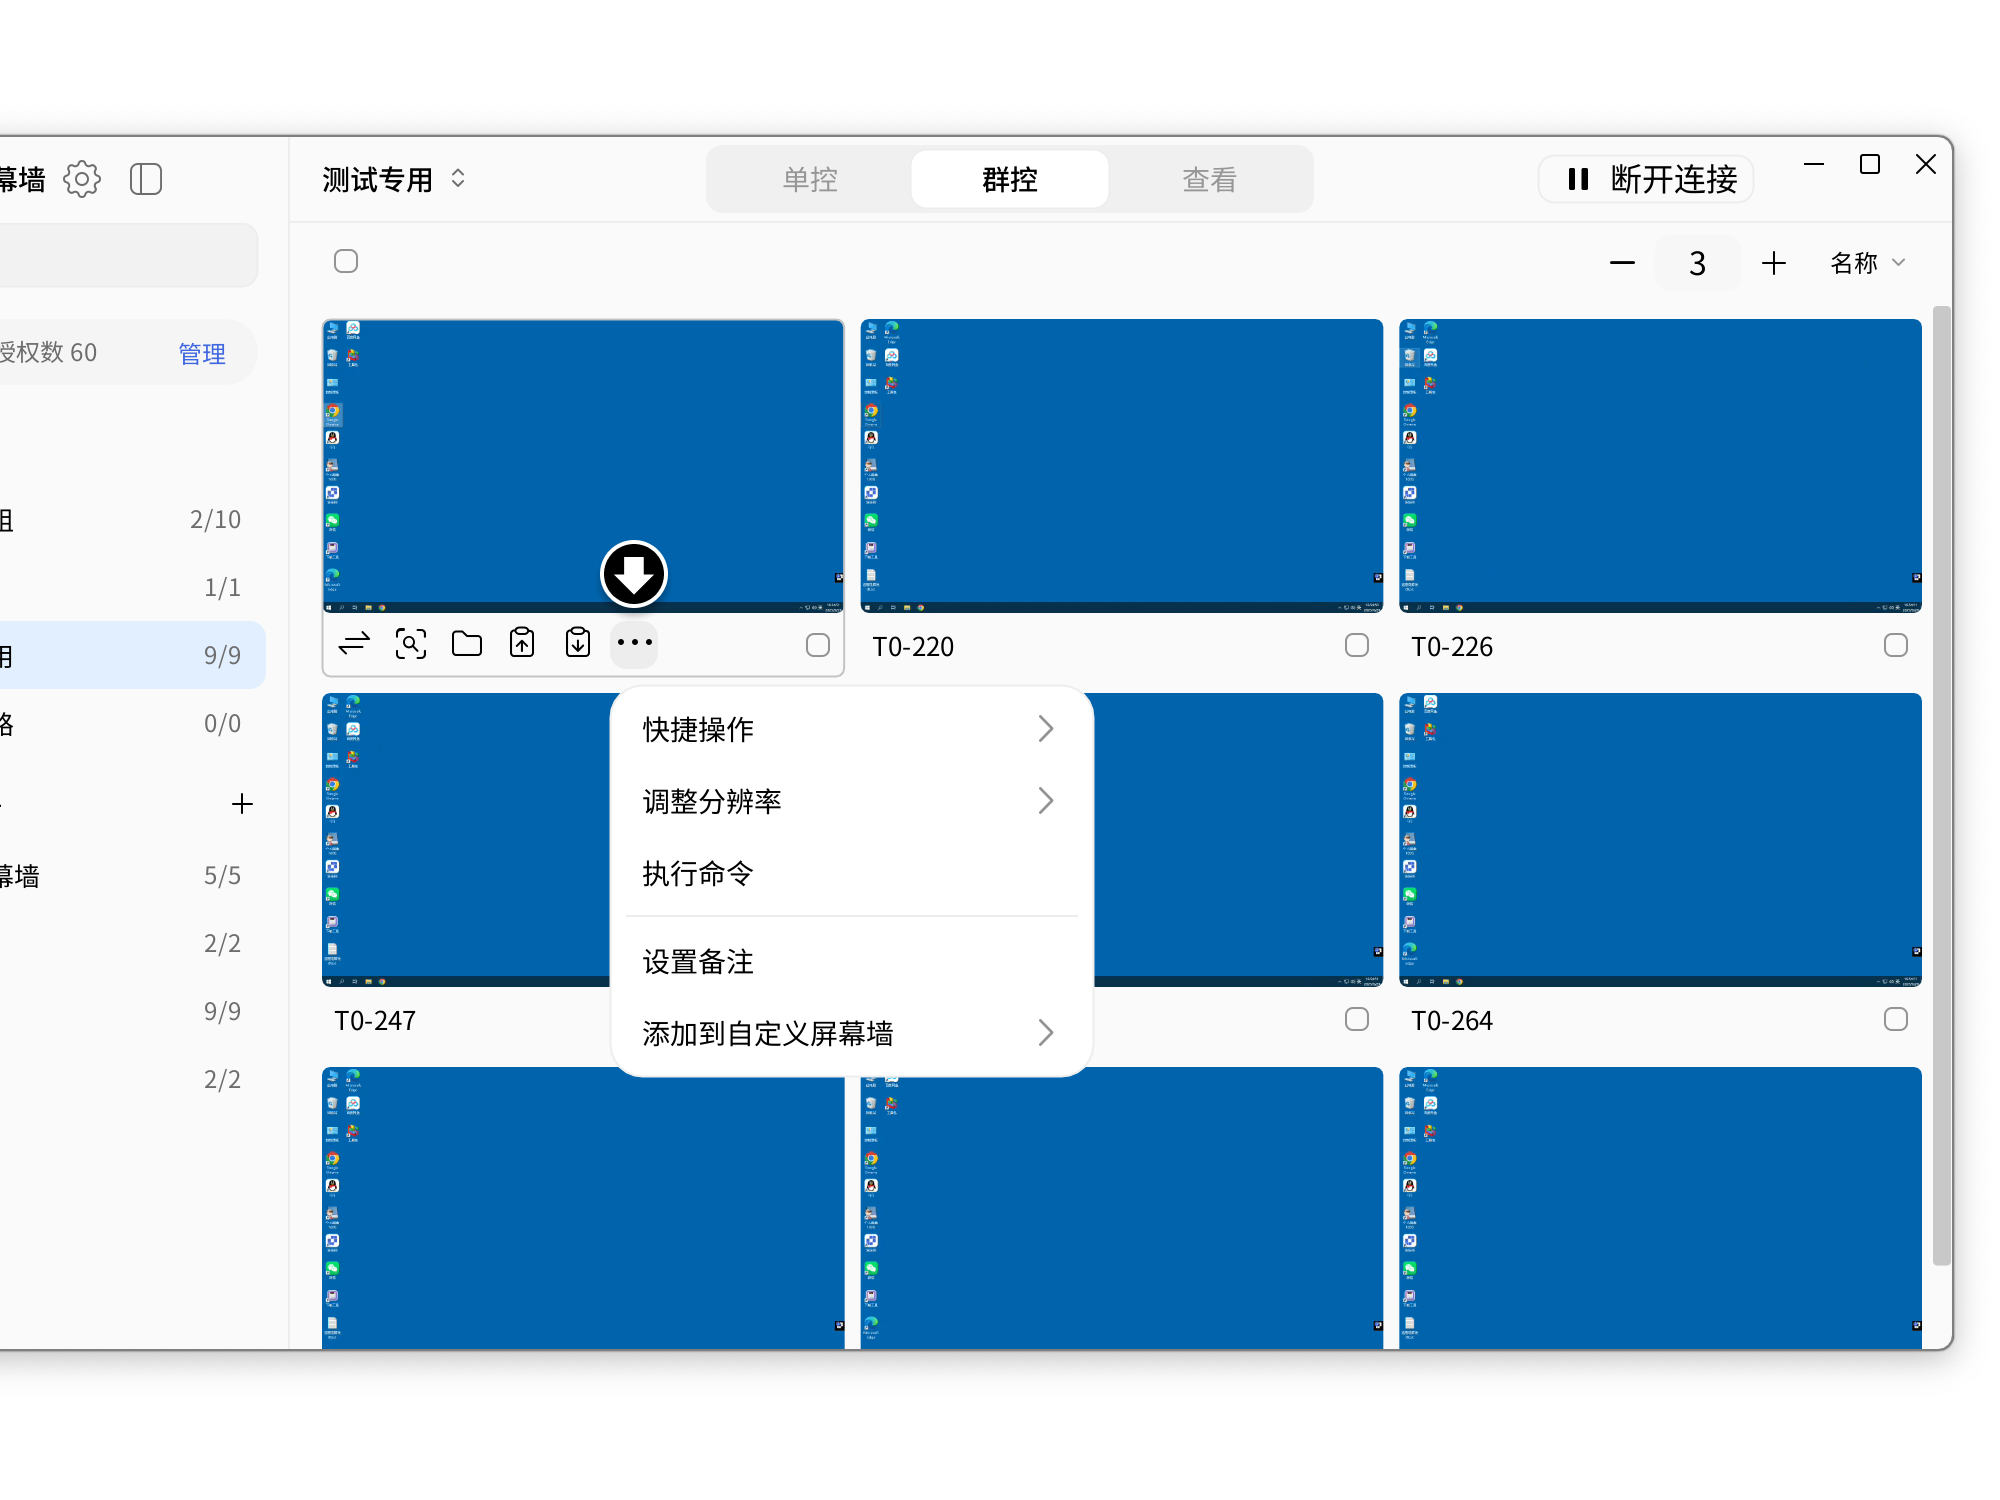
More
More common operations can be performed in More, such as shortcut operations, adjusting resolution, and Execute Command.
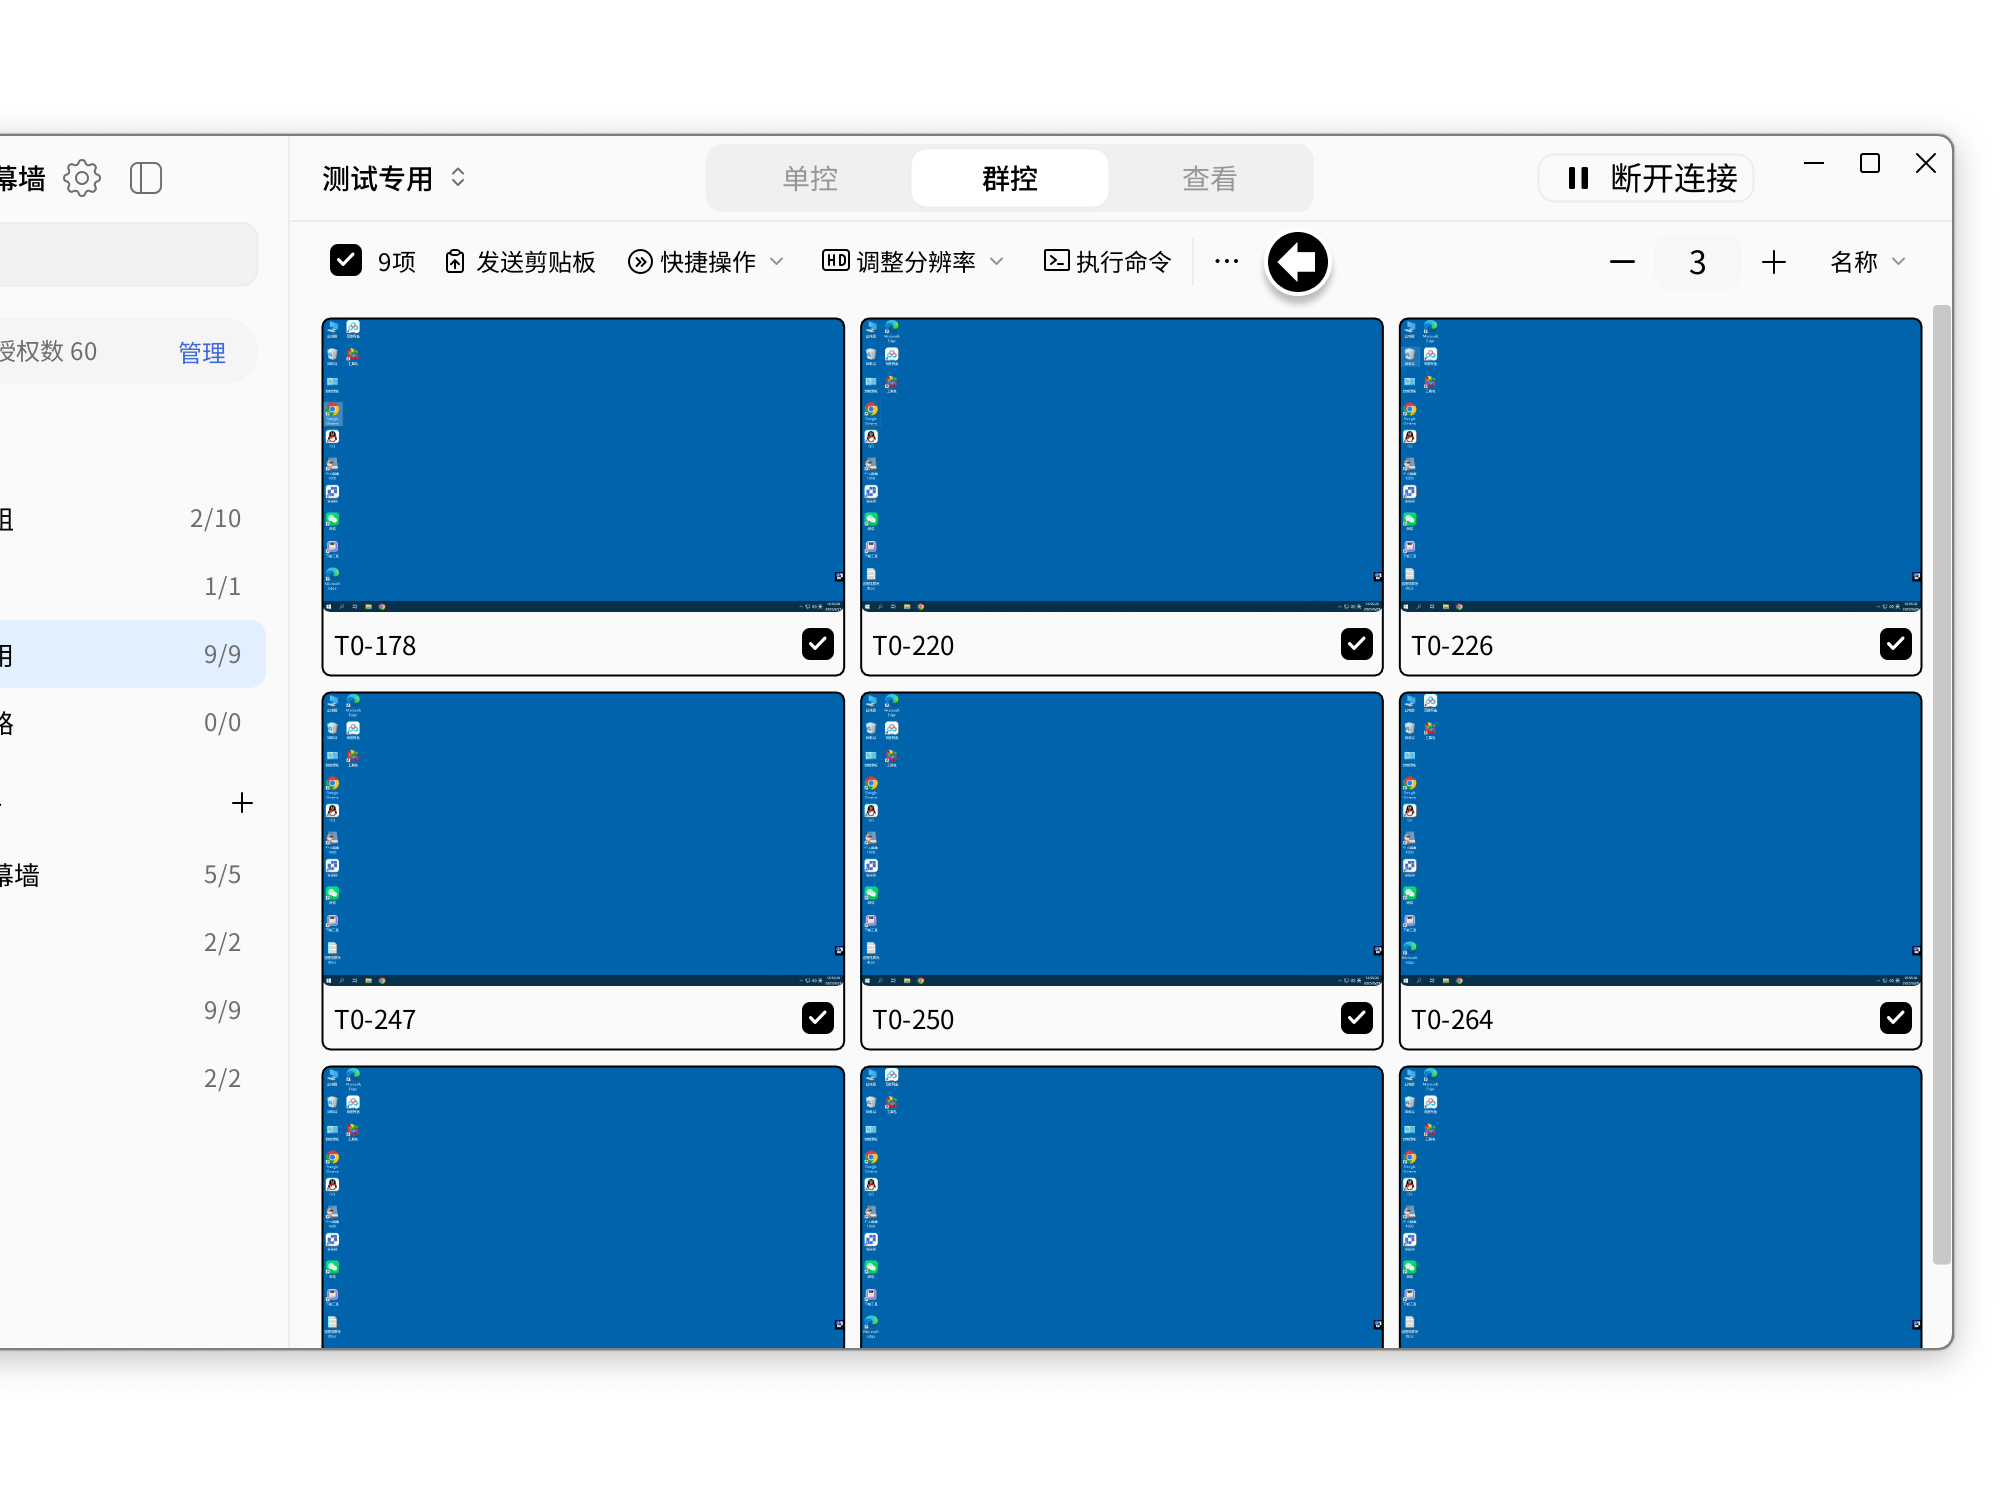
Group Control Mode
Group Control mode is used to control multiple devices at the same time and perform batch tasks across multiple devices.
Screen Synchronized Operations
- When operating a device, you can directly select that device;
- For selected target devices, performing an operation on any one of them synchronizes the operation to all selected devices;
- You can clear the selection at any time to stop controlling a device.
Batch Task Execution
Through the task bar above, you can perform tasks in bulk: Send Clipboard, shortcut operations, adjust resolution, and Execute Command.
Select the devices to control uniformly, then click the operation to perform in the task bar above.
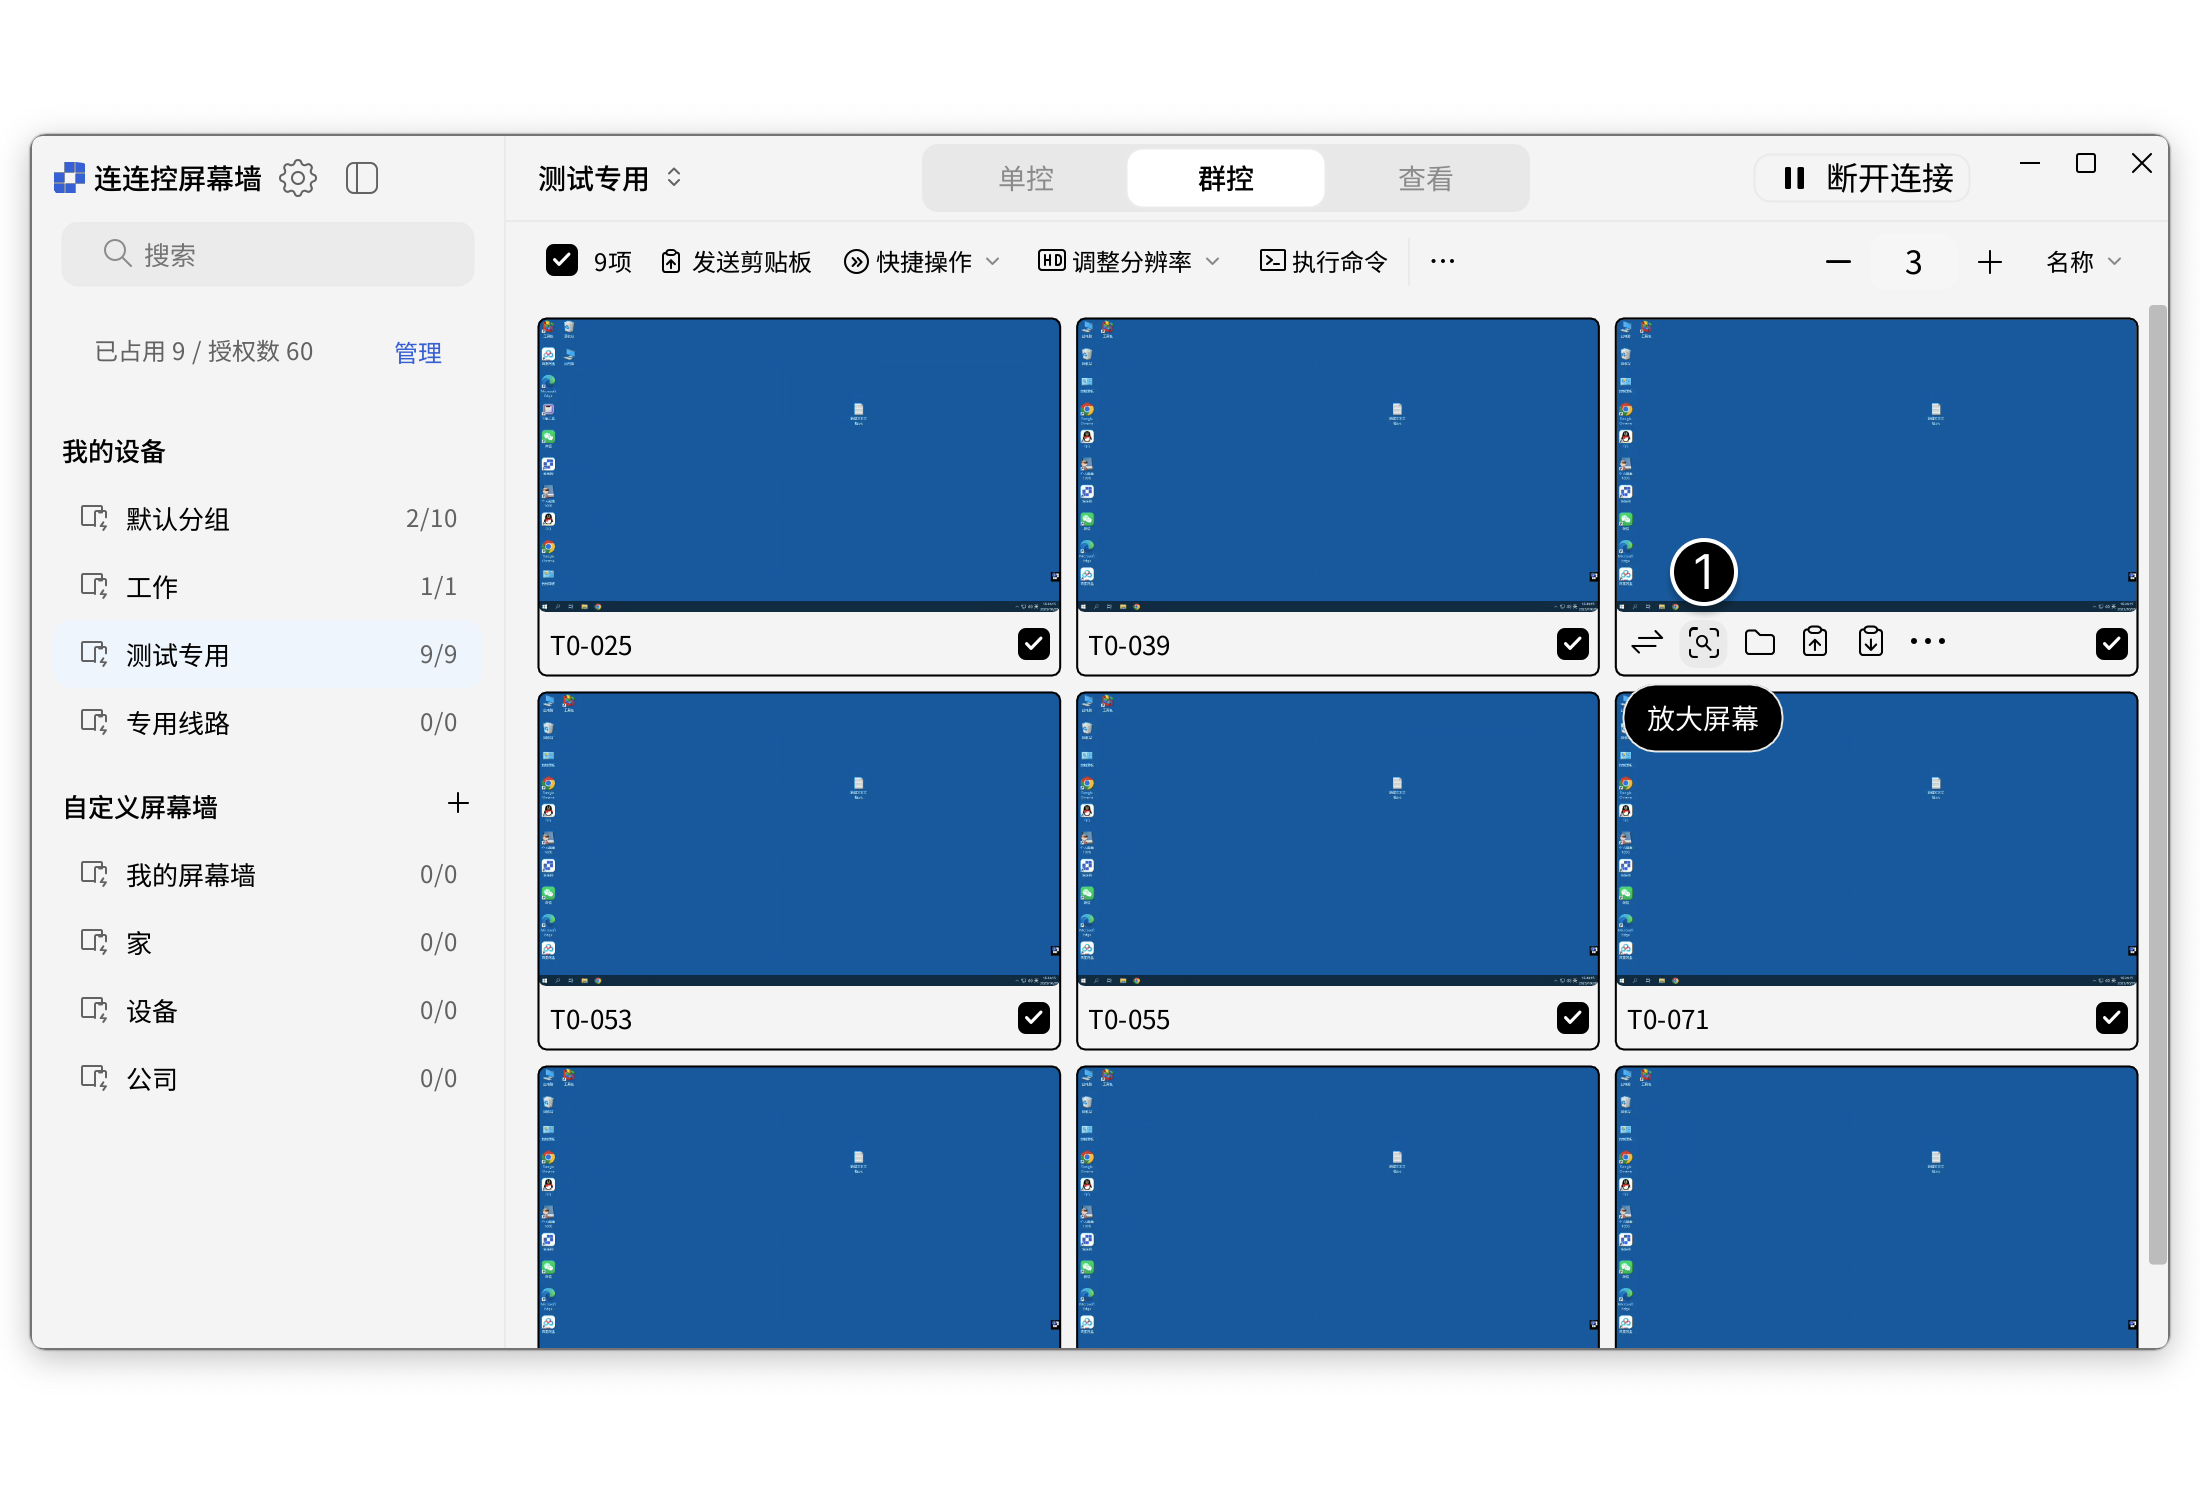
Enlarge Screen
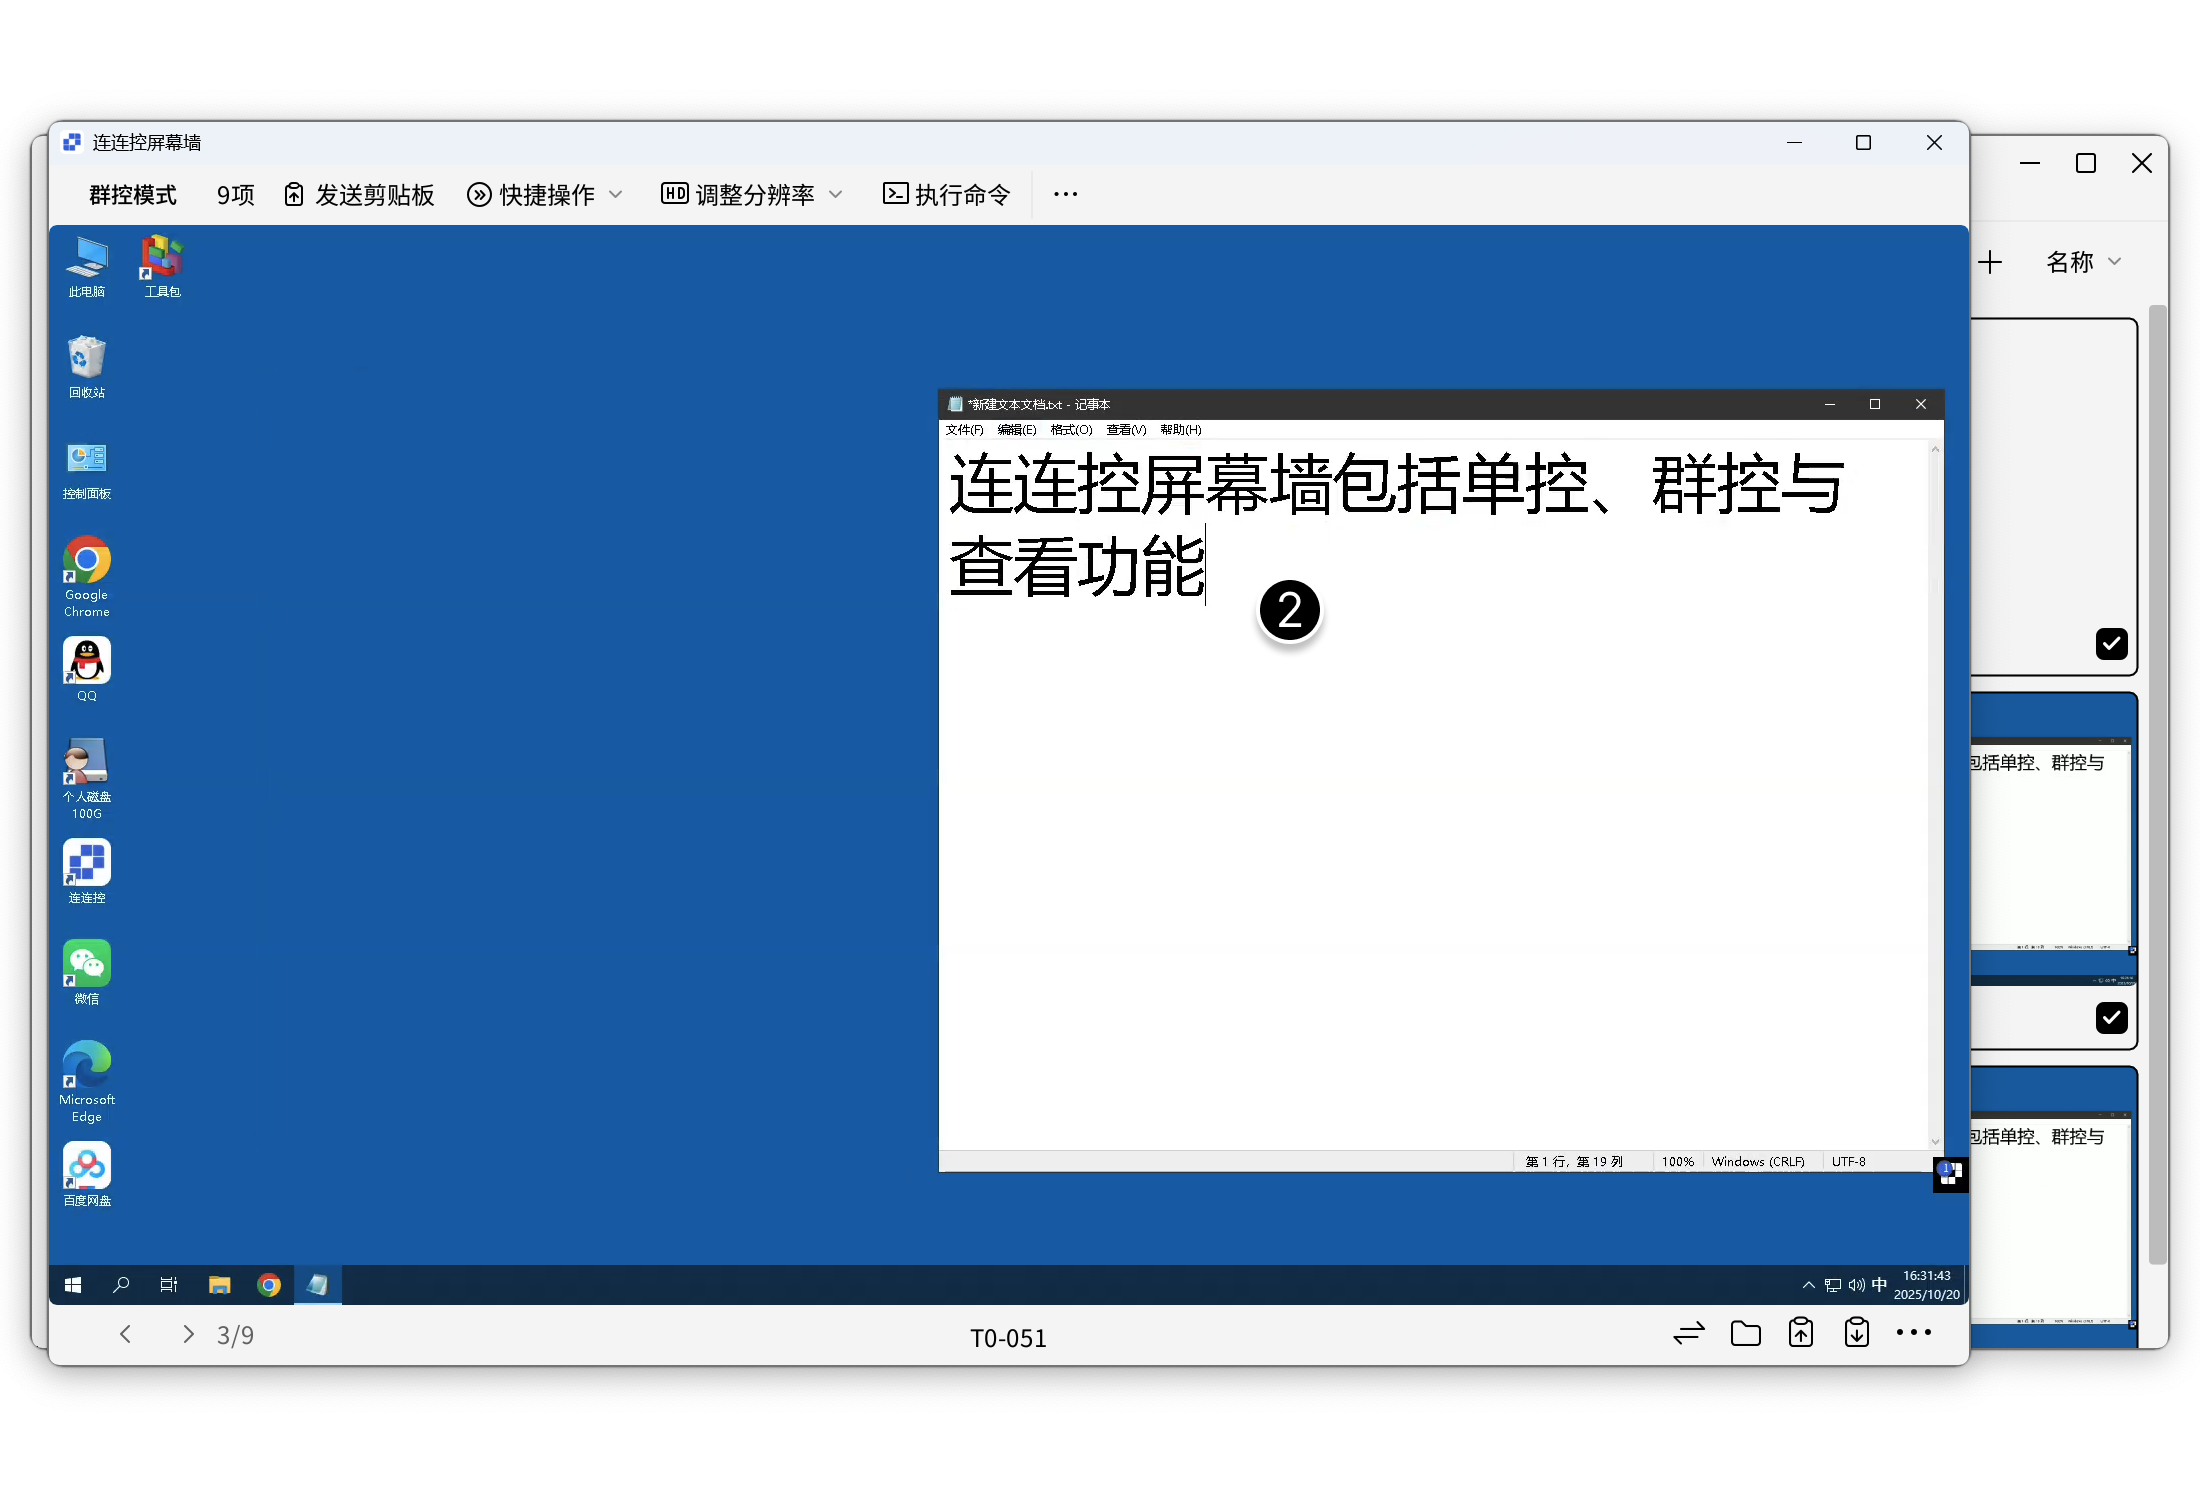
When you need to perform a unified operation on multiple devices but screen space is limited and selection is inconvenient, you can enlarge one device screen into the main view for operation. This operation is synchronized to all selected devices.
- Select the devices to control uniformly, then click the Enlarge Screen button below any selected device;
- Perform operations in the enlarged main view interface, and the operations can be synchronized to other selected devices.
Independent Operation on a Single Device
You can also perform tasks on a single device in Group Control. For details, refer to Single Control Mode.
View-Only Mode
View-Only mode supports unified browsing of all device screens in Monitor Wall, while preventing any remote operations. Enabling this mode can prevent accidental touches and avoid unnecessary interference with devices.
Enable View Mode
Click View above to enable this mode.
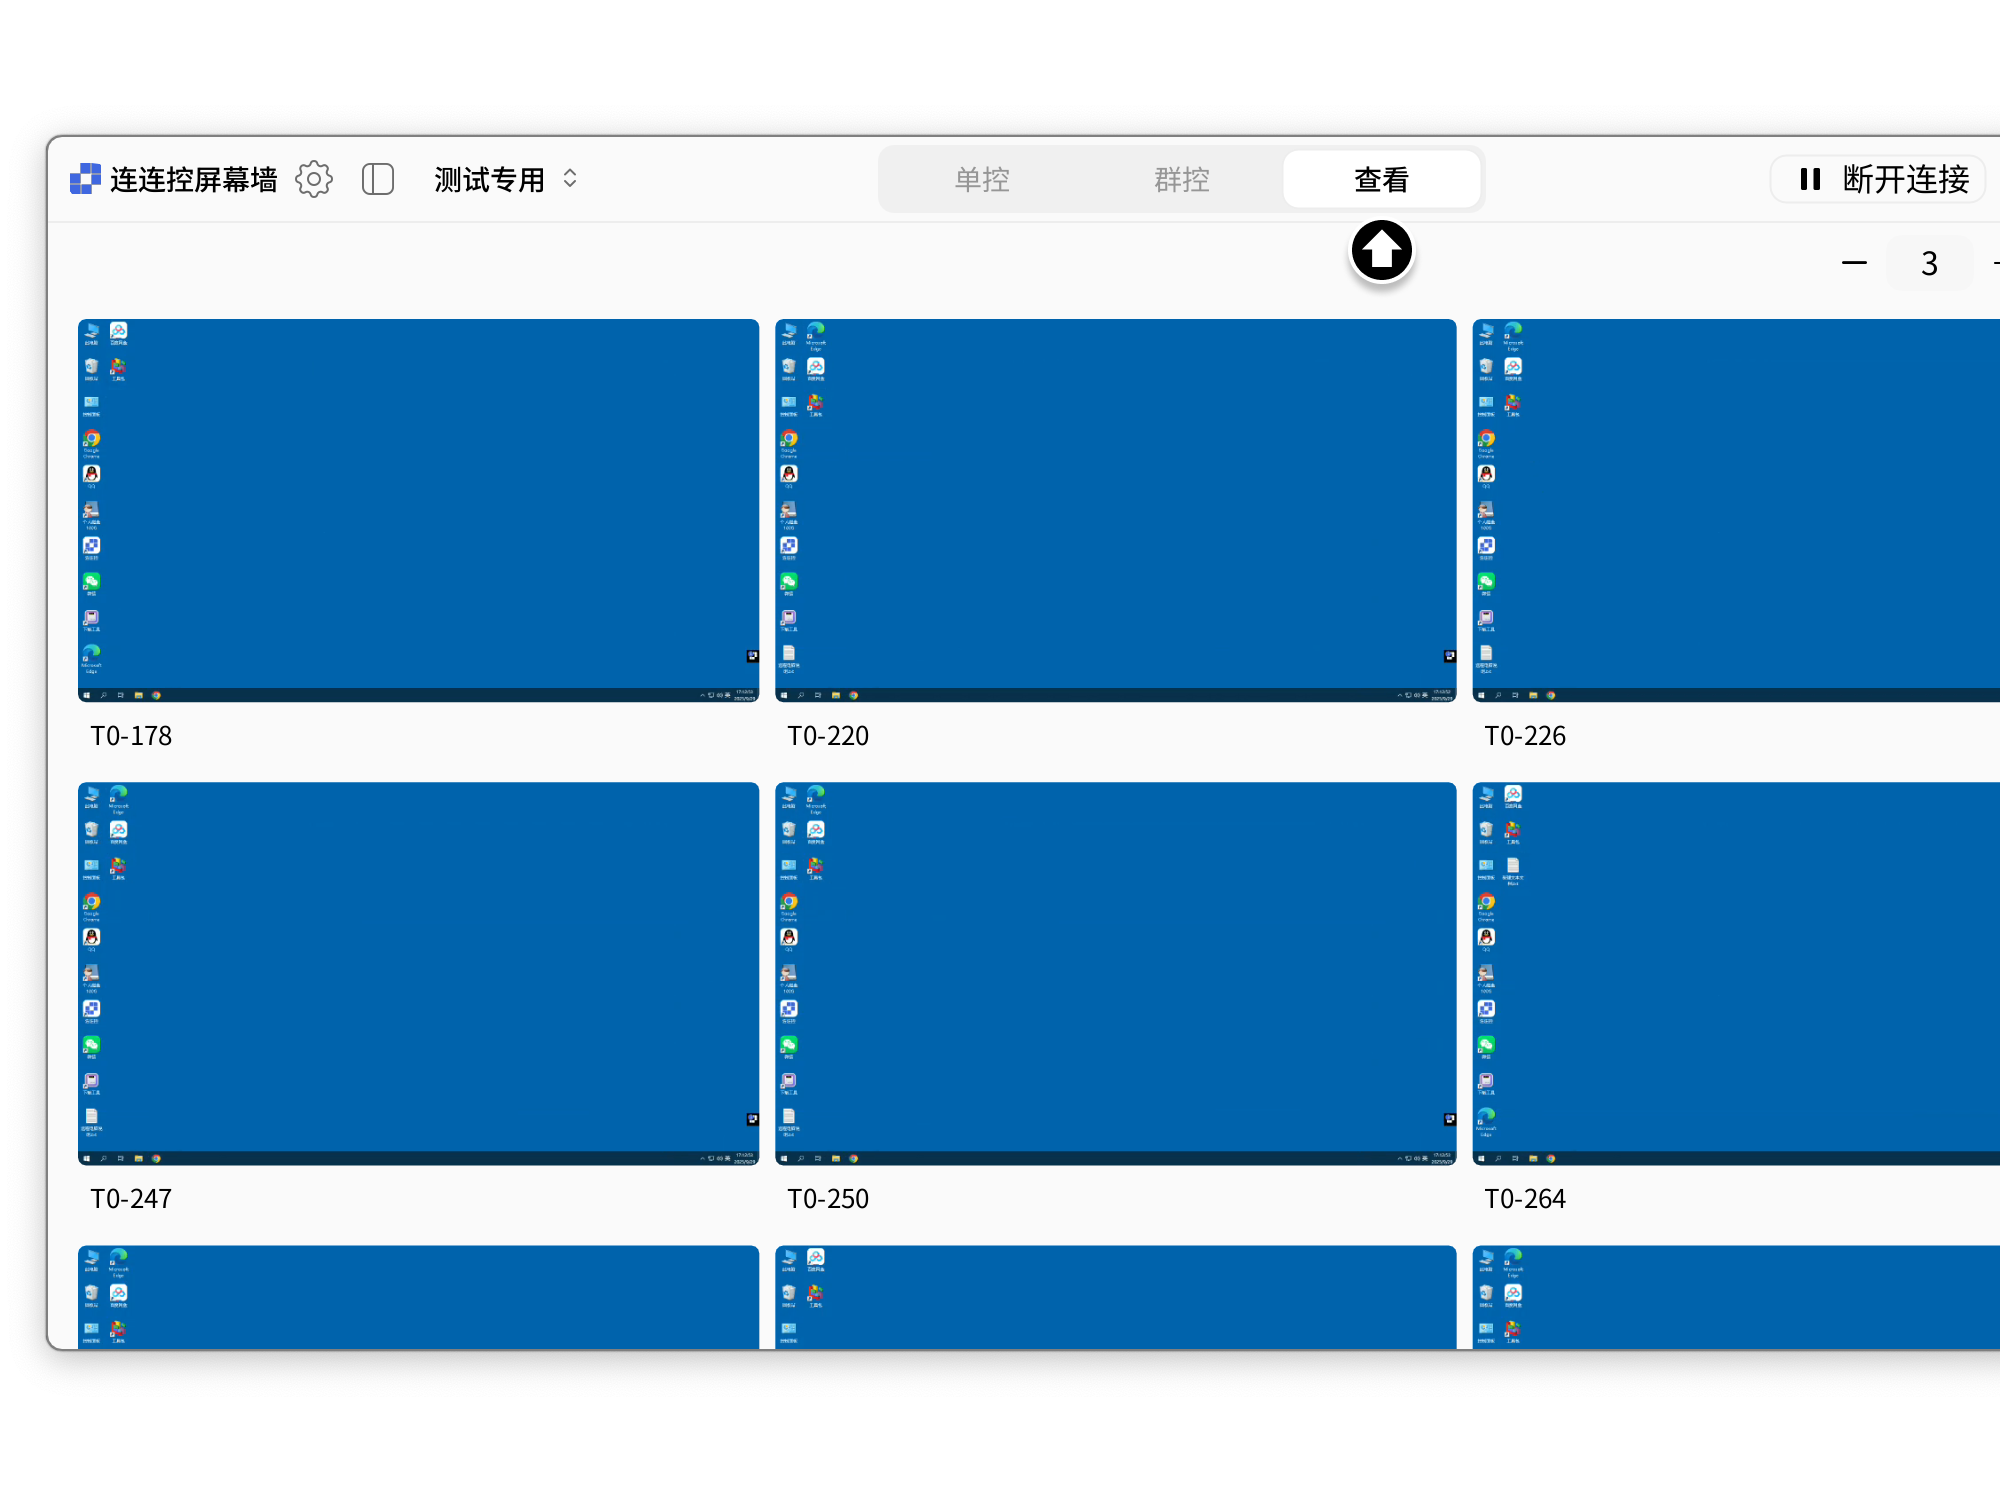
Operations Available in View-Only Mode
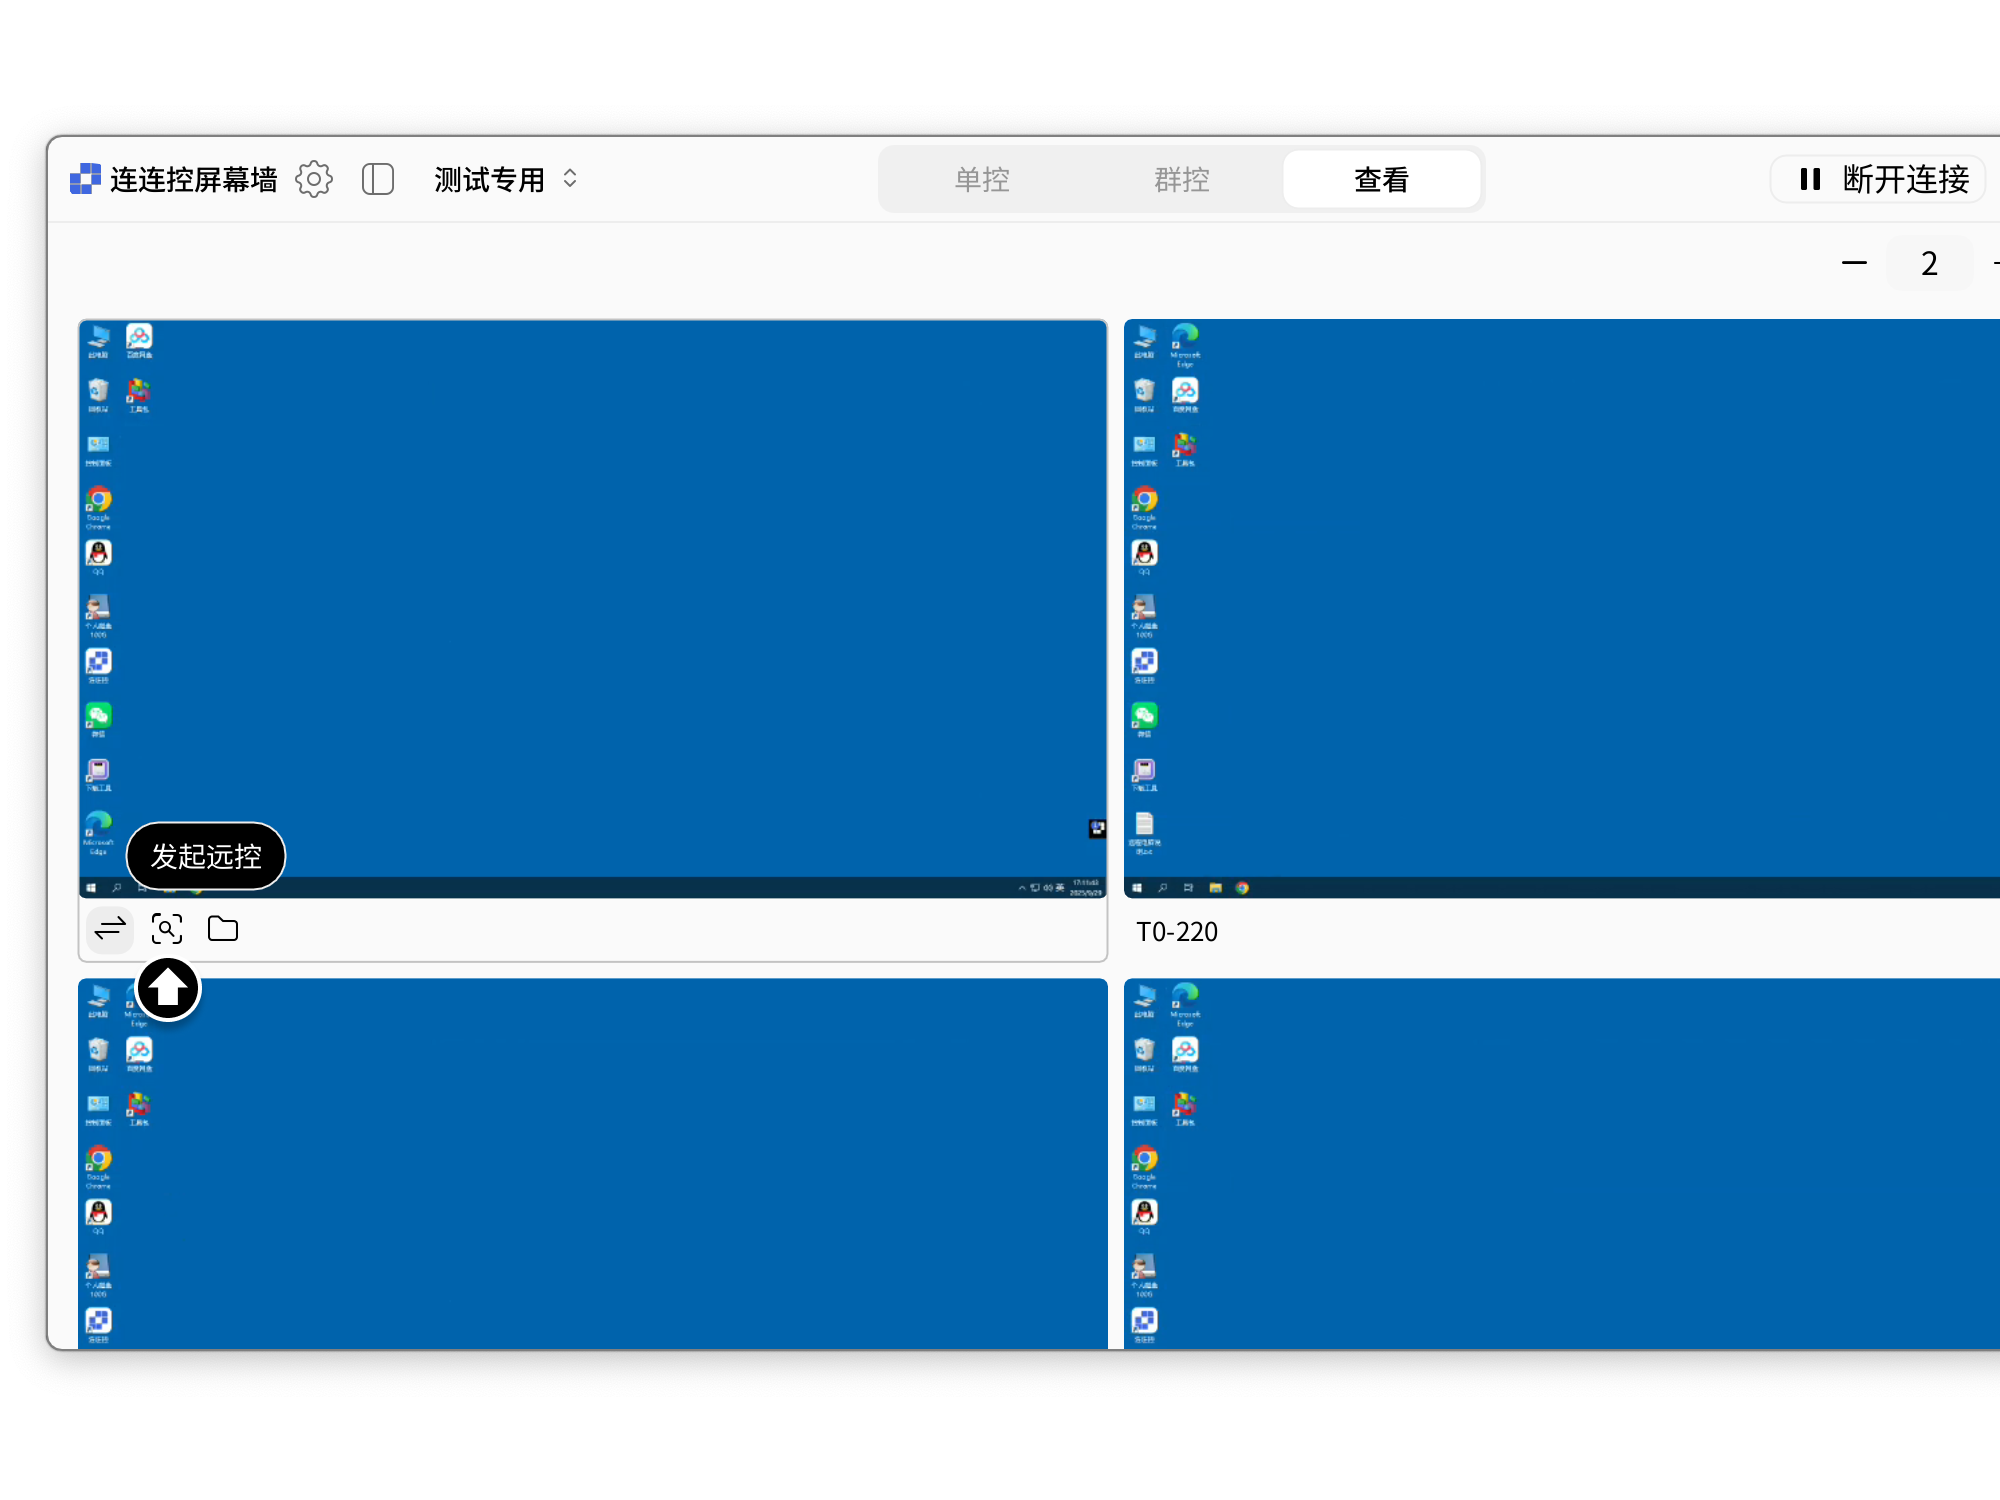
Initiate Remote Control
Click Initiate Remote Control below a device screen.
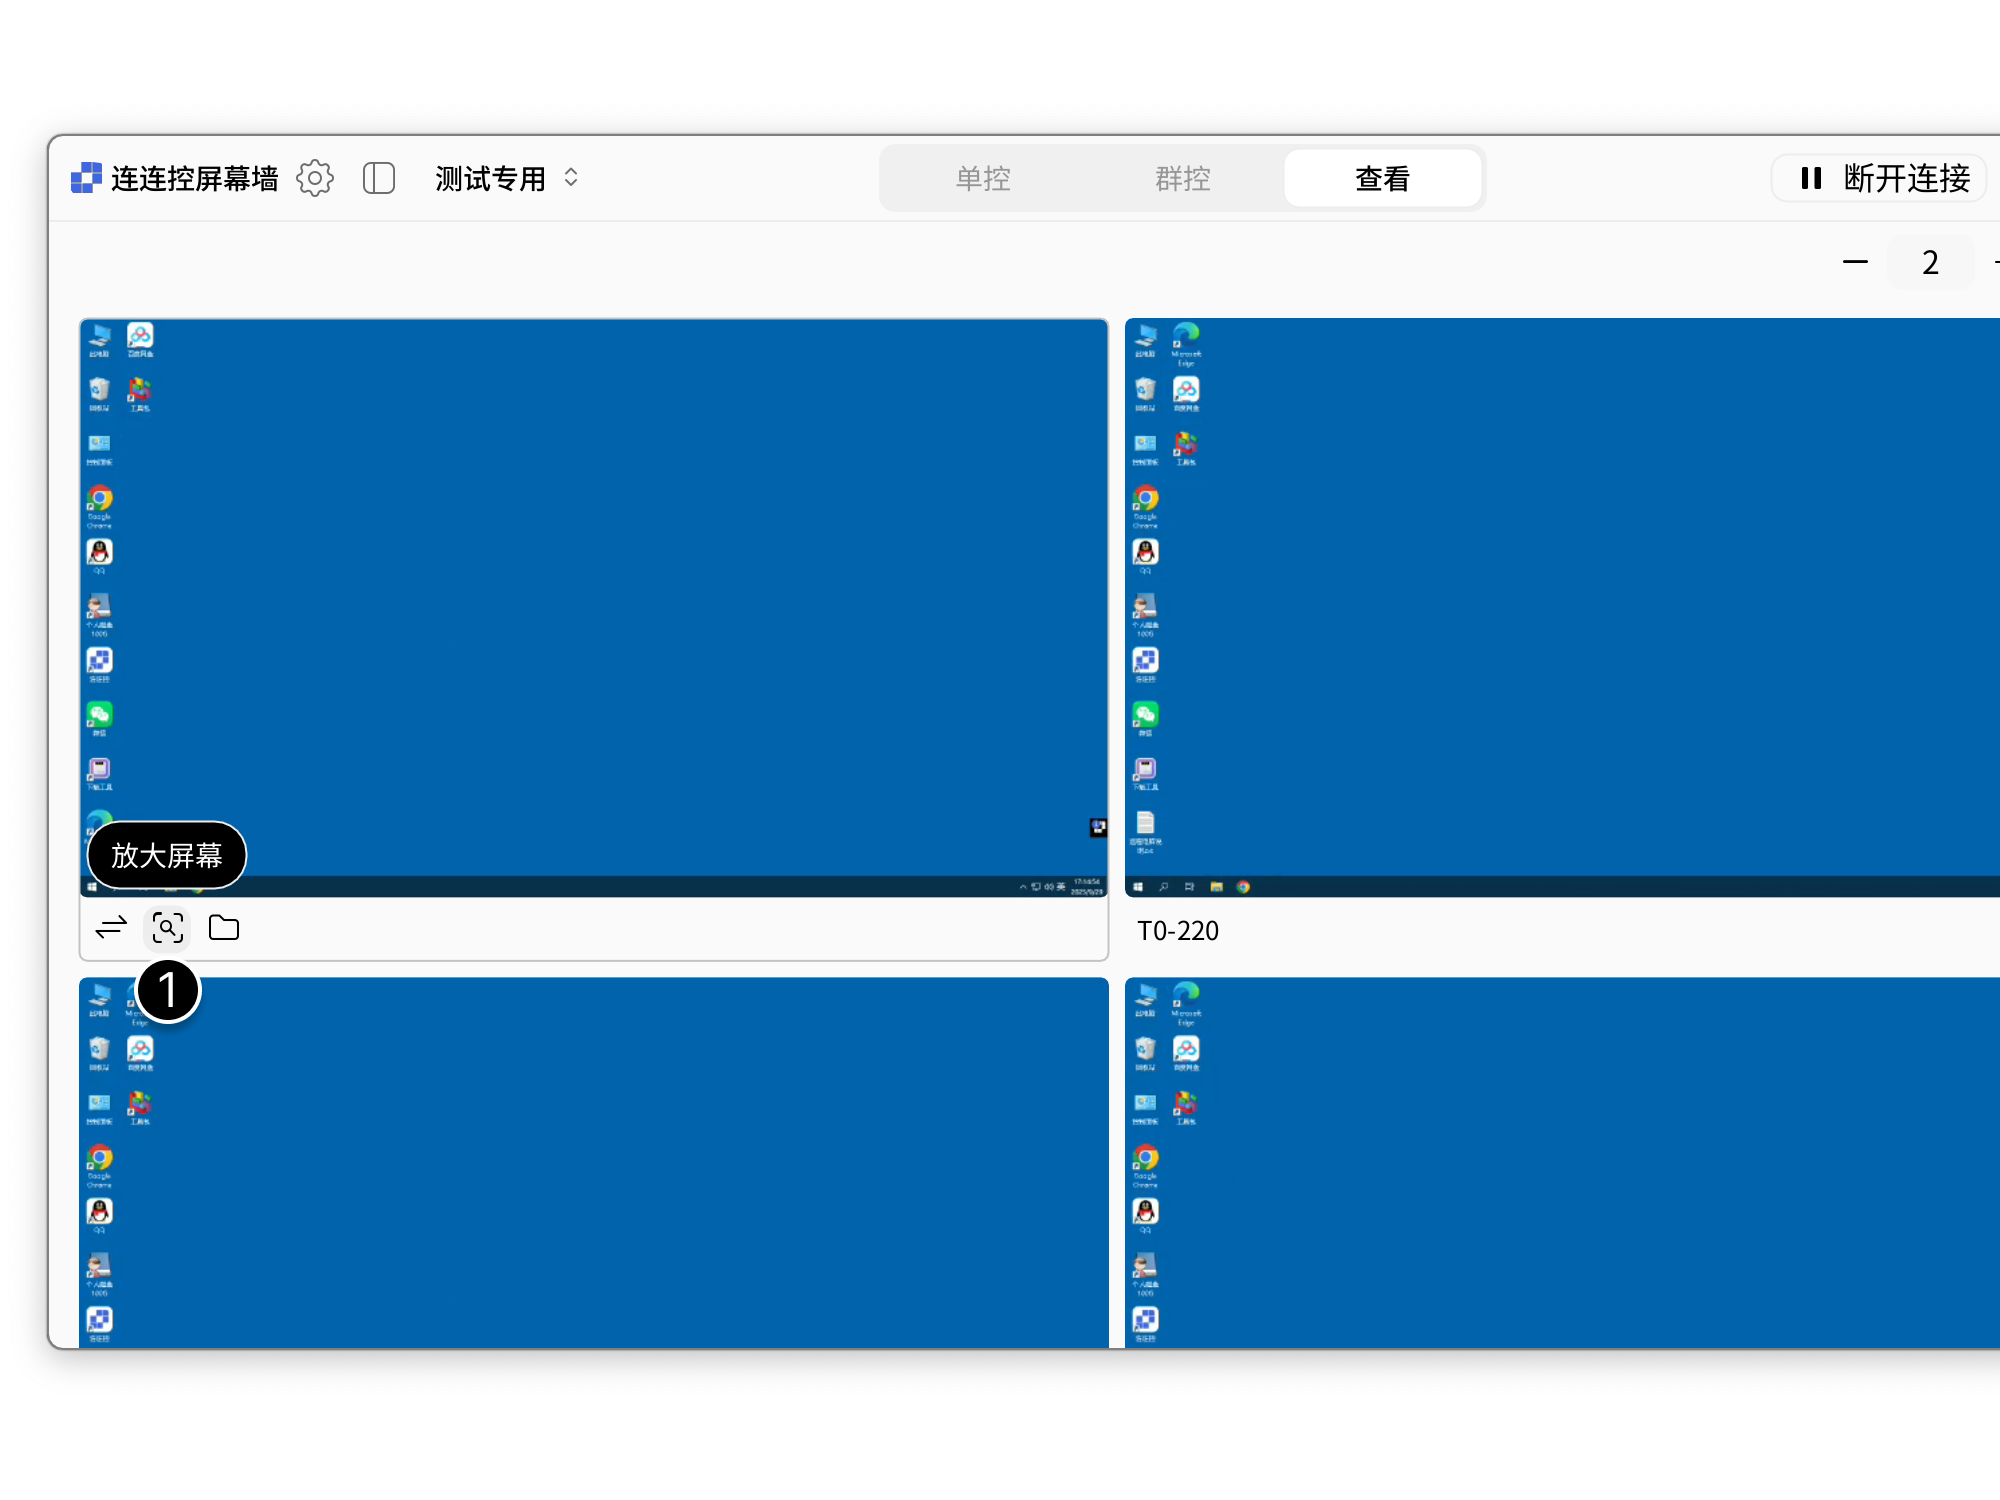
Enlarge for Inspection
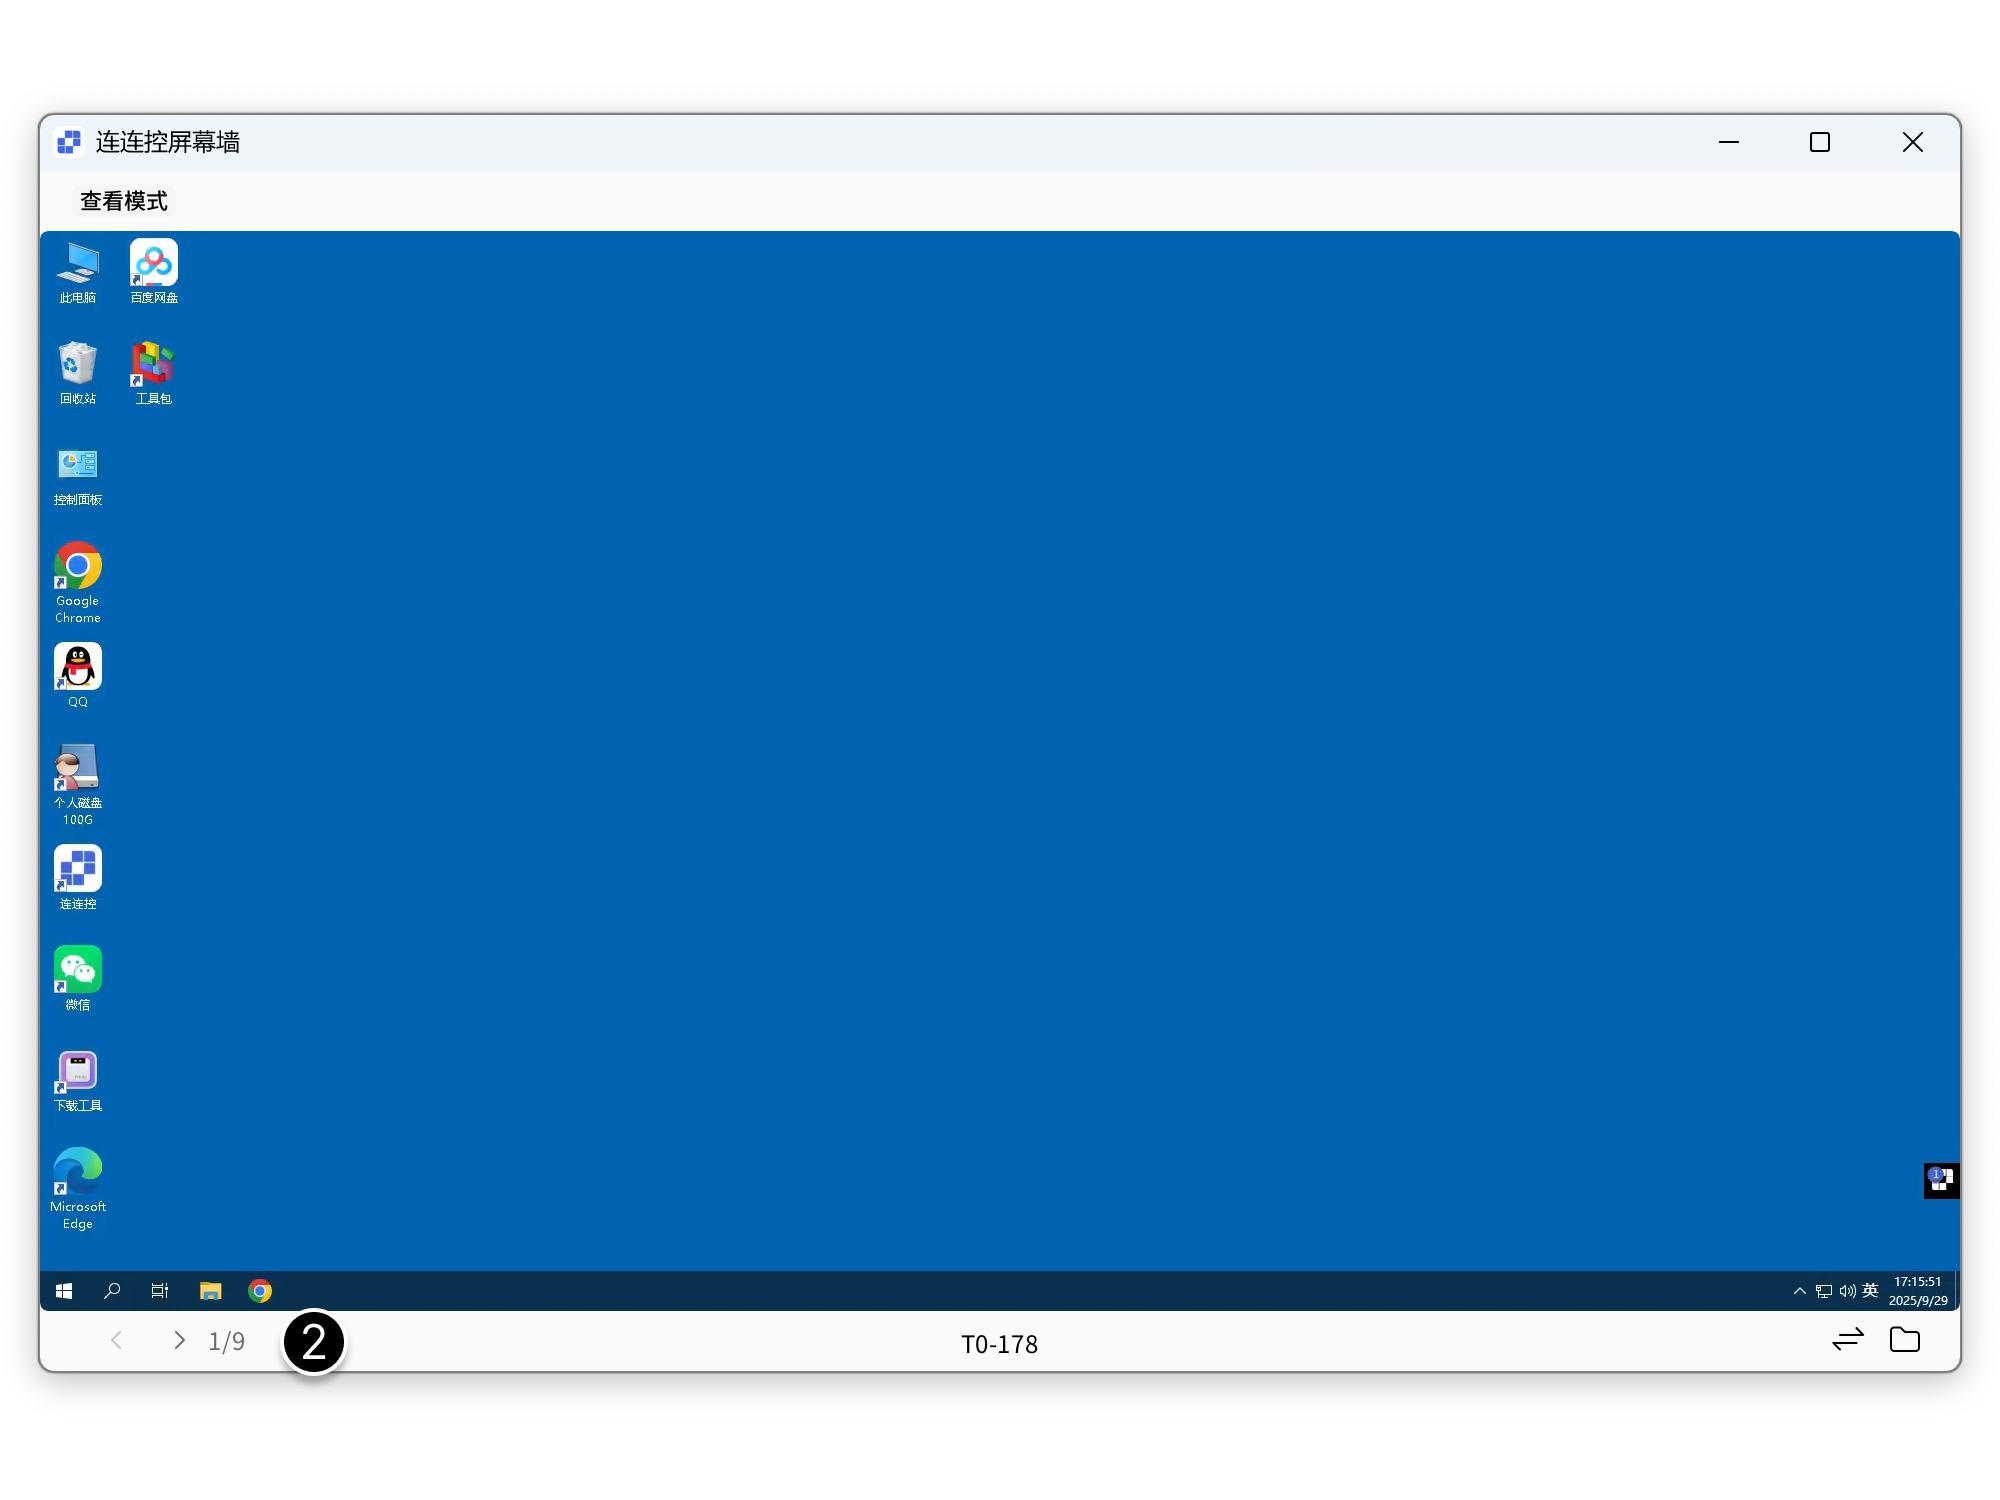
After enlarging one screen, you can switch left or right between devices for quick inspection.
- Click the Enlarge Screen button below a window to enlarge one device screen separately;
- Click the left or right arrow buttons below the enlarged window to quickly inspect each device.
File Transfer
Click the File Transfer button below the screen.
Manage Monitor Wall
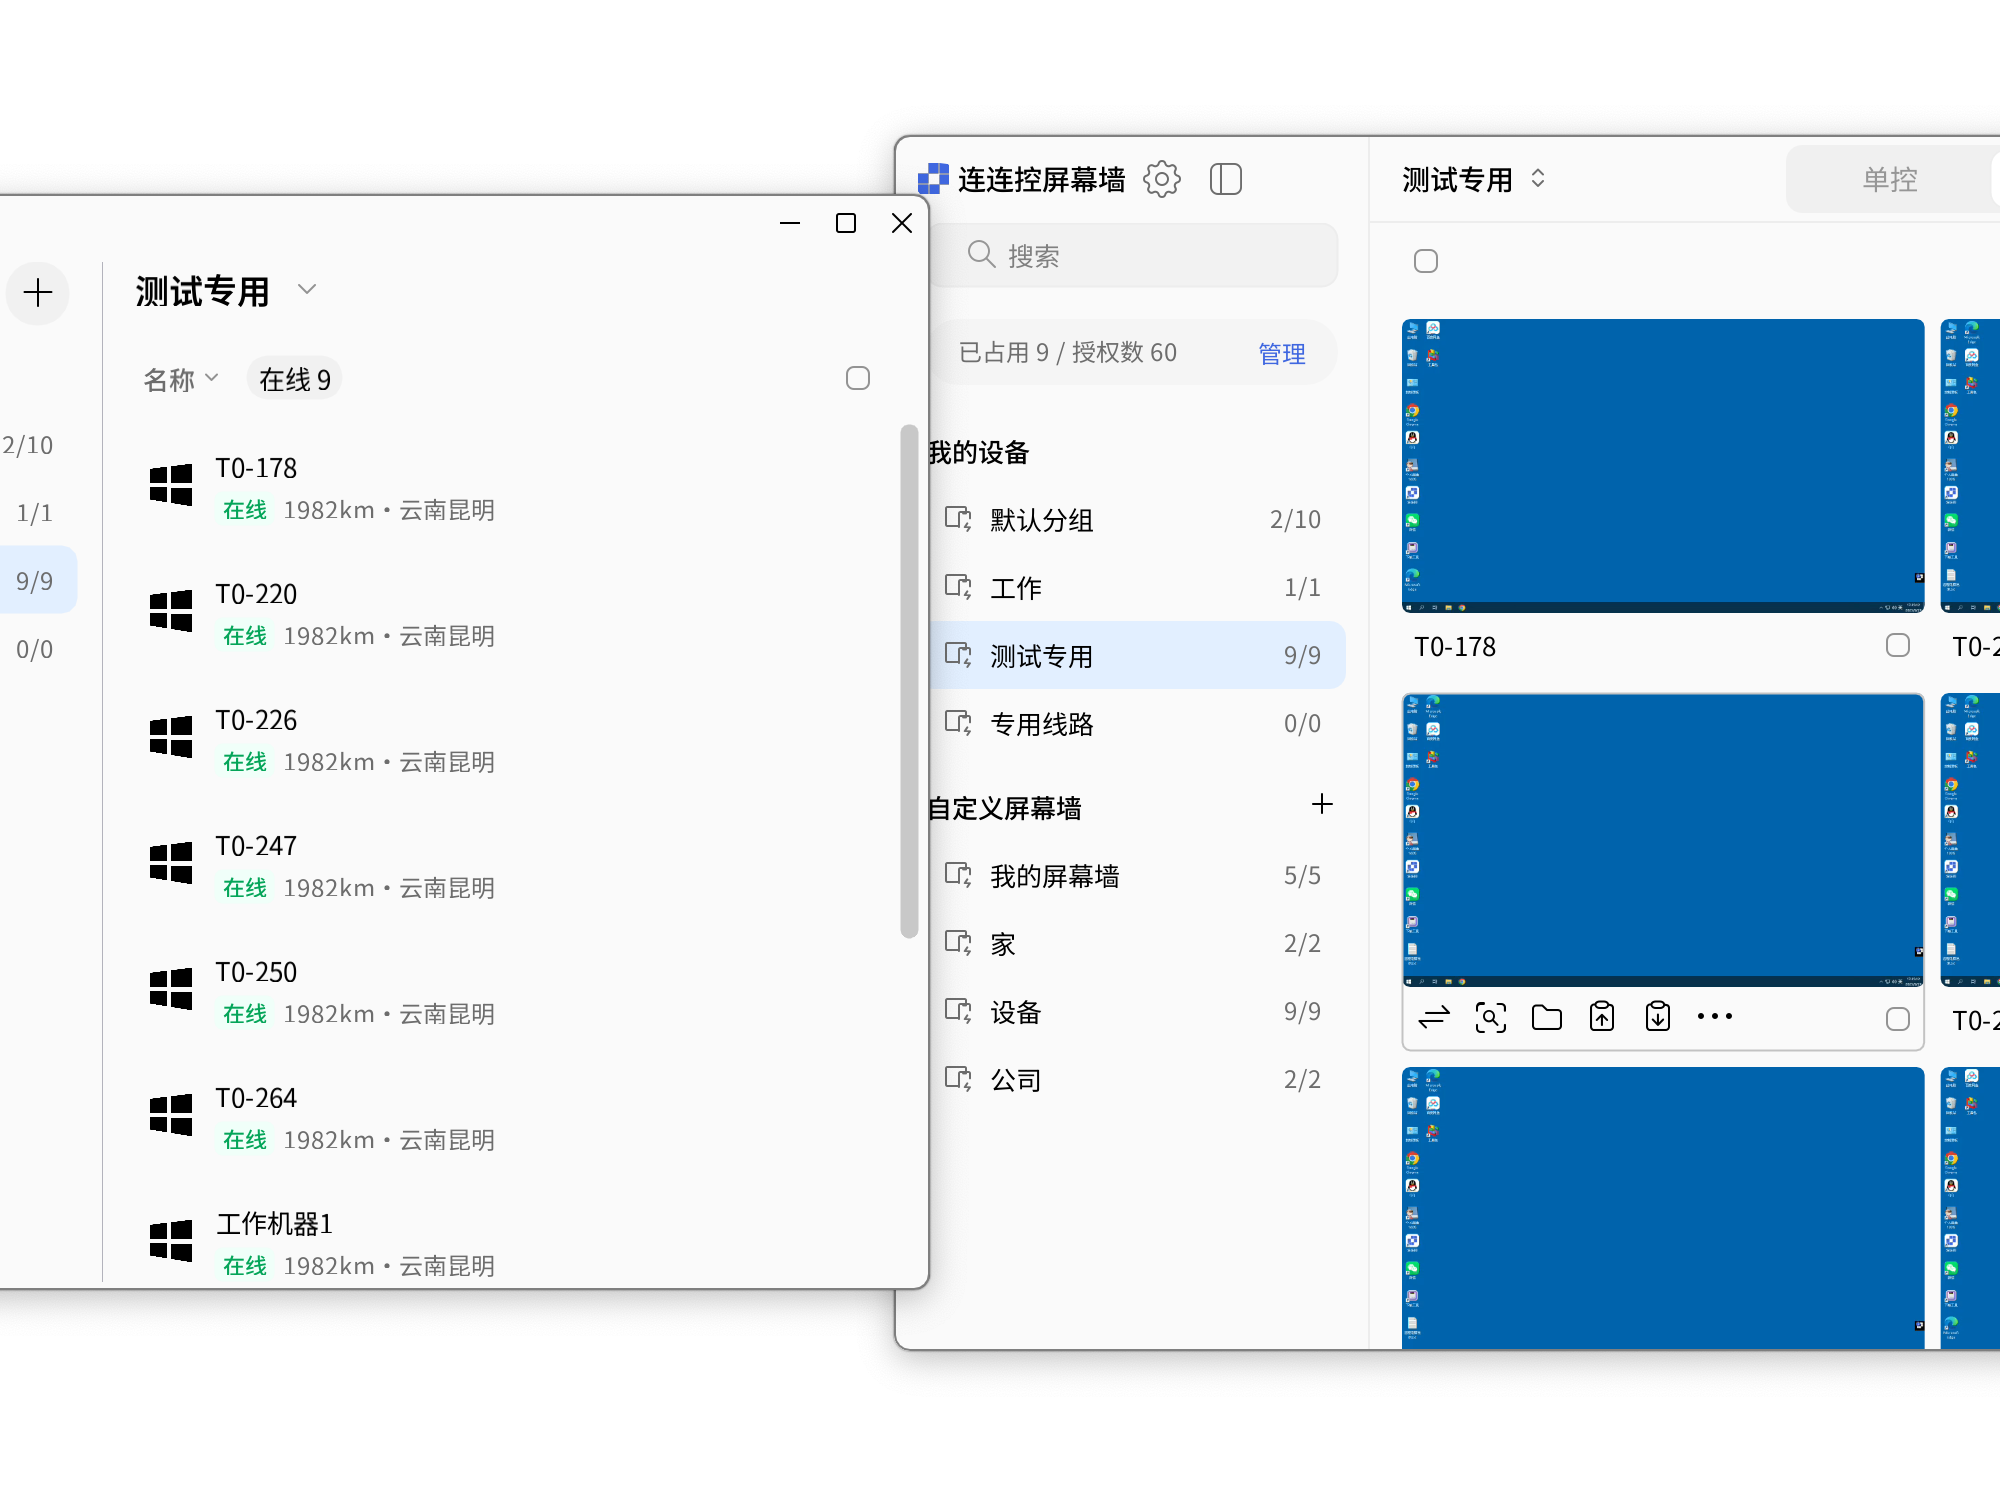
The Monitor Wall list is divided into Authorized Devices and Custom Monitor Wall.
- Authorized Devices: Synced with the AskLink Business Controller device list in real time;
- Custom Monitor Wall: Supports creating groups by project or scenario, allowing flexible management of devices in different groups.
Authorized Devices
Monitor Wall devices under Authorized Devices are synced with the device list in real time. Set Remark and Copy to Custom Monitor Wall can be performed directly in Monitor Wall, while other operations are synchronized with device management.
Custom Monitor Wall
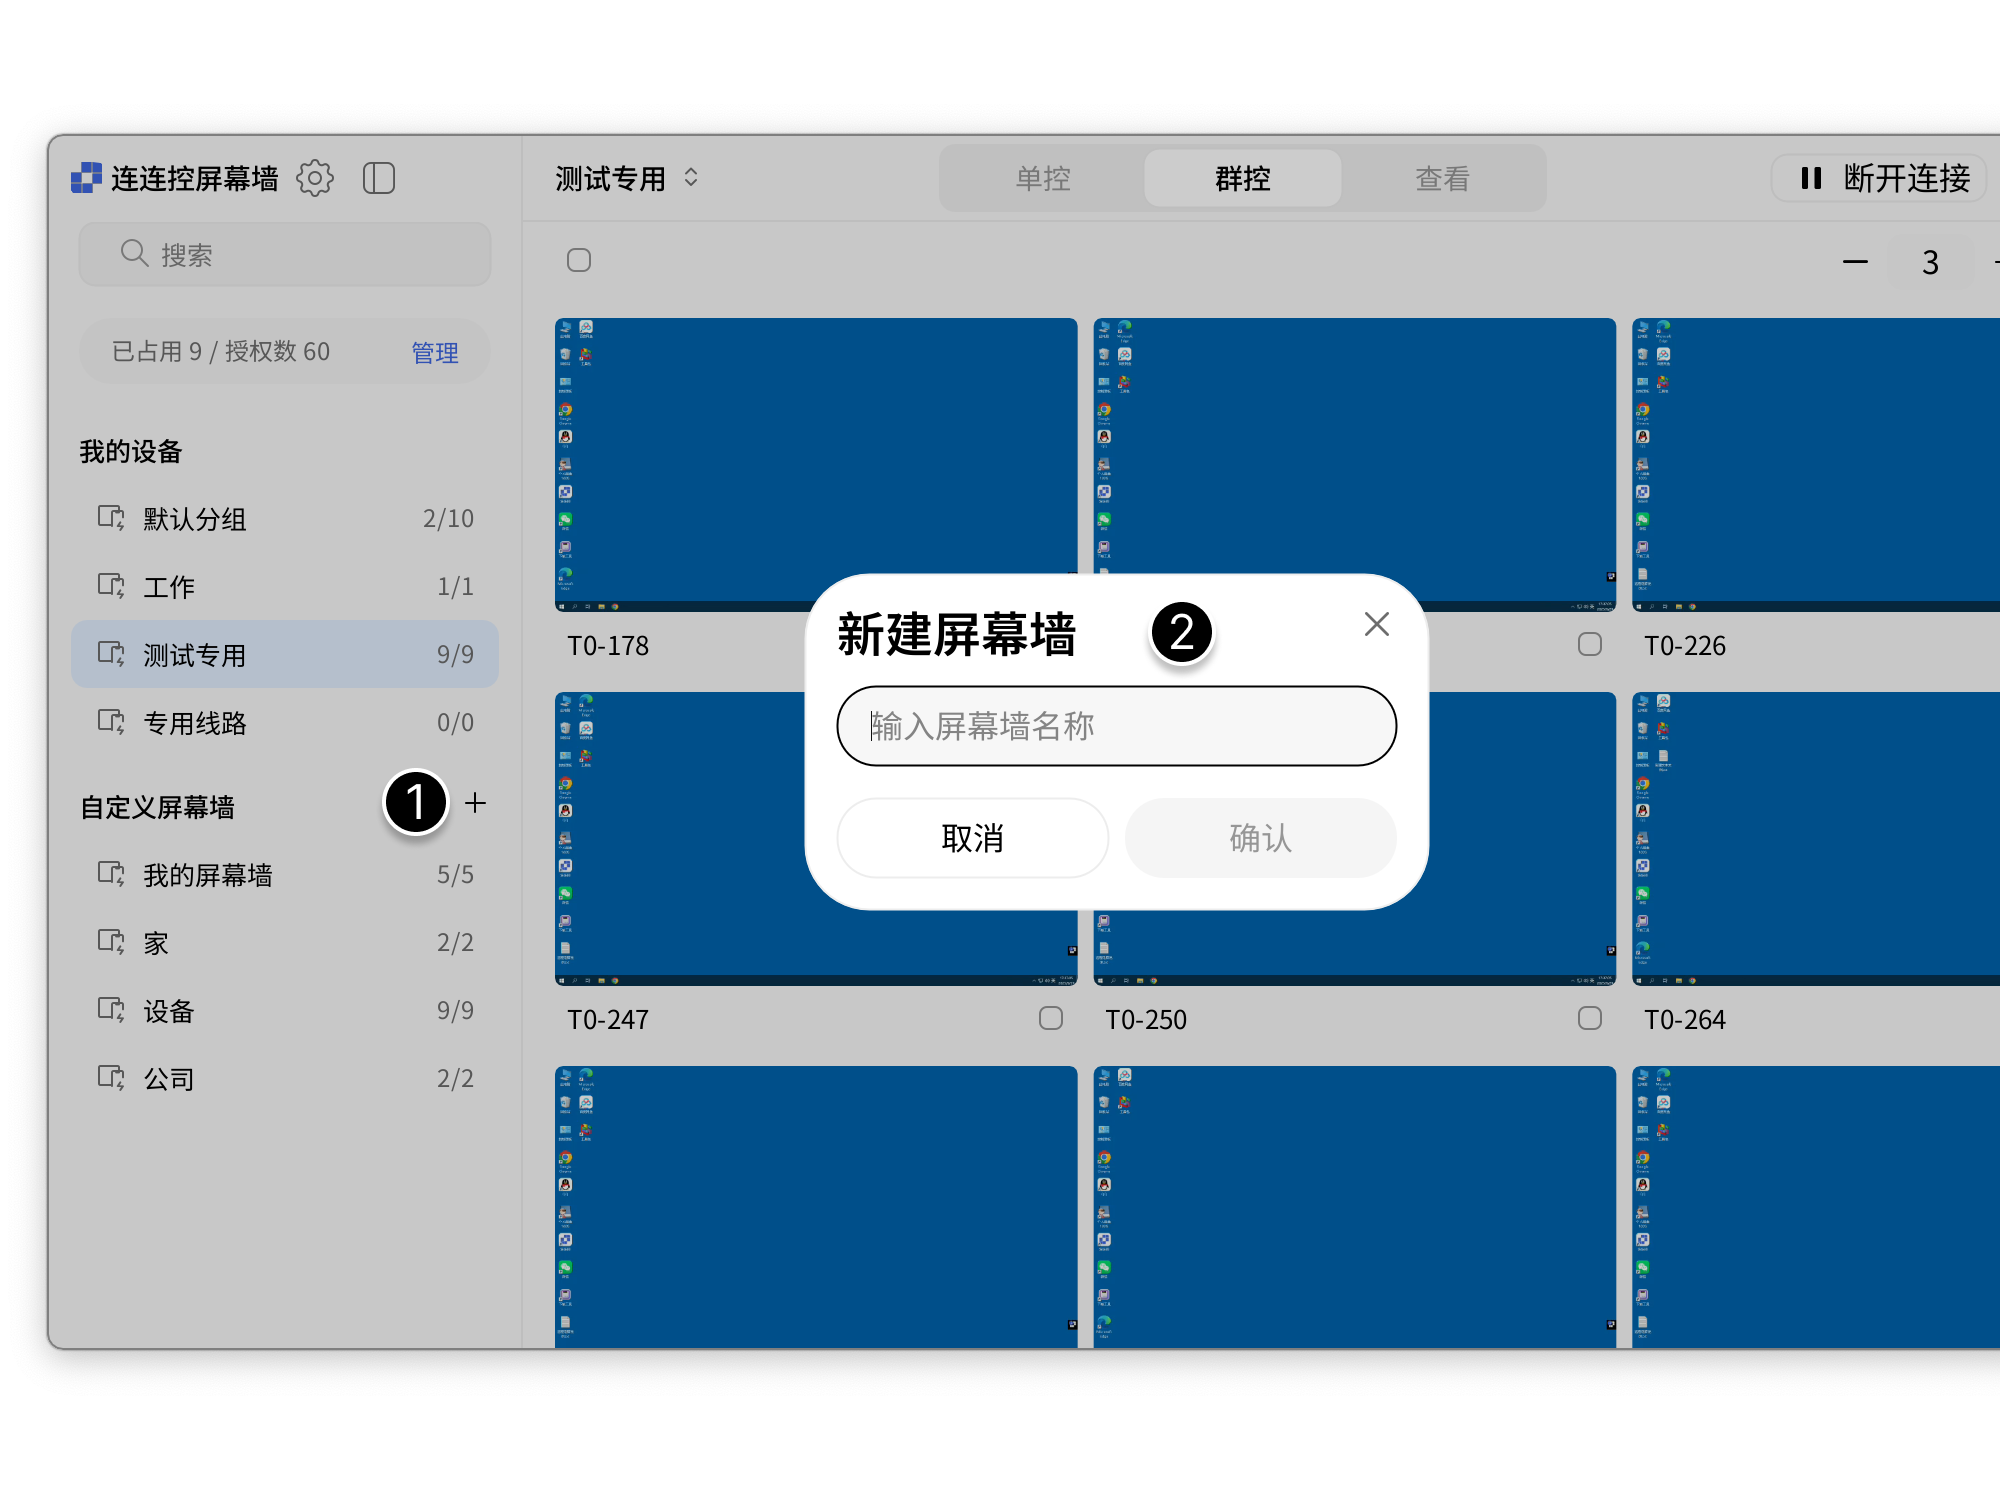
Manage Groups
- In the Monitor Wall interface, click the plus sign next to Custom Monitor Wall on the right;
- Enter the name of the new Monitor Wall and click Confirm to complete creation.
Add Devices to a Custom Group
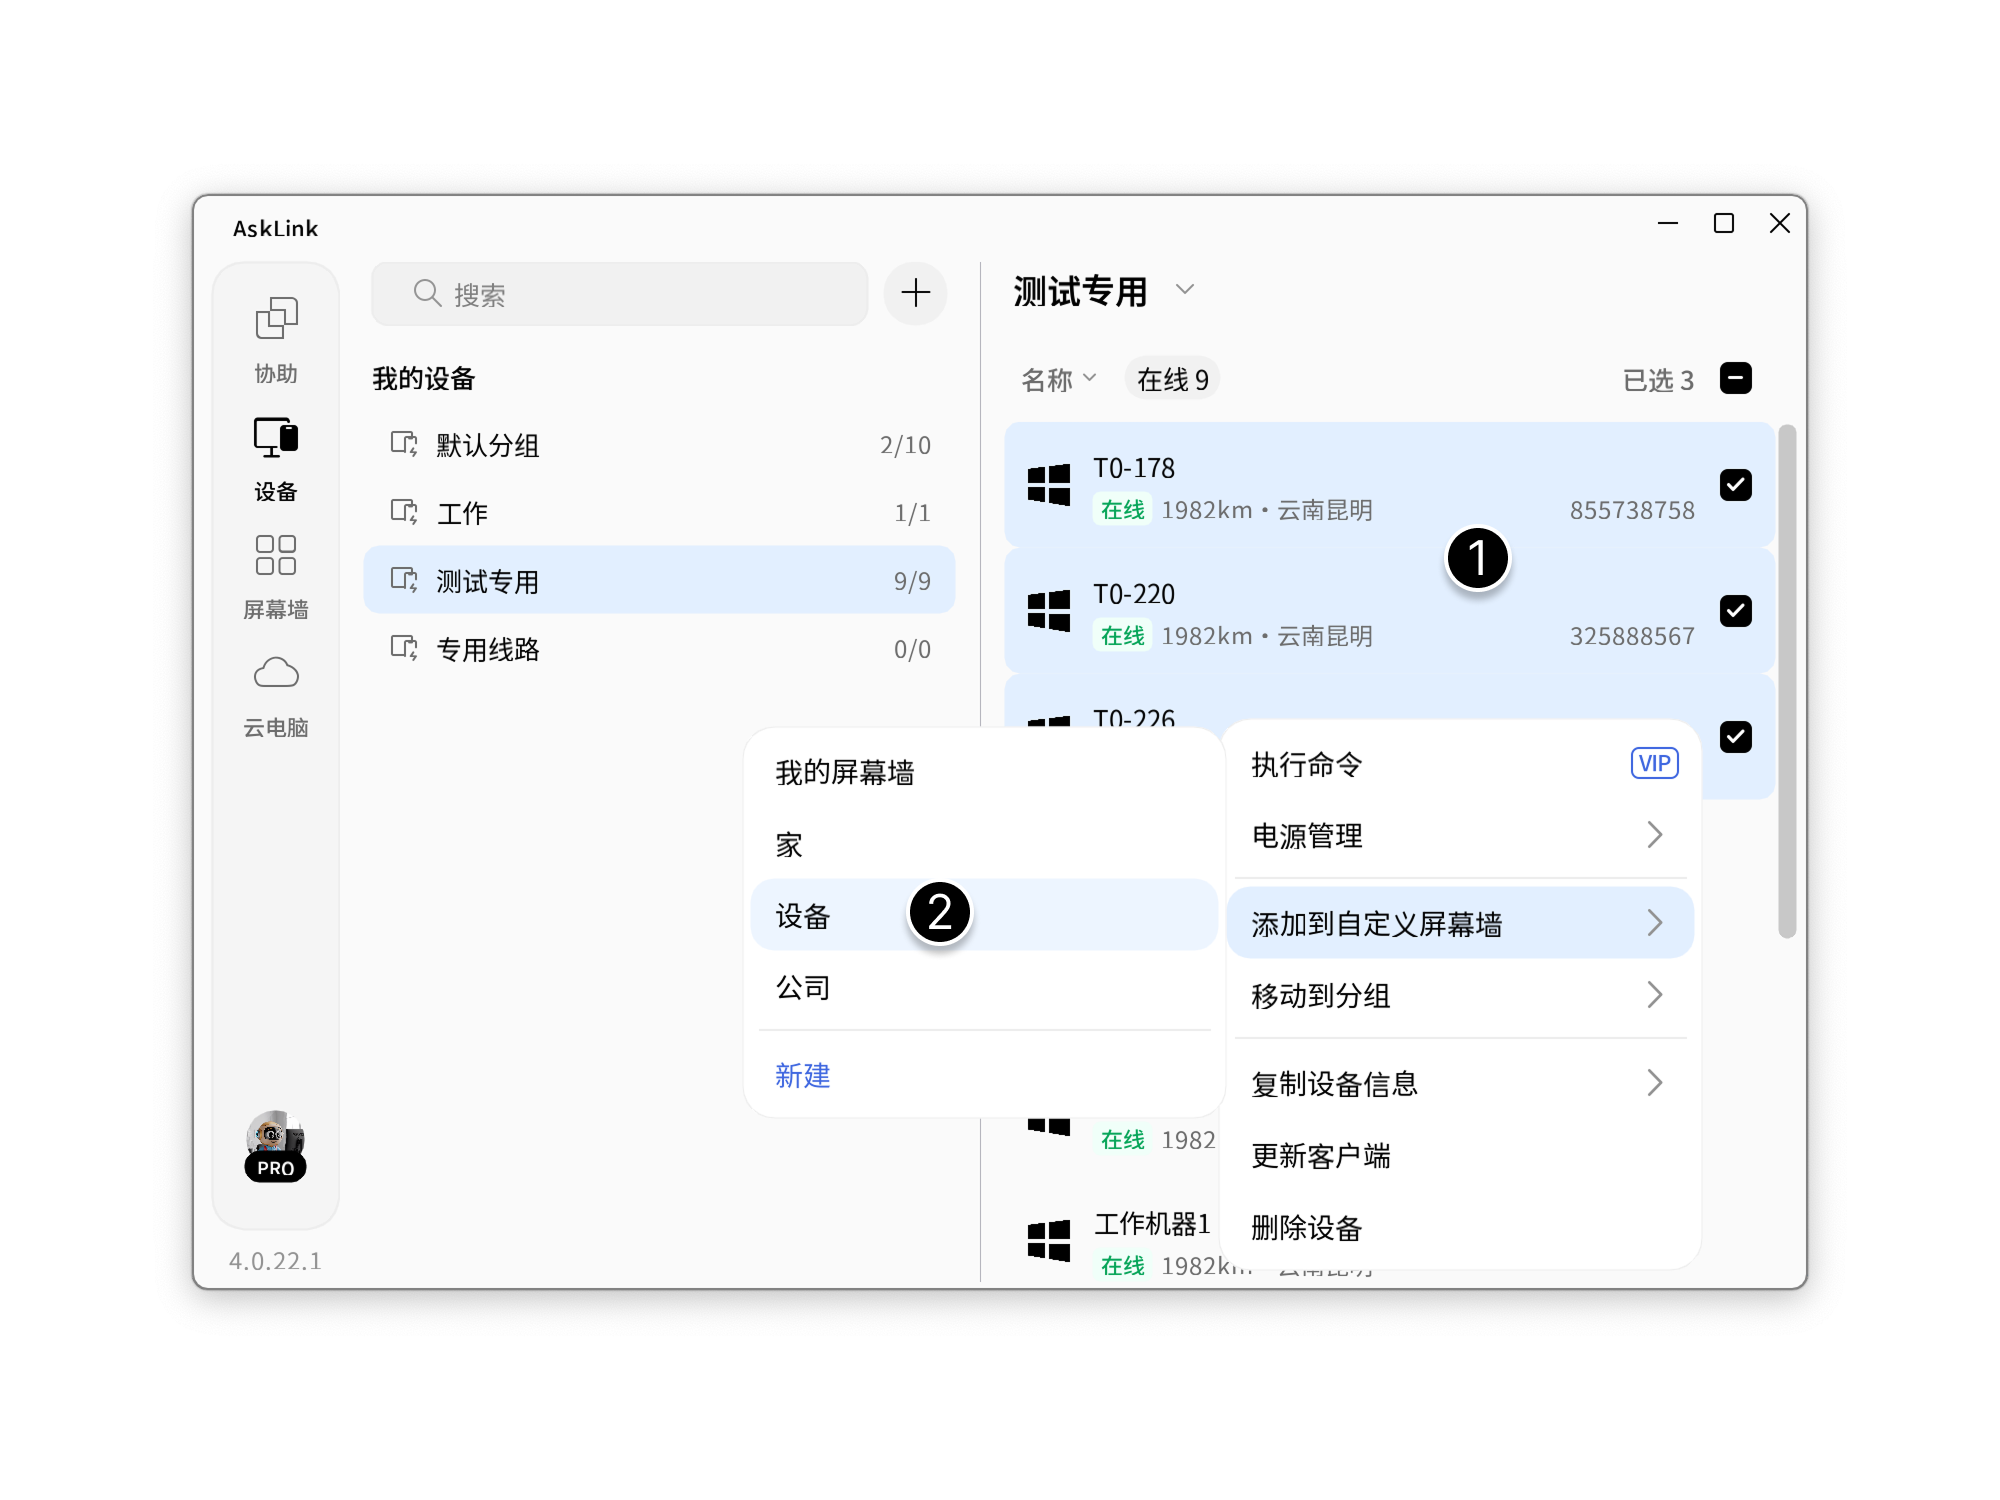
Add from the device list:
- In the enterprise device list, select the devices to add to Custom Monitor Wall;
- Right-click, select Add to Custom Monitor Wall, then select a group to complete the operation.
Copy in Monitor Wall:
- In Authorized Devices of Monitor Wall, select the devices to add to Custom Monitor Wall;
- Select More > Add to Custom Monitor Wall above the task bar, then select a group to complete the operation.
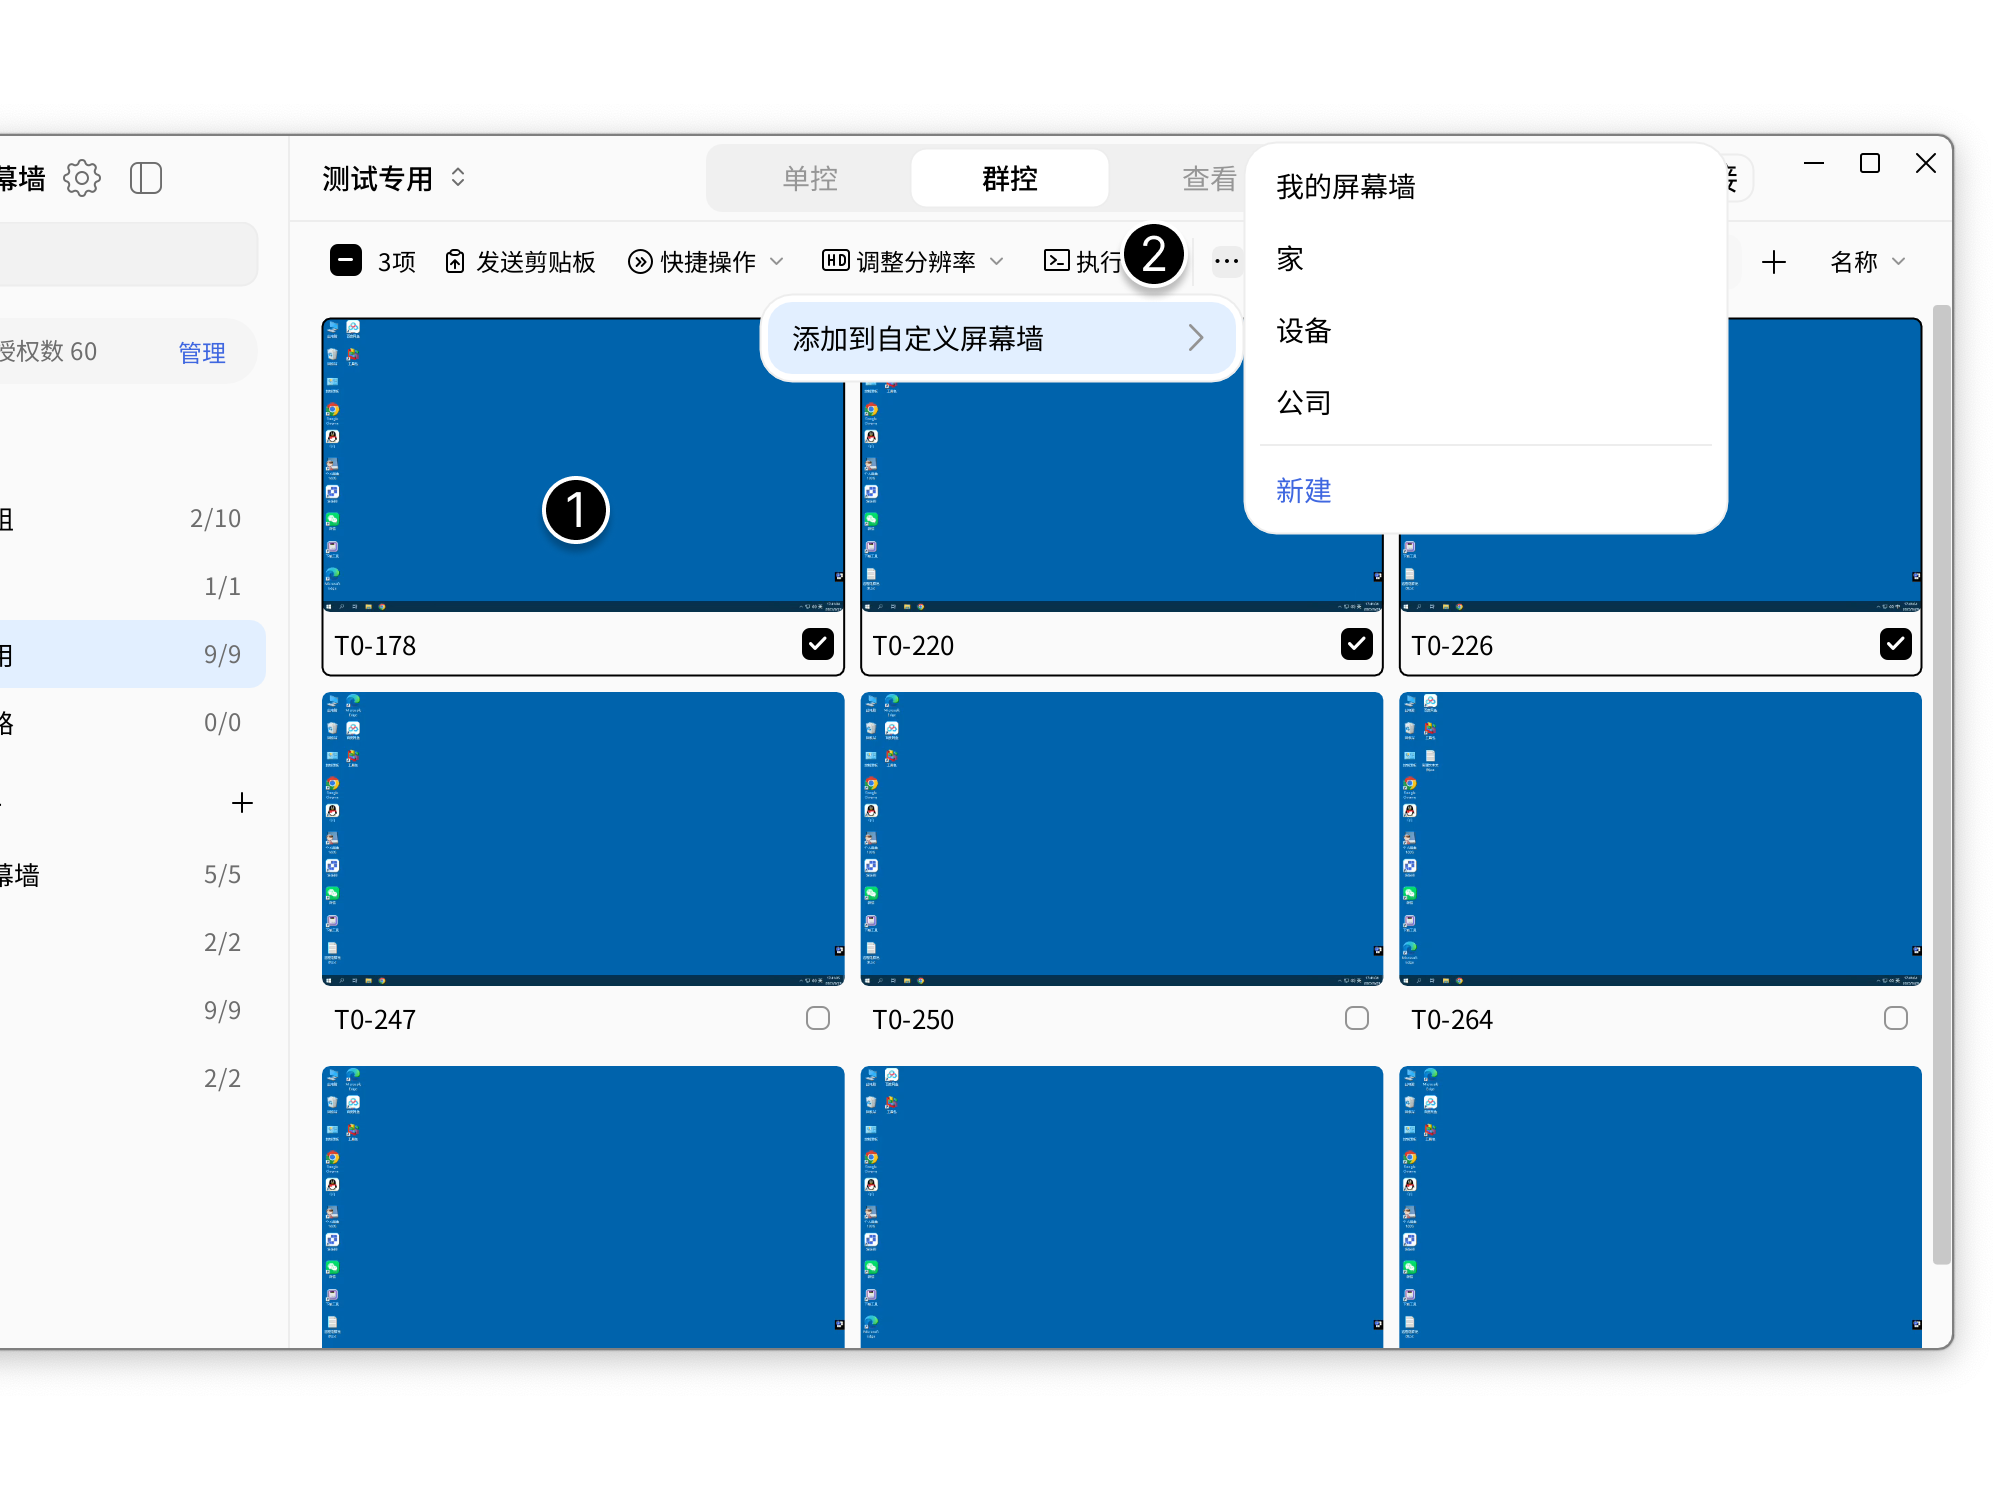
In Custom Monitor Wall, devices cannot be duplicated within the same group, but can be duplicated across different groups.
Move Within Custom Groups
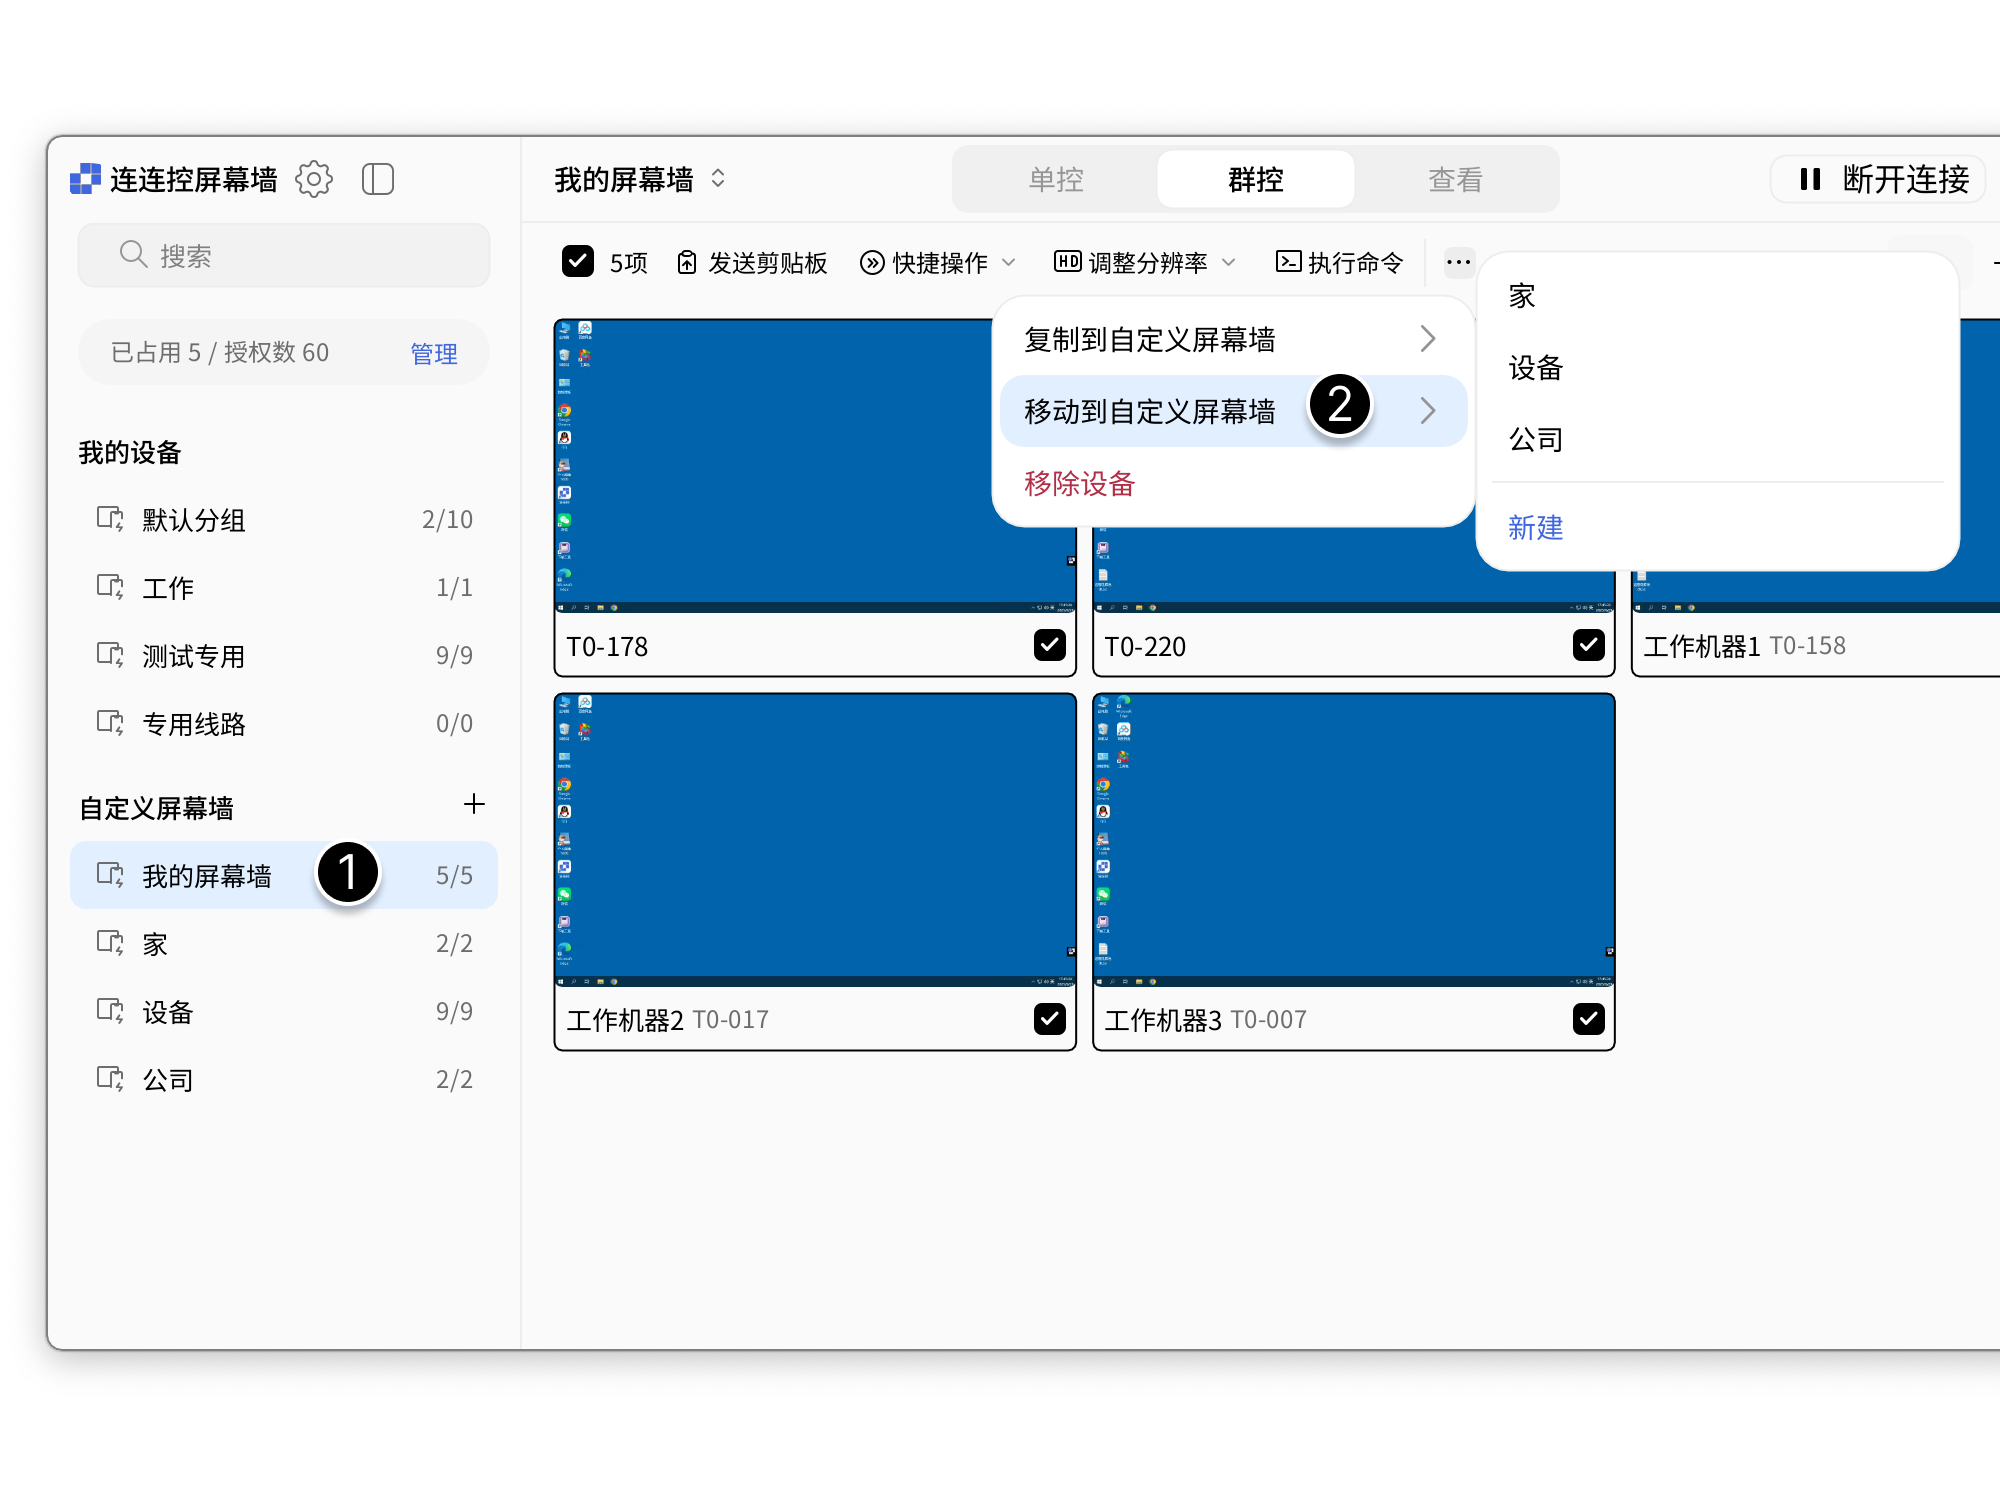
- In Monitor Wall, select the devices to move to another group;
- Select More > Move to Custom Monitor Wall above the task bar, then select a group to complete the operation.
Remove Devices from Custom Monitor Wall
- Select devices in a Custom Monitor Wall group and click More above;
- Select Remove Device.
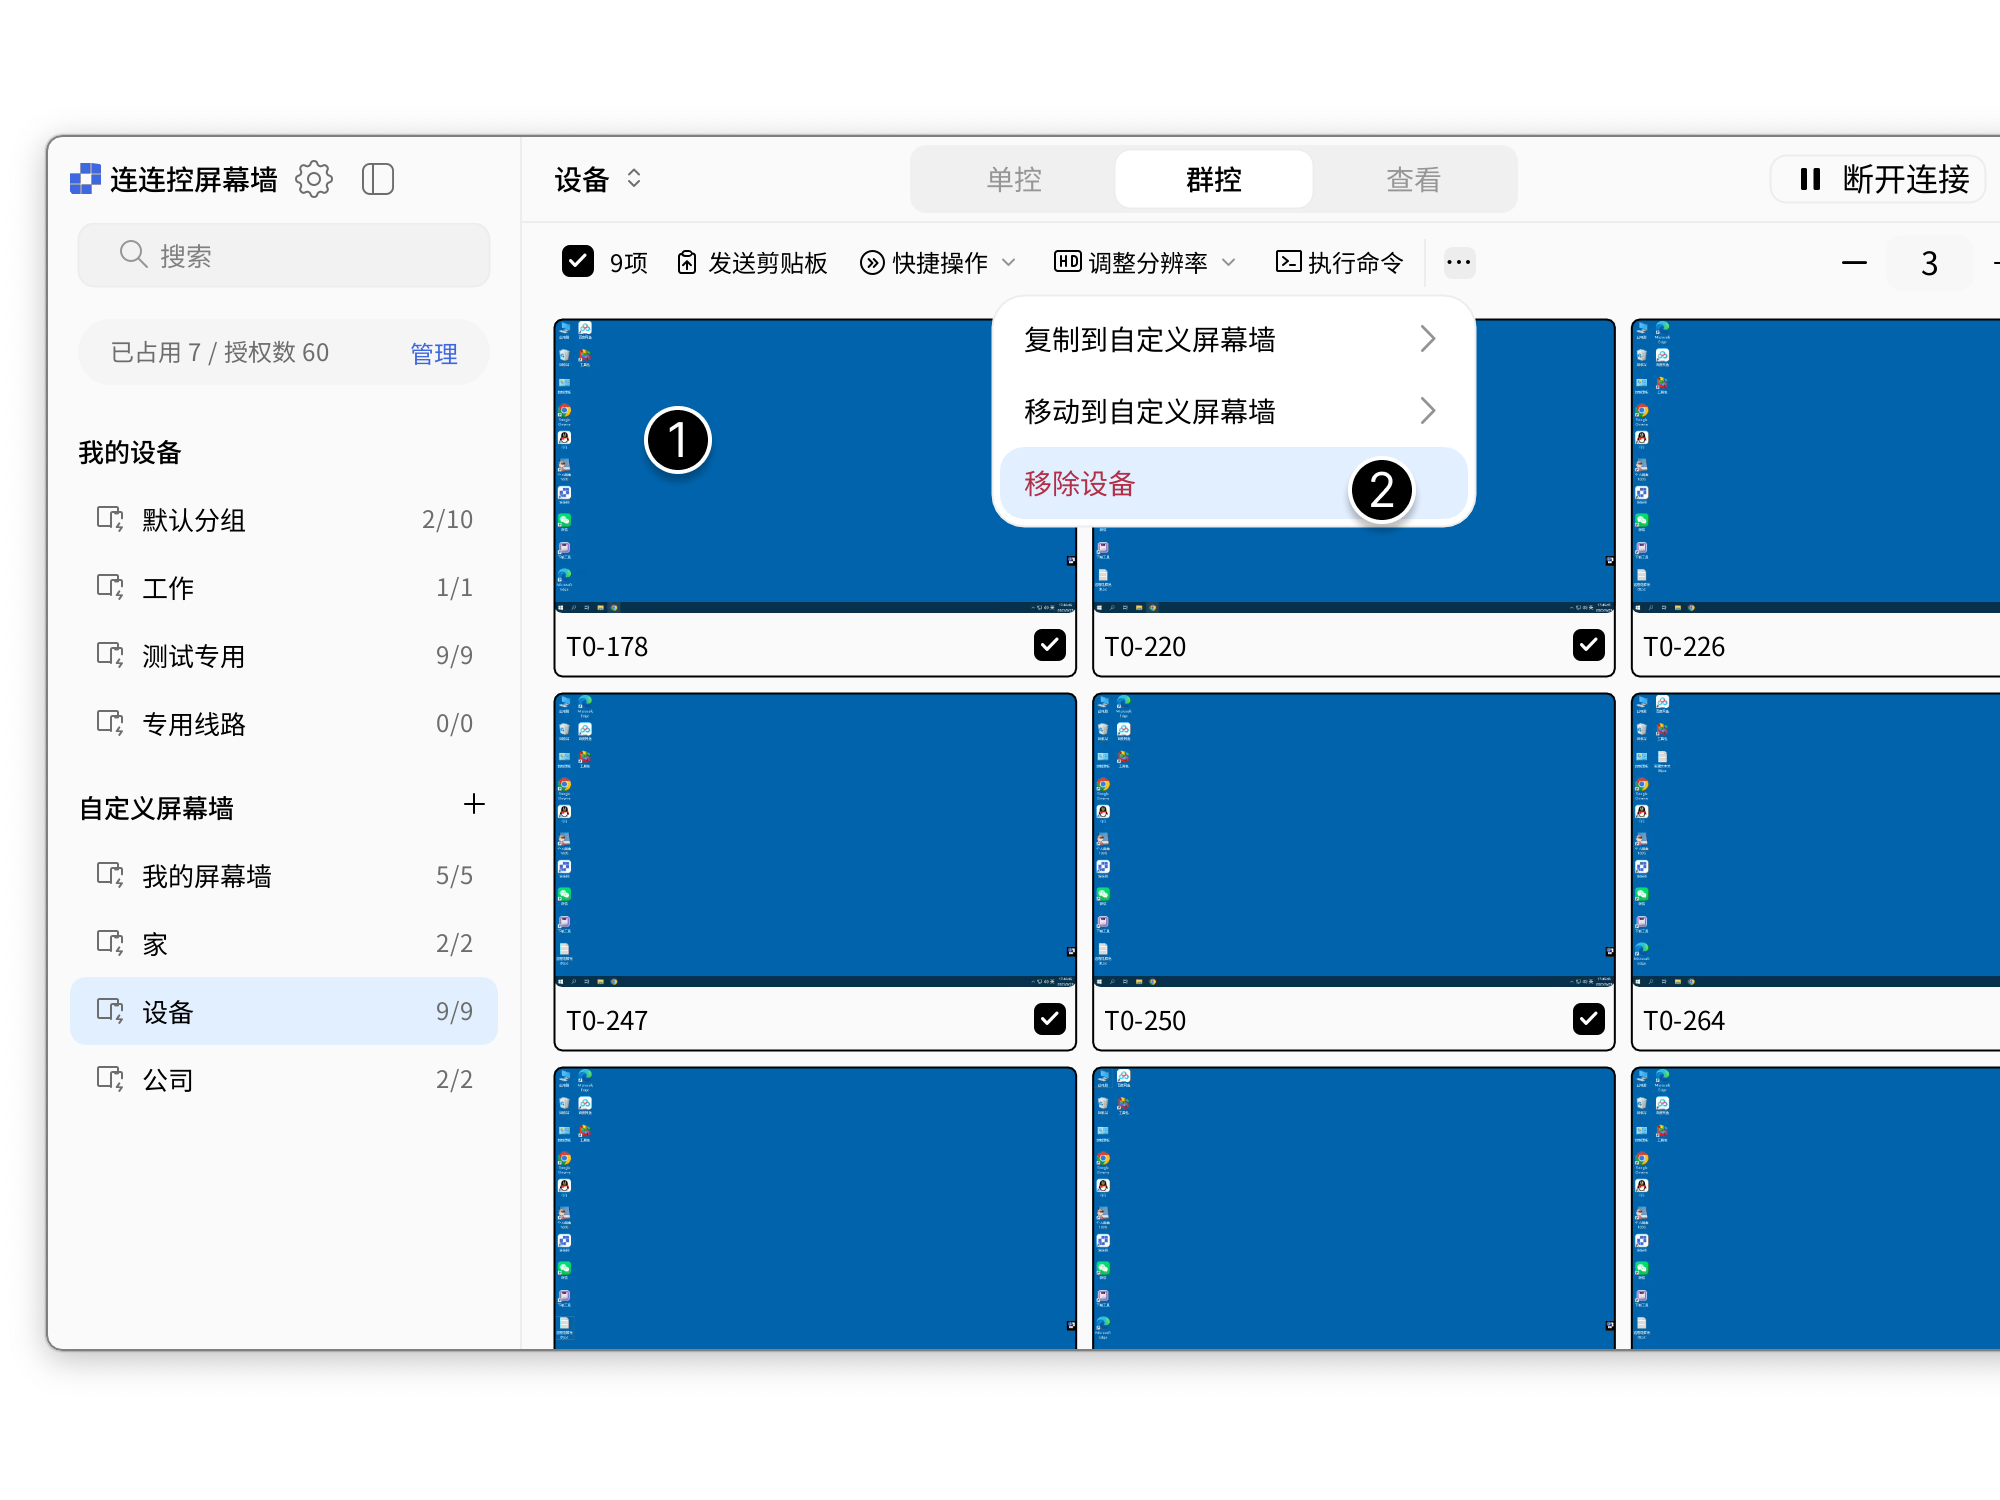
Removing a device from Custom Monitor Wall does not affect the Authorized Devices list.
Remark Devices
- Select the device to remark in Monitor Wall;
- Select More > Set Remark below the screen;
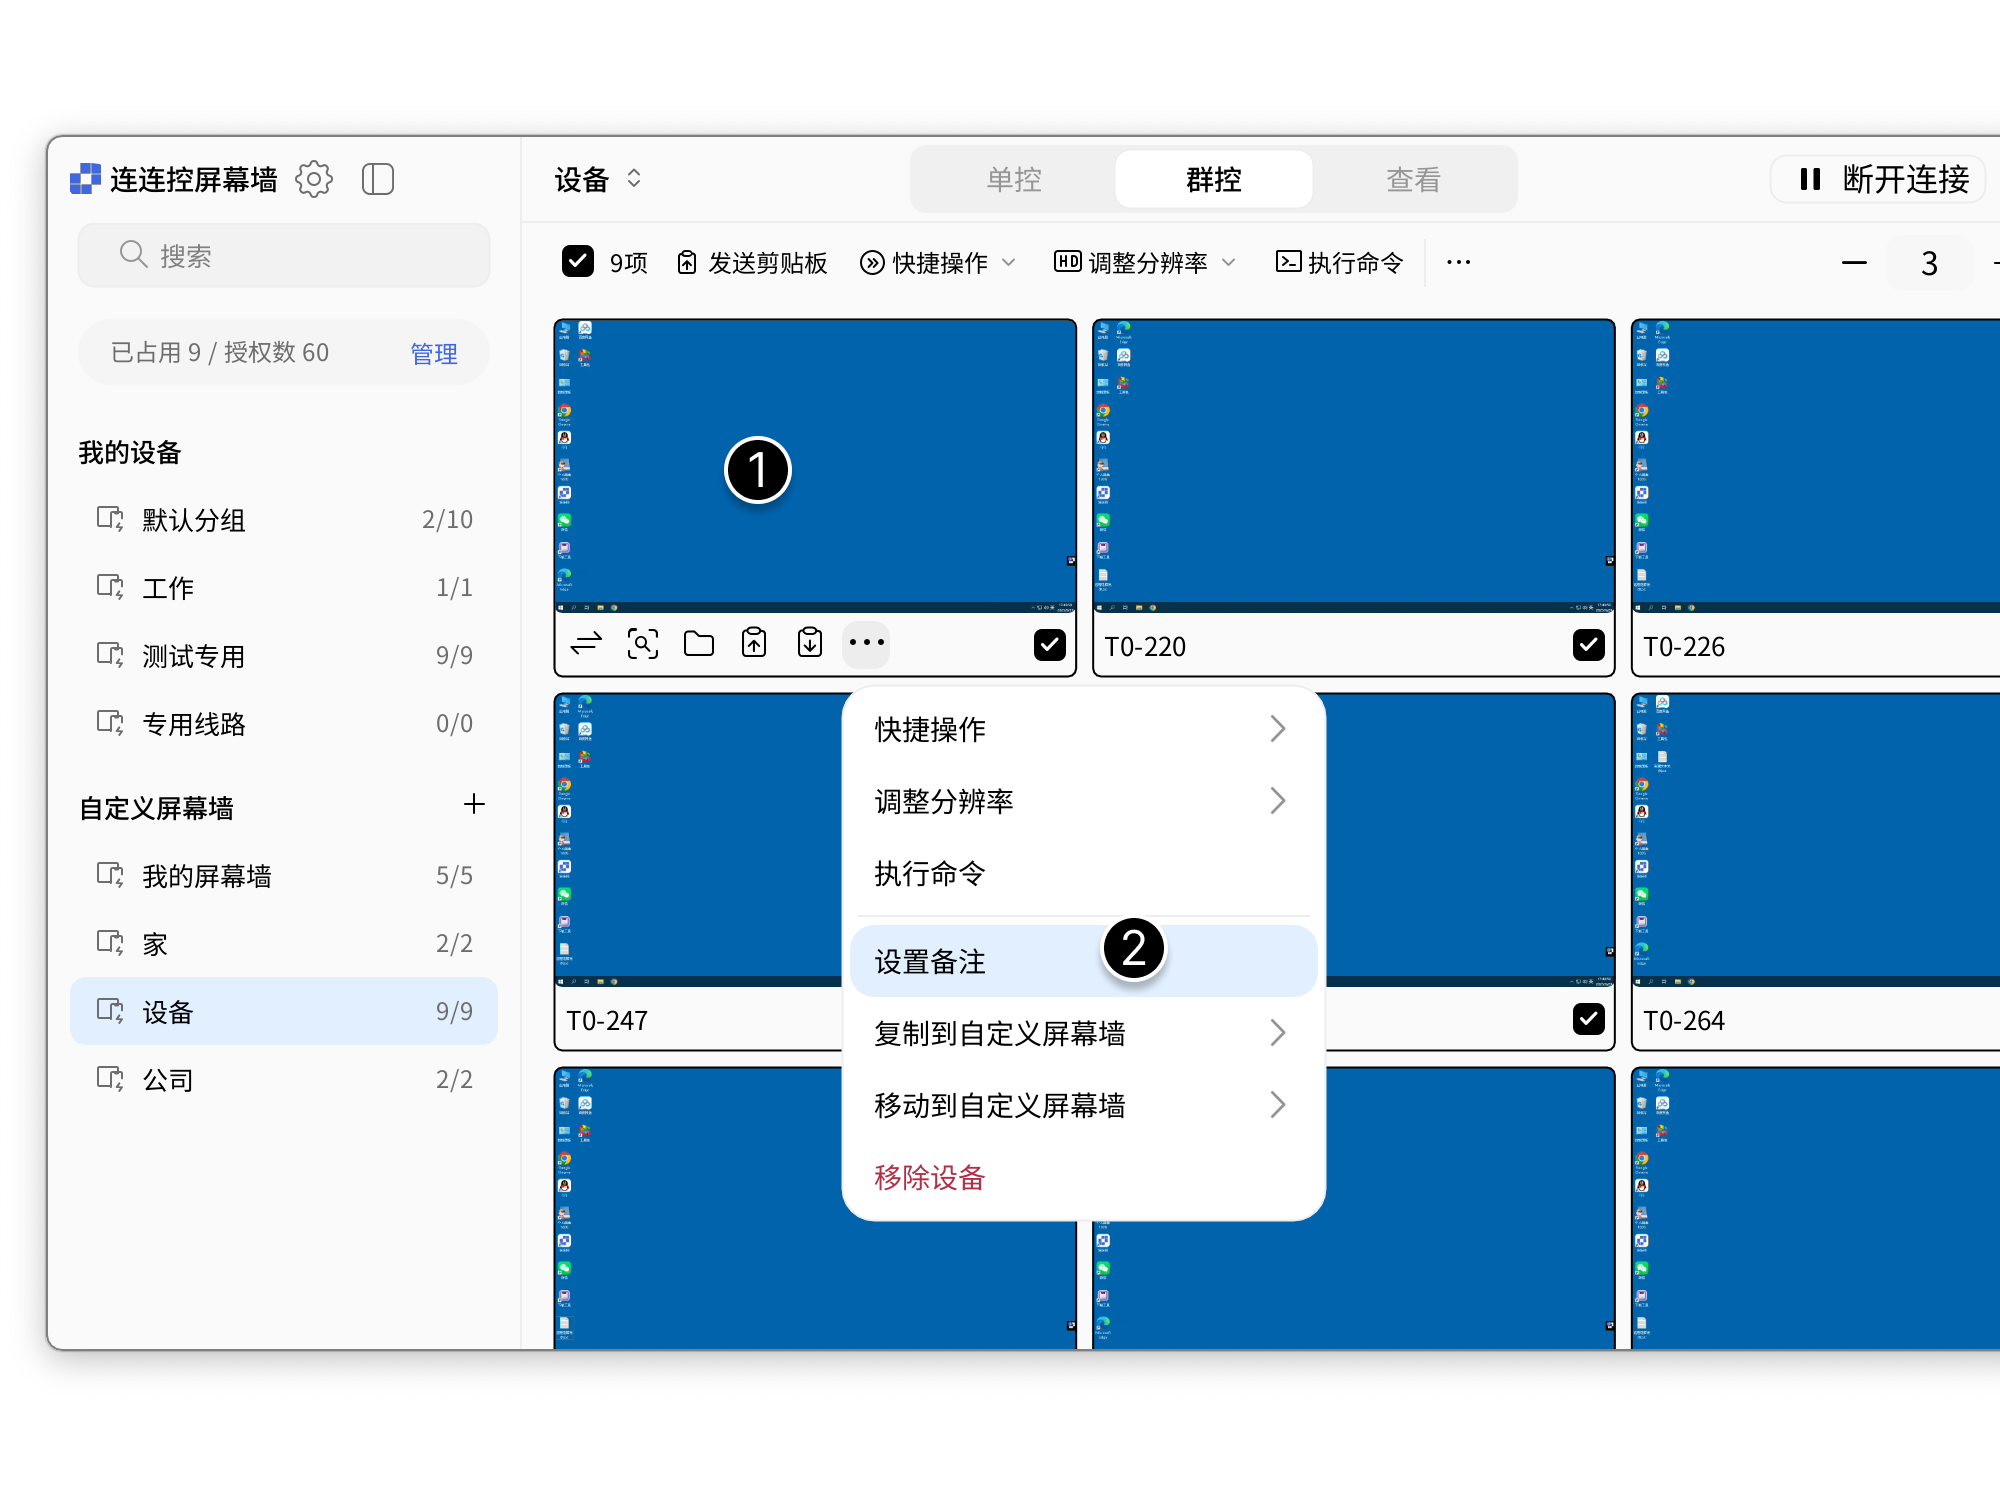
- Enter the remark and click Confirm to complete.
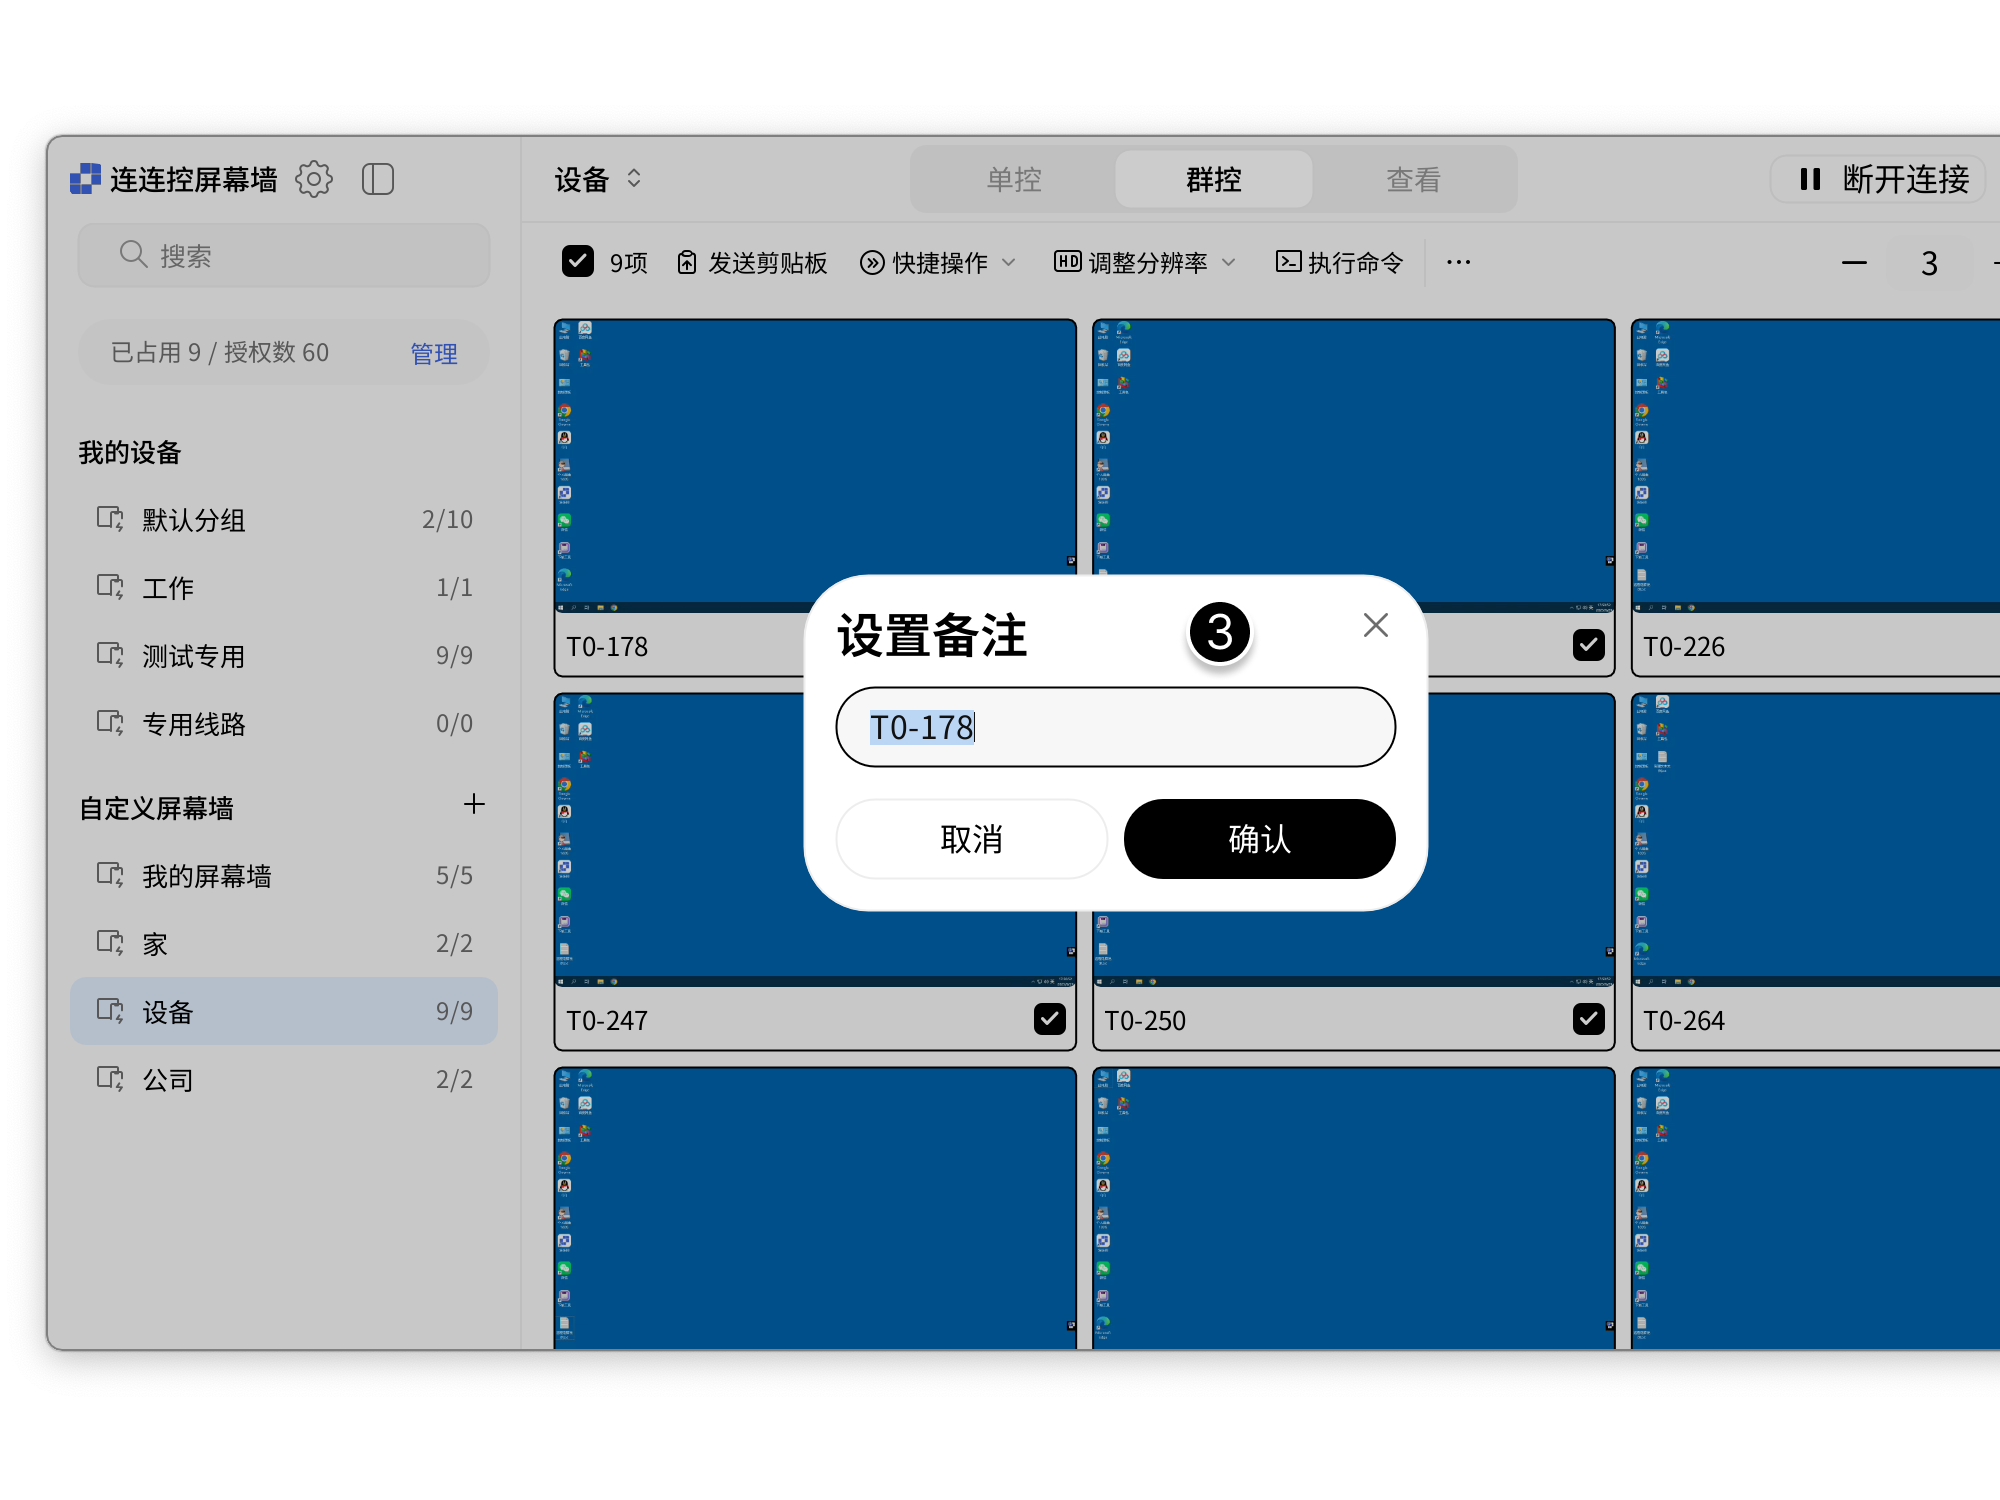
The same device in different groups can use different remark names.
Find Devices
- Enter a device name or remark in the search box;
- All groups display the number of devices and search results according to the search text.
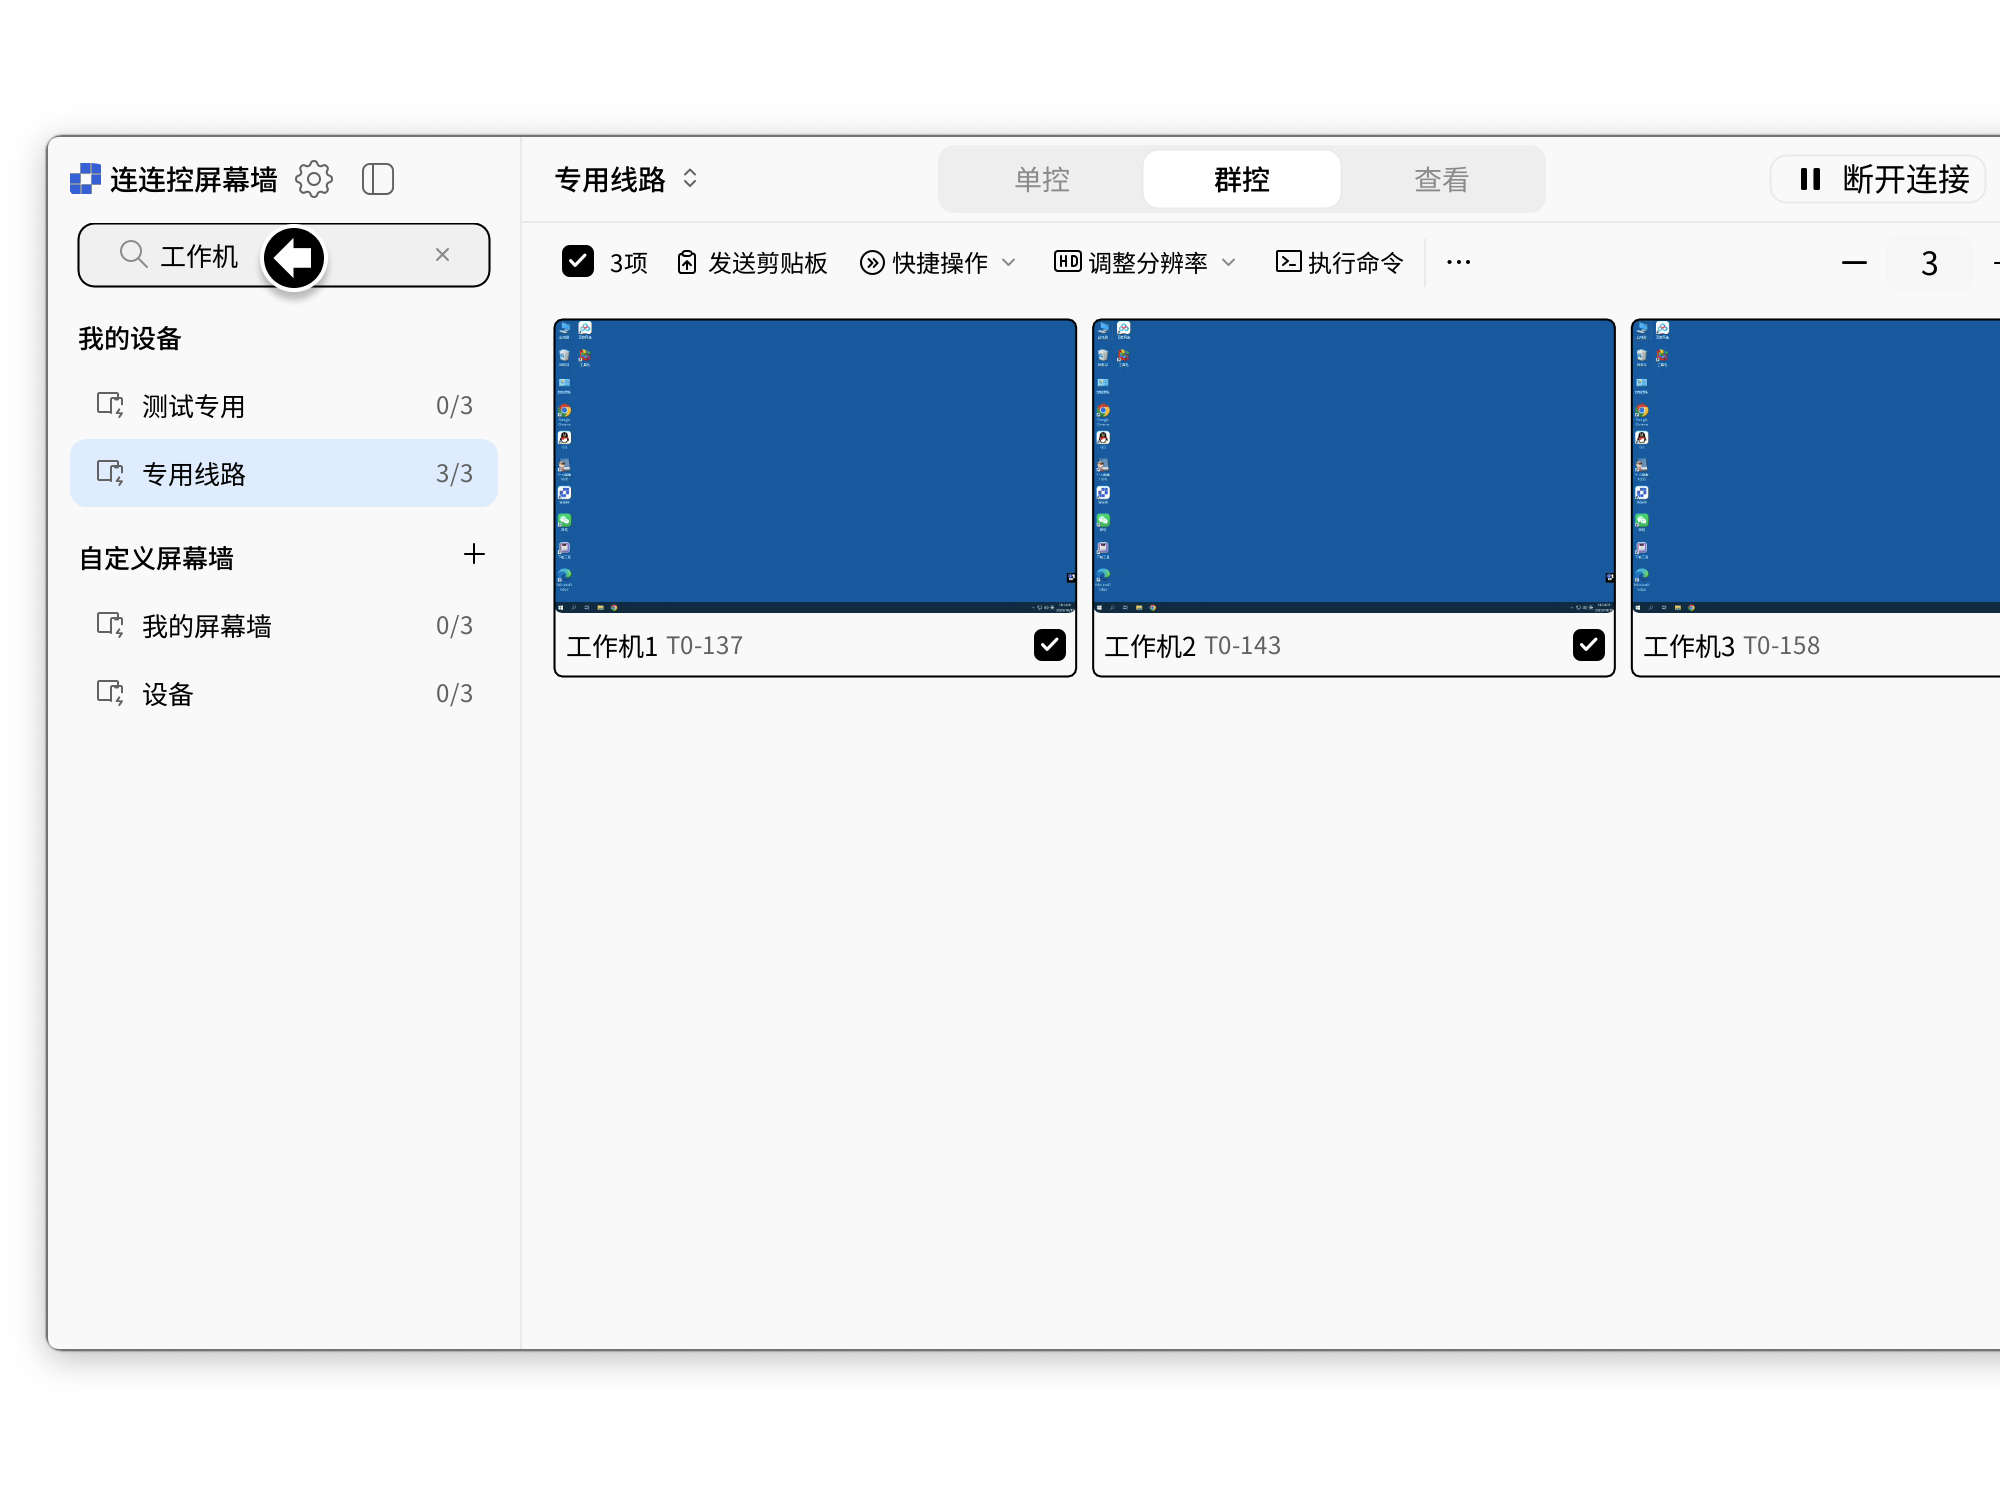
Monitor Wall Related Settings
Monitor Wall can adjust capture resolution, frame rate, image quality, audio, and driver keyboard and mouse.
Capture Resolution
Capture resolution can uniformly adjust the resolution of Monitor Wall in each group.
- Click the settings icon in the upper-left corner of Monitor Wall and select Capture Resolution;
- Click the resolution to set.
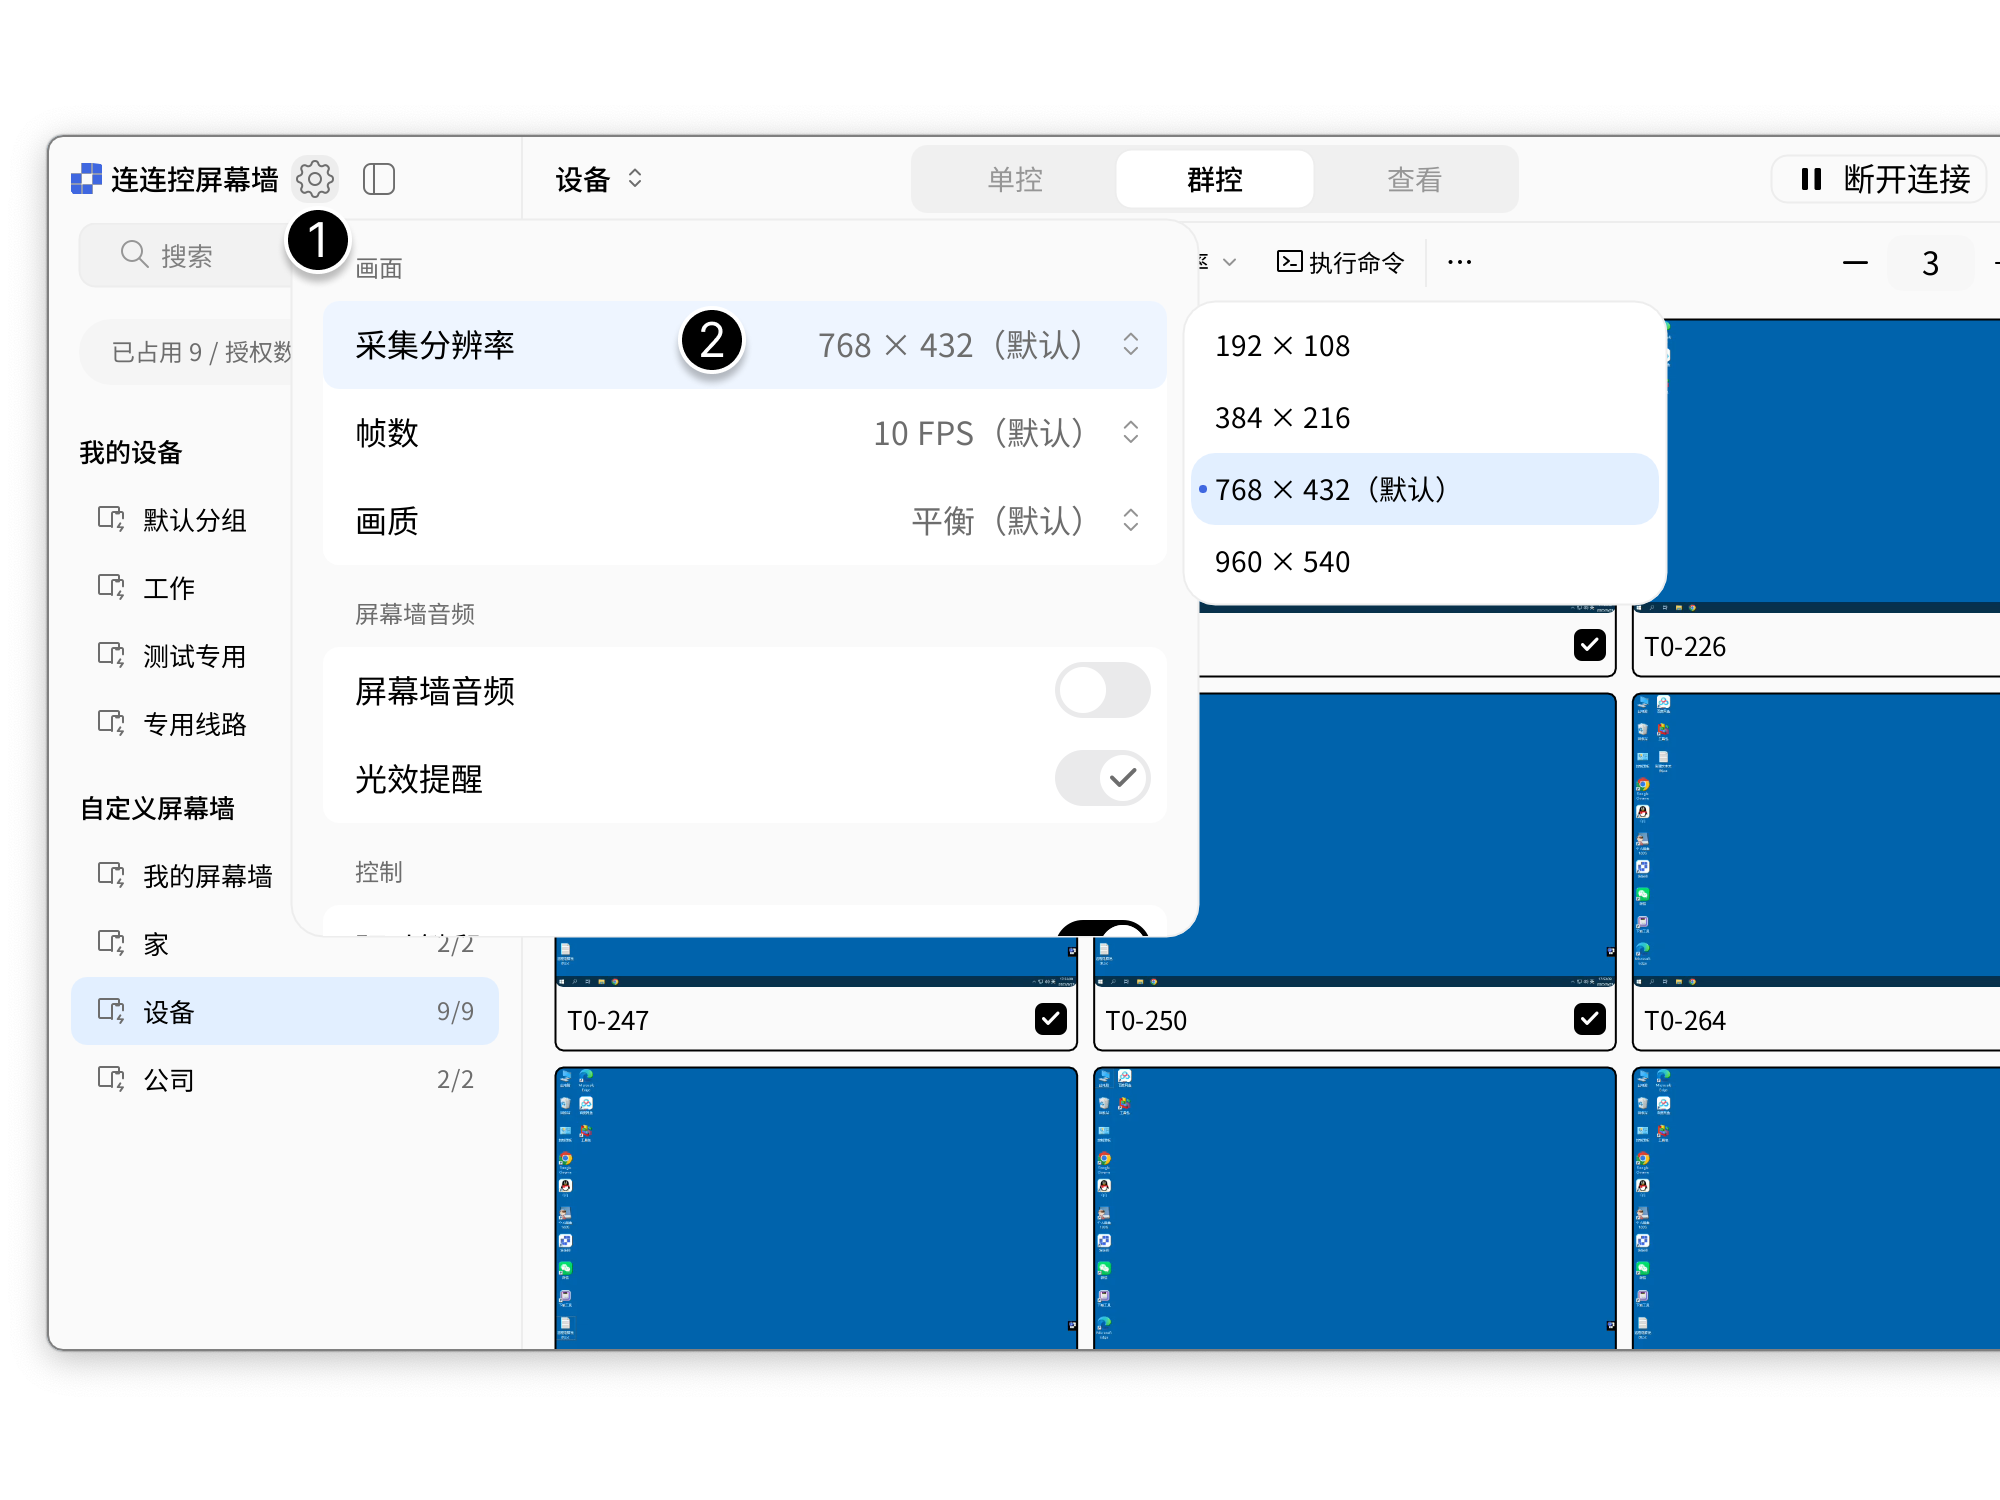
High resolution increases system resource consumption. Adjust according to performance.
Frame Rate
Frame rate can uniformly adjust the refresh frequency of Monitor Wall in each group.
- Click the settings icon in the upper-left corner of Monitor Wall and select Frame Rate;
- Click the frame rate to set.
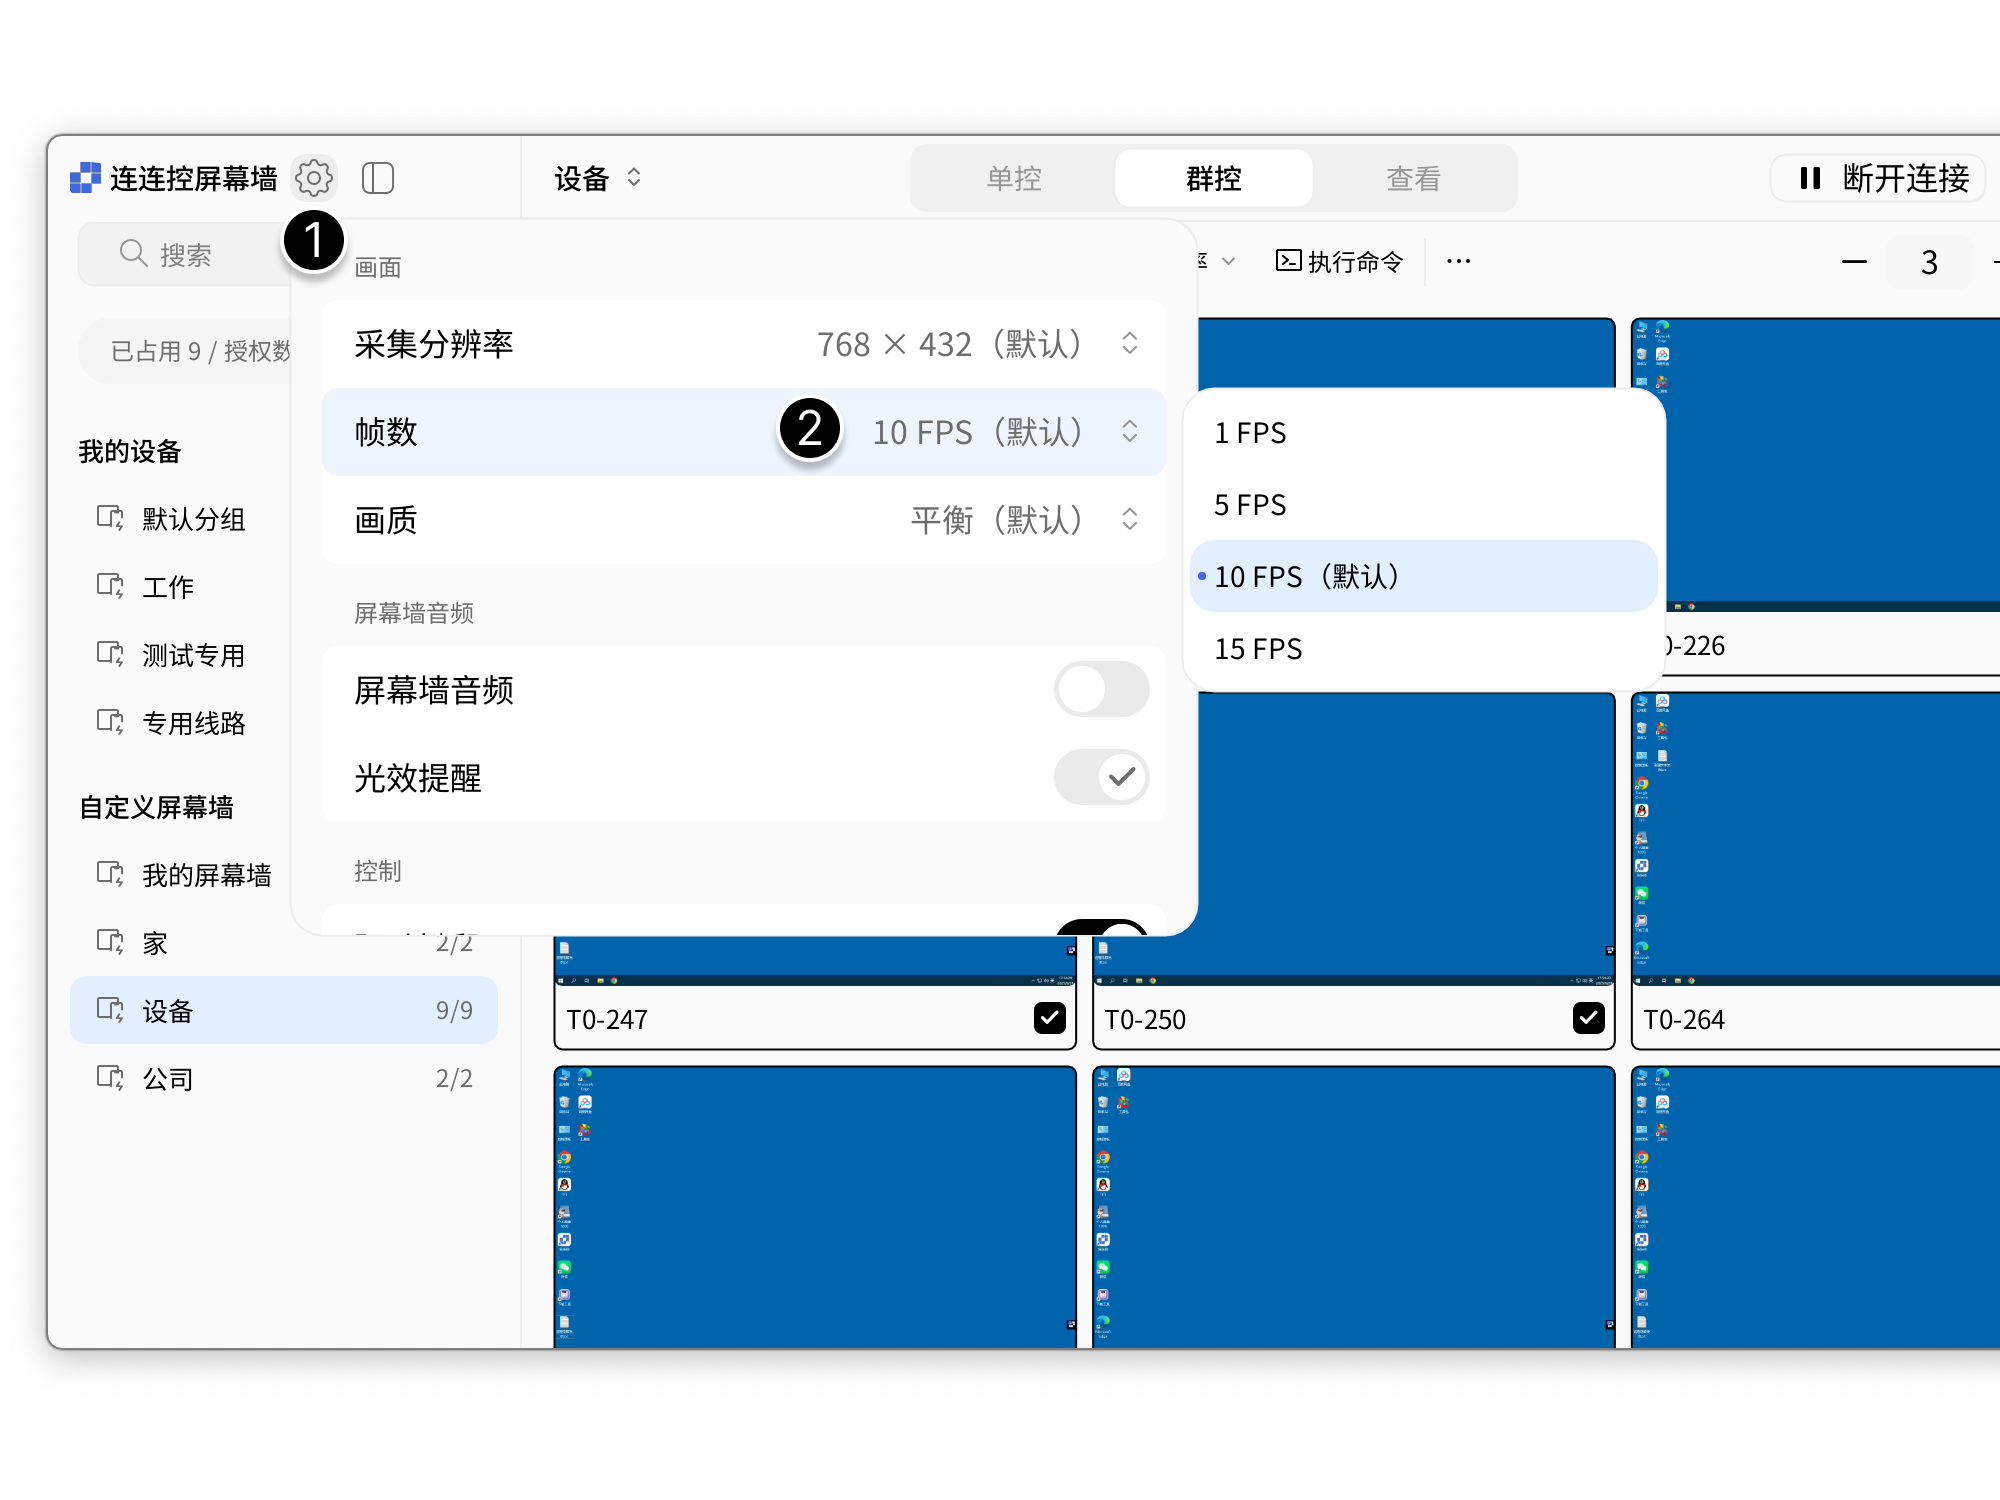
High frame rate increases system resource consumption. Adjust according to performance.
Image Quality
Image quality can uniformly adjust the screen quality of Monitor Wall in each group.
- Click the settings icon in the upper-left corner of Monitor Wall and select Image Quality;
- Click the image quality option to set.
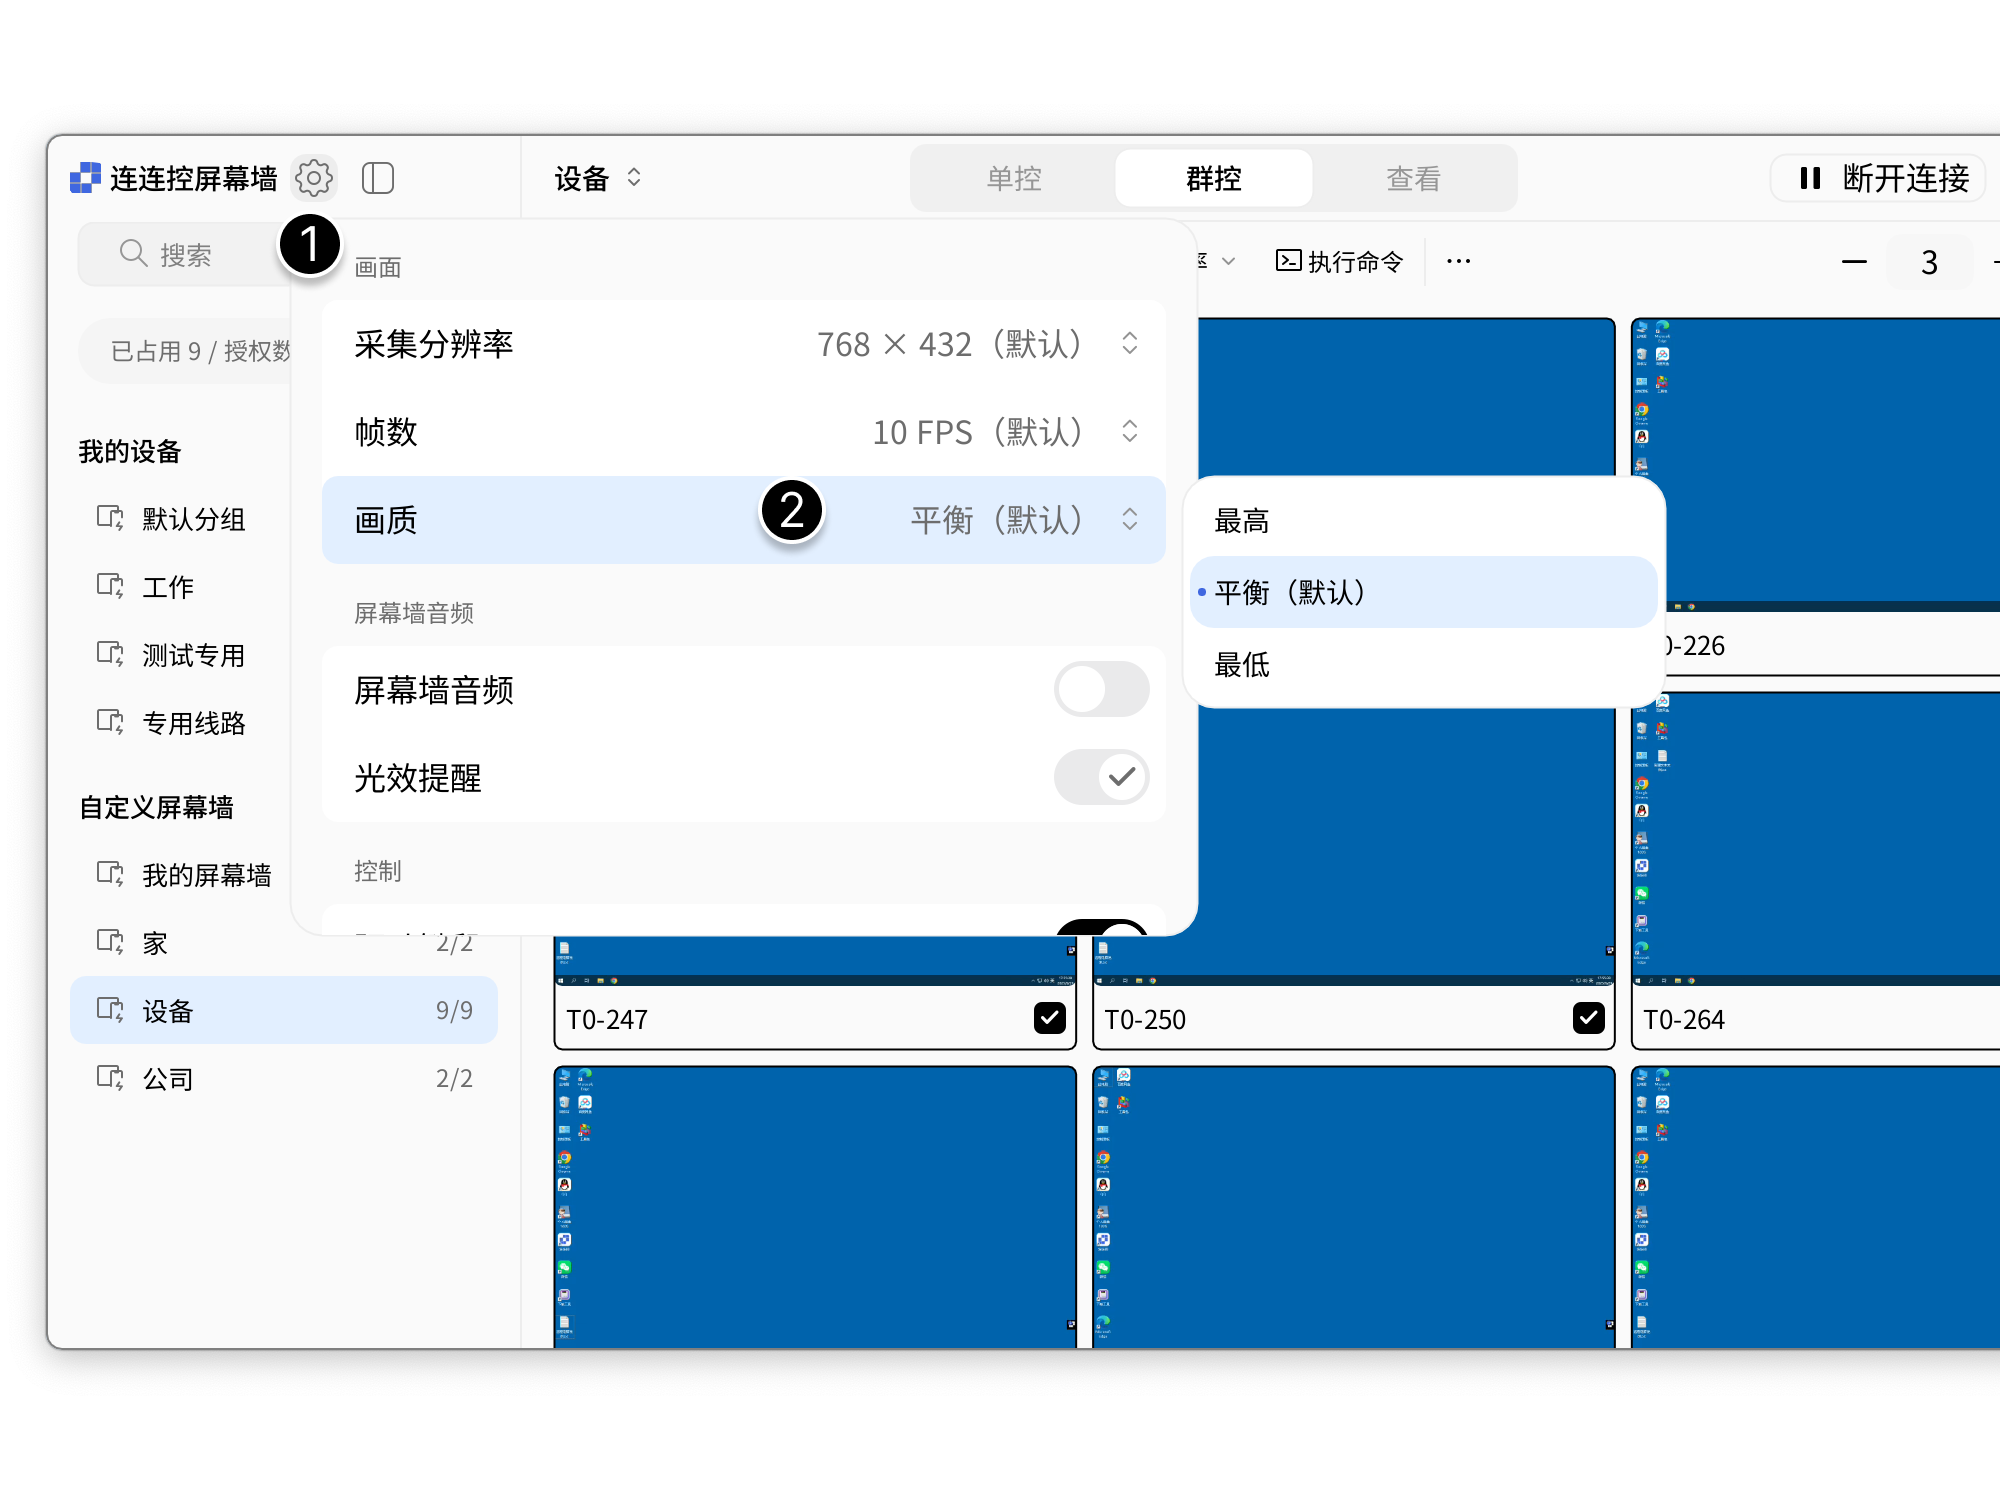
High-definition image quality increases network bandwidth consumption. Adjust according to network conditions.
Monitor Wall Audio
Audio can uniformly control audio transmission for Monitor Wall in each group.
- Click the settings icon in the upper-left corner of Monitor Wall and select Audio;
- Enable the Monitor Wall Audio option.
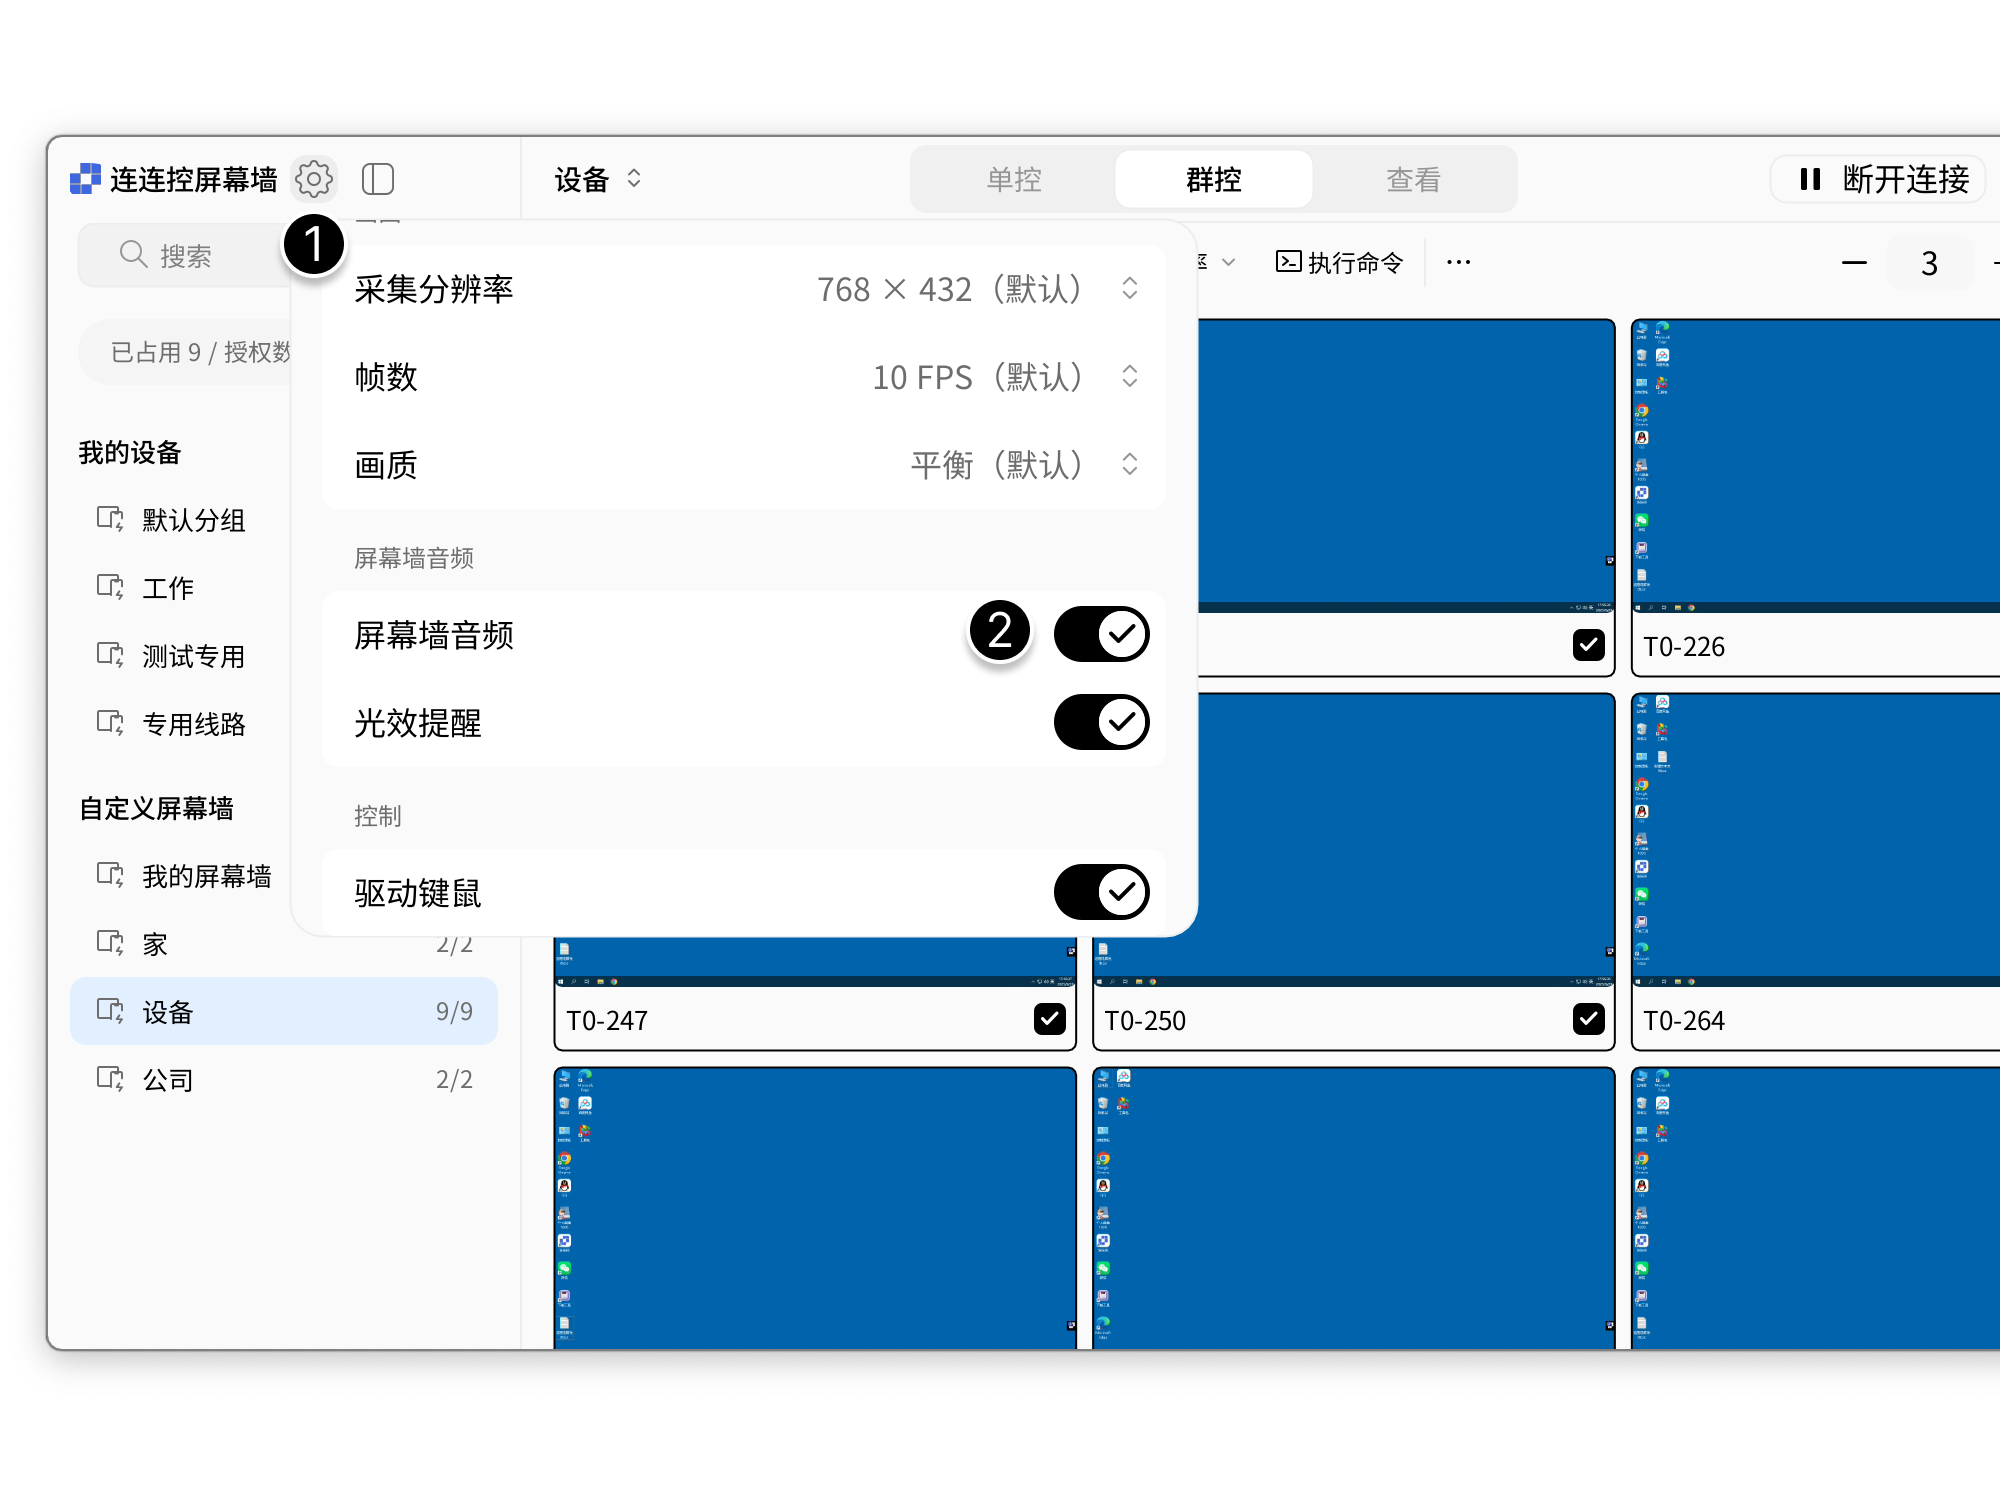
Enabling audio increases network bandwidth consumption. Adjust according to actual needs.
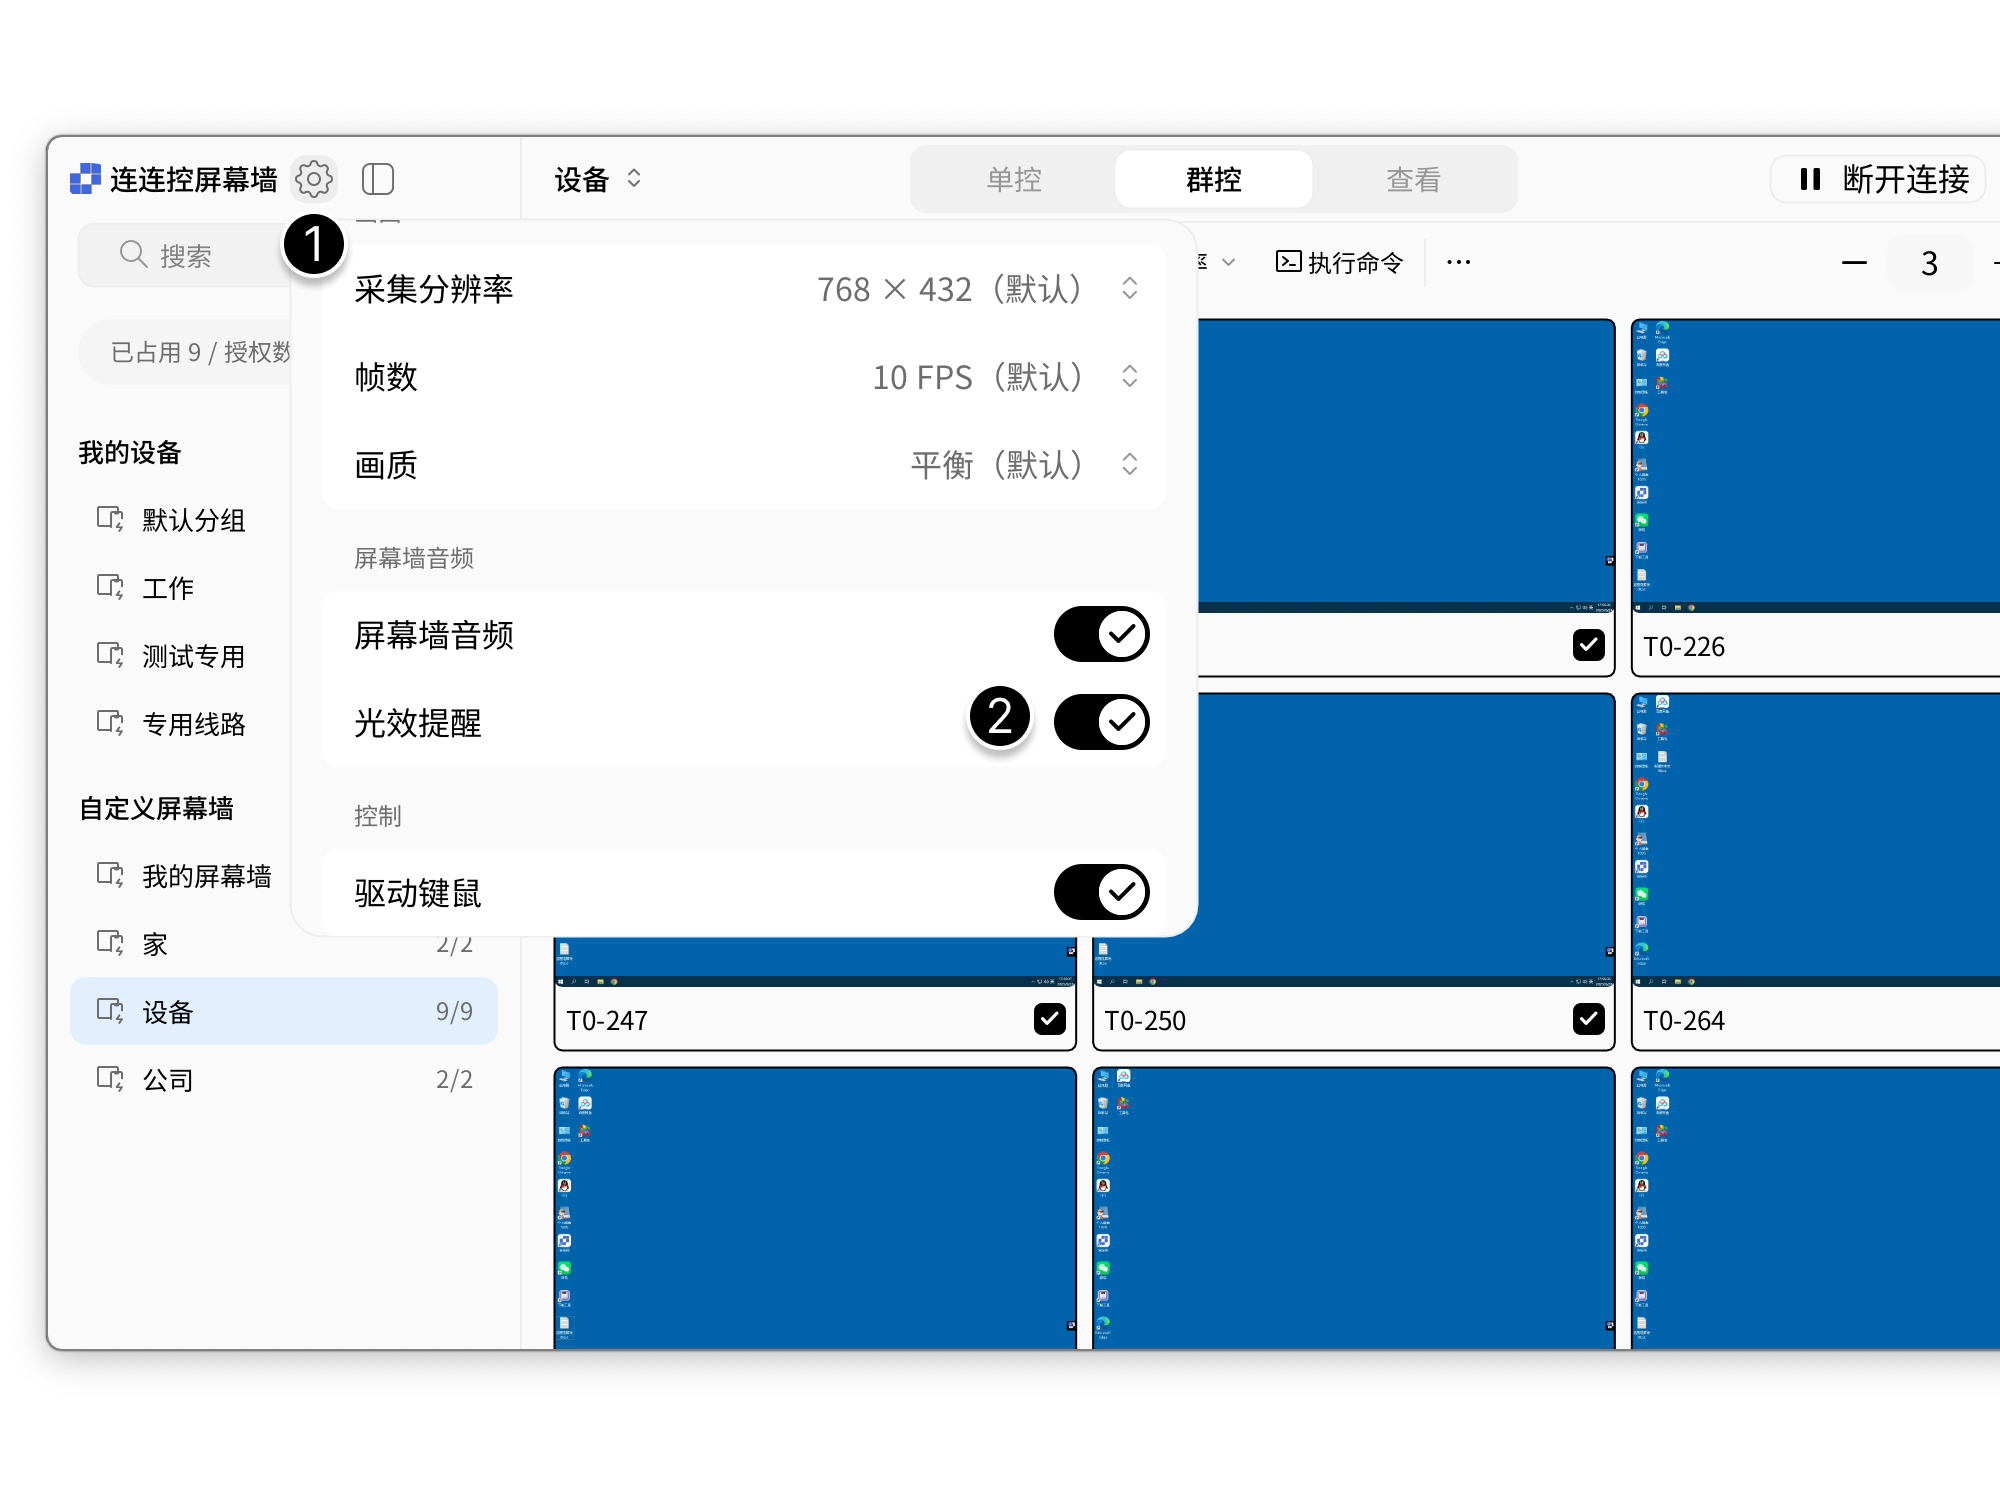
Lighting Alert
When a device in Monitor Wall has audio output, a lighting effect appears around the device to quickly locate the device producing sound.
- Click the settings icon in the upper-left corner of Monitor Wall and select Audio;
- Enable the Lighting Alert option.
Driver Keyboard and Mouse
Driver keyboard and mouse can uniformly control keyboard and mouse operation permissions for Monitor Wall in each group.
- Click the settings icon in the upper-left corner of Monitor Wall and select Driver Keyboard and Mouse;
- Click the keyboard and mouse option to set.
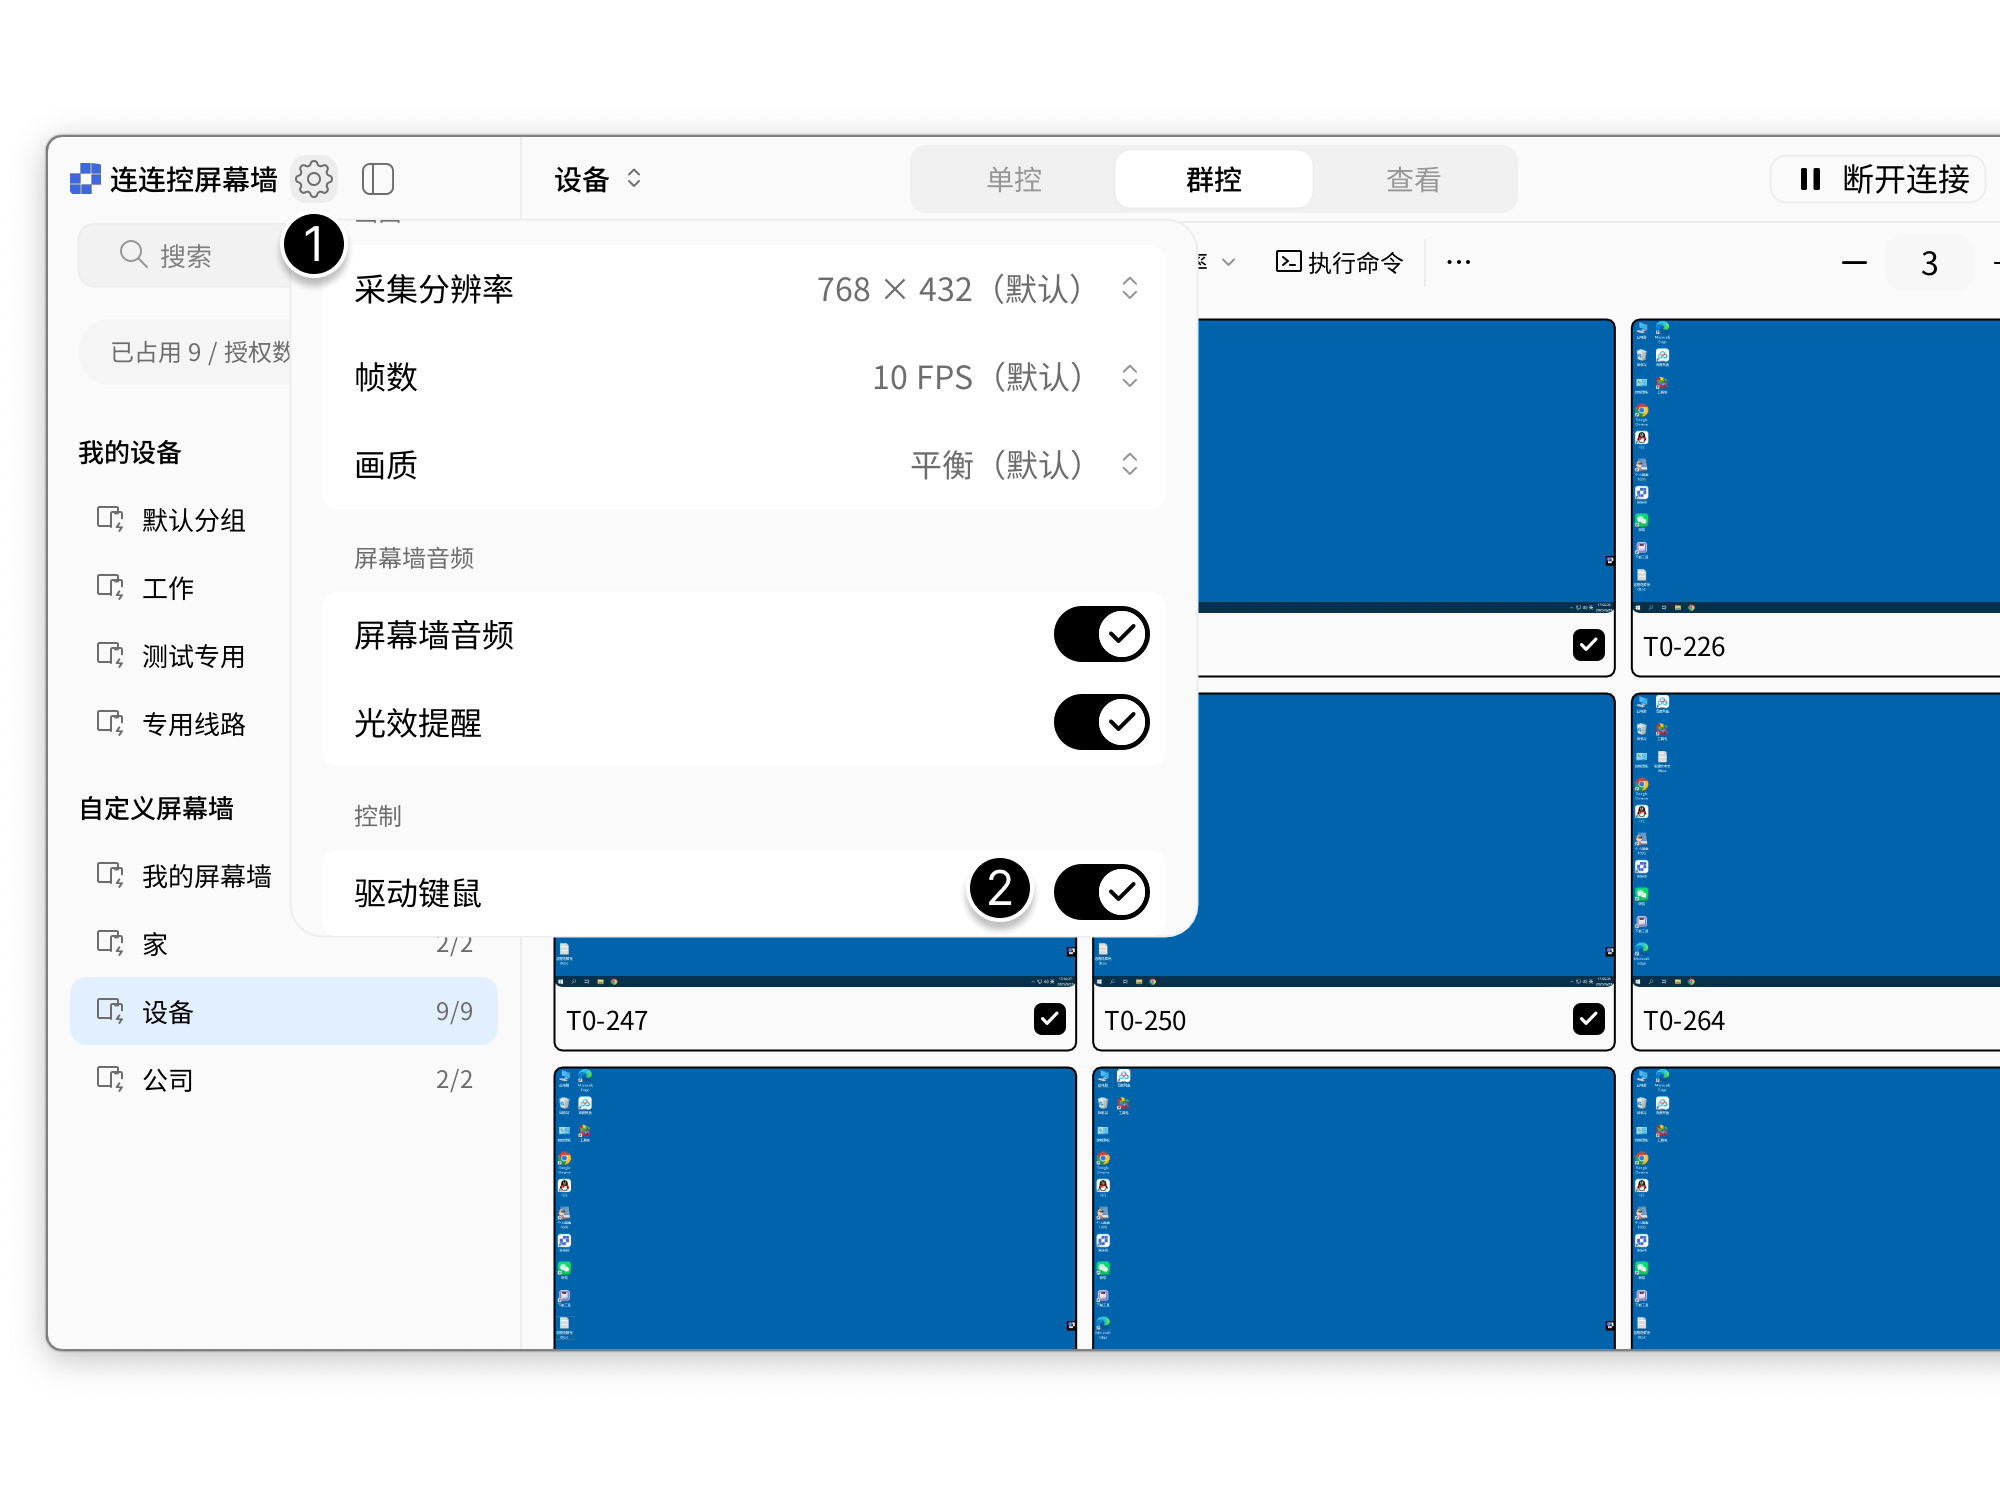
Enabling driver keyboard and mouse can improve operation accuracy. Adjust according to the usage scenario.
Monitor Wall Video Tutorial
Desktop
Mobile
Notes
- Devices must be online before connections can be established;
- After settings are completed, connections need to be re-established;
- Members can only view and operate devices authorized to them by the administrator in Monitor Wall;
- If entries such as Monitor Wall, Group Control, File Transfer, and Execute Command are not visible, it usually means the administrator has not enabled the corresponding permissions, or the enterprise's current service does not include this capability.