Remote Power-On (Wake-on-LAN, WOL)
The Remote Wake feature allows a target computer to be powered on over the network while it is in sleep, hibernation, or powered-off states. AskLink provides one-click remote wake capability. After completing the required configuration, you can wake the device more conveniently. This article explains how to use AskLink's remote wake feature, and how to enable Wake-on-LAN (WOL) in both Windows and the BIOS of major motherboard brands.
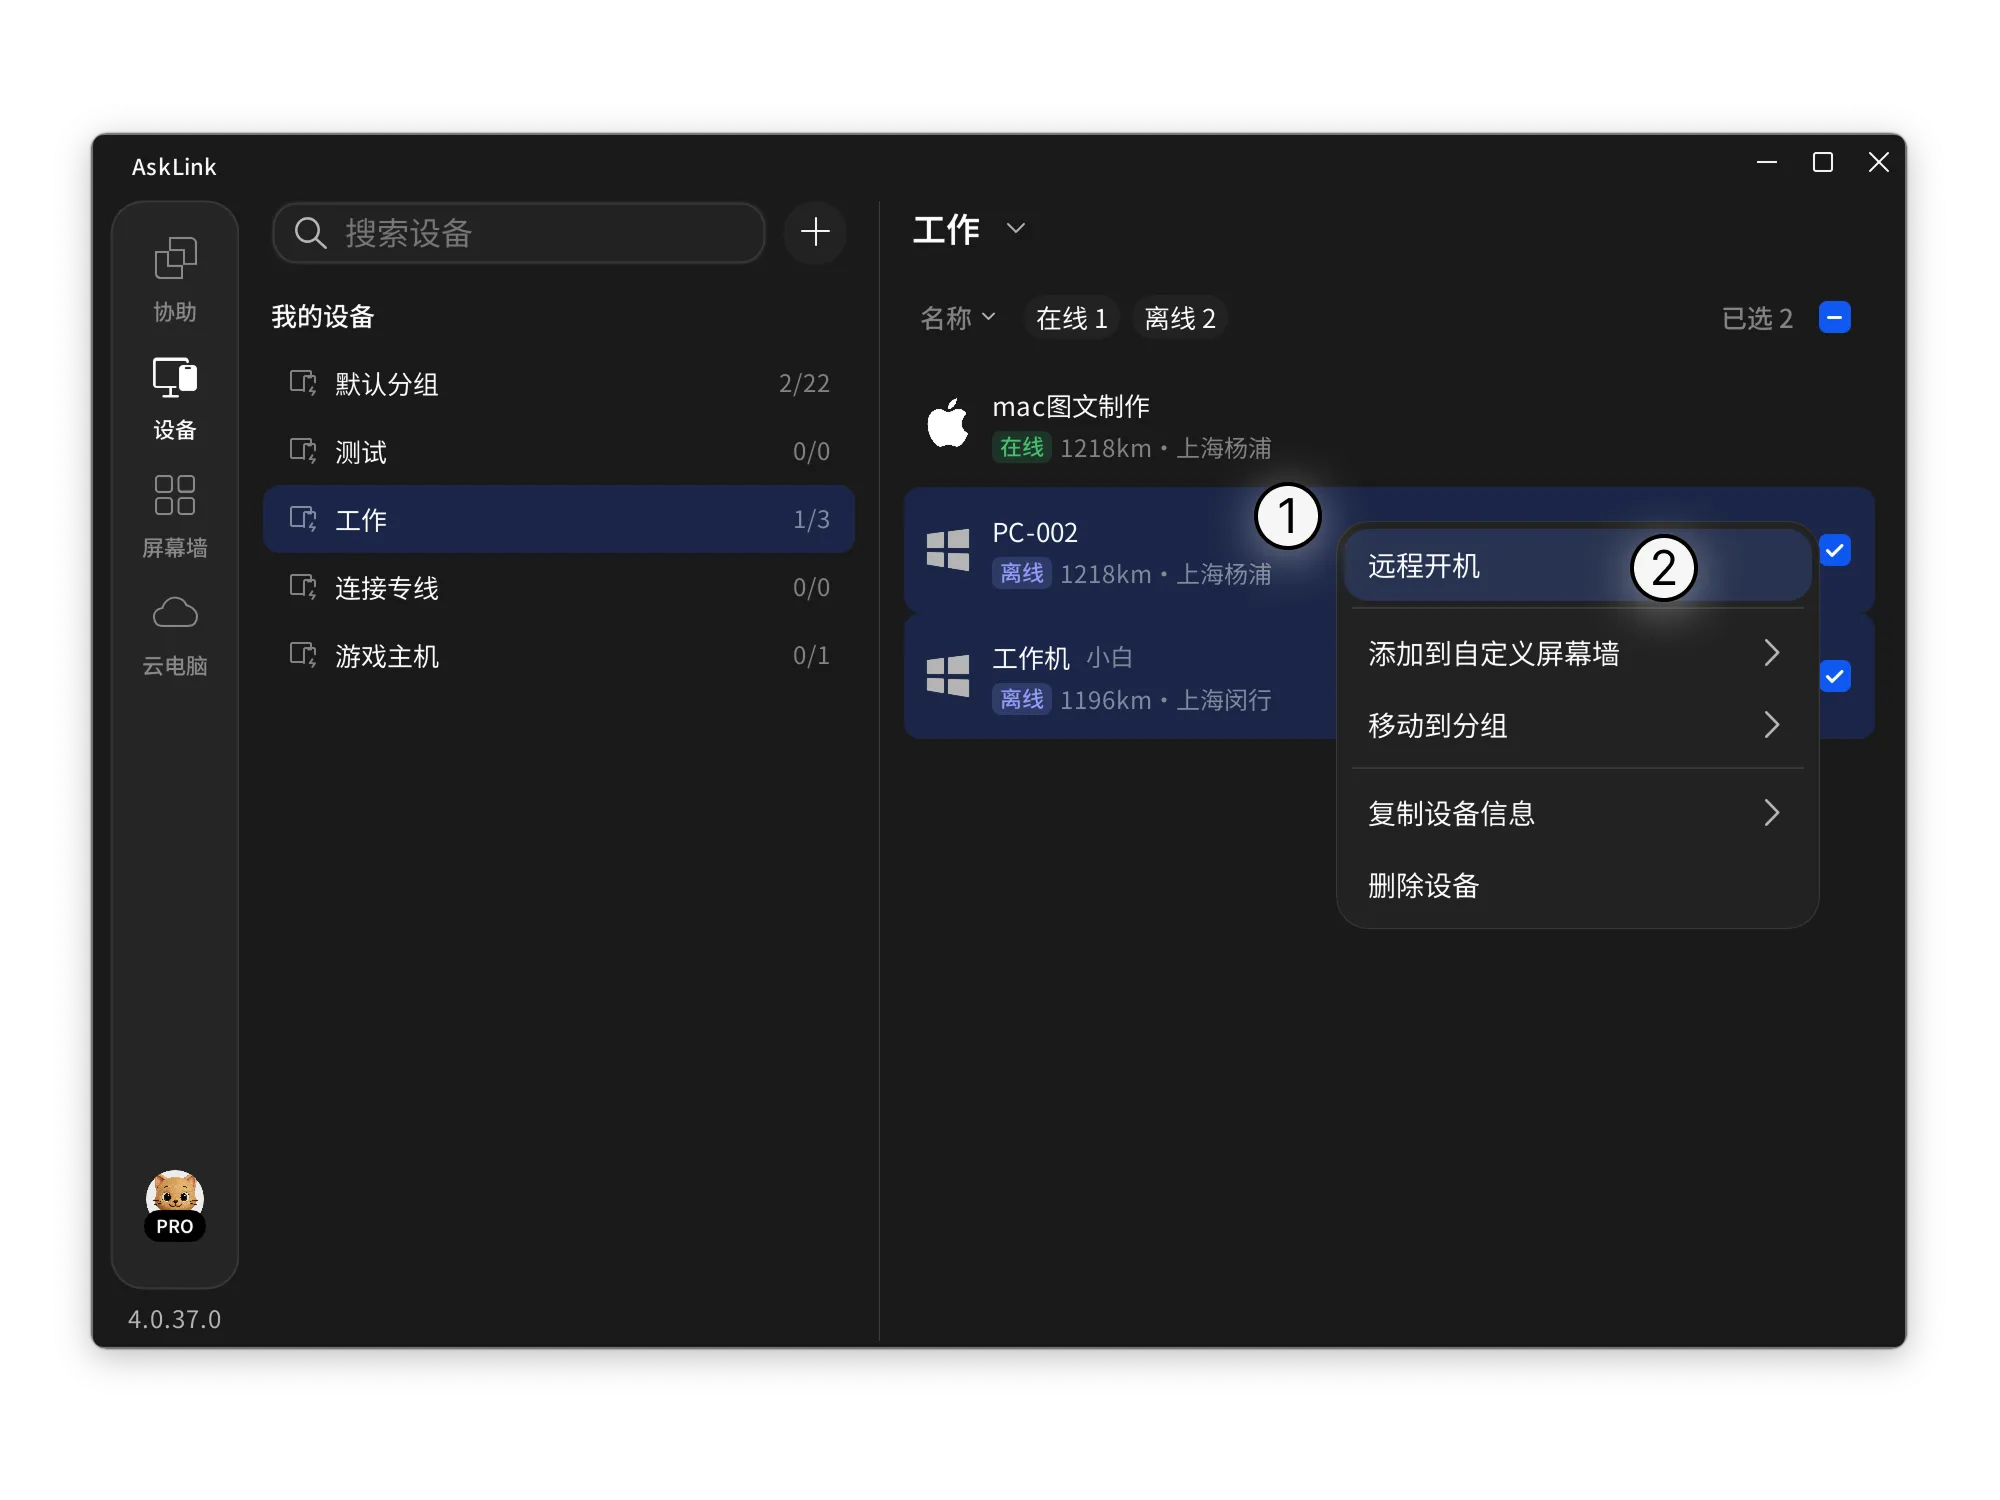
- Open AskLink, and select the offline device you want to wake from the device list.
- Right-click the device and select Remote Power-On to send the wake command.
- After sending the wake command, one of the following situations may appear:
① Wake conditions are met

The current device meets the wake conditions and can be woken directly.
② Detected that settings may not meet the wake conditions

The motherboard BIOS may not have Wake-on-LAN (WOL) enabled, or the Windows network adapter may not have options such as “Allow this device to wake the computer” enabled. However, you can still try sending the wake command.
③ No device available to execute the wake action

Please make sure there is at least one device in the same LAN as the target device that is running AskLink and is currently online.
- Wake scope: Only devices currently in the offline state can be woken through the device list.
- Network requirement: There must be at least one AskLink device that is signed in and online in the same LAN as the target device to help send the wake command.
- Supported platforms: Currently supports sending remote wake commands to Windows and Linux devices.
- Prerequisites: The target device must have the relevant Wake-on-LAN (WOL) options correctly enabled in both the motherboard BIOS and the network adapter power management settings. Otherwise, the wake operation may fail.
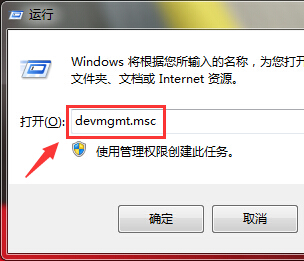
- Press Windows logo key + R to open the Run dialog box.
- Enter devmgmt.msc, then press Enter or click OK to open Device Manager.
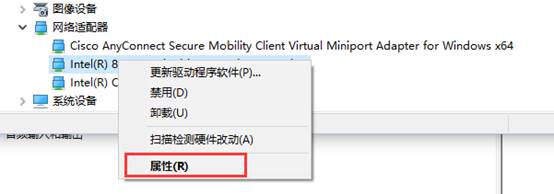
- In Device Manager, expand Network adapters. Different brands or models of network adapters may display different names.
Intel adapter:

Atheros adapter:

Broadcom adapter:

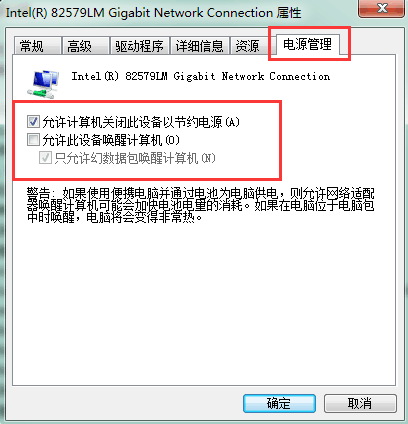
- Right-click the target network adapter and select Properties.
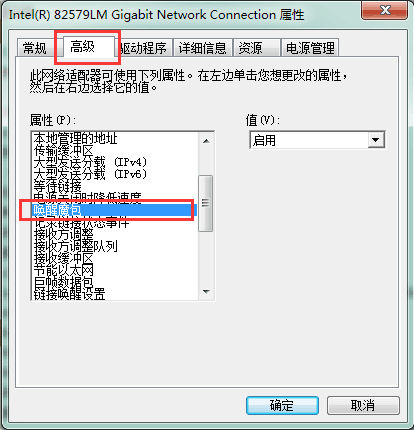
- Open the Advanced tab, find Wake on Magic Packet, and set it to Enabled.
- Open the Power Management tab, and check wake-related options such as:
- Allow this device to wake the computer
- Only allow a magic packet to wake the computer
The available options may vary depending on the network adapter driver. Please refer to the actual interface.
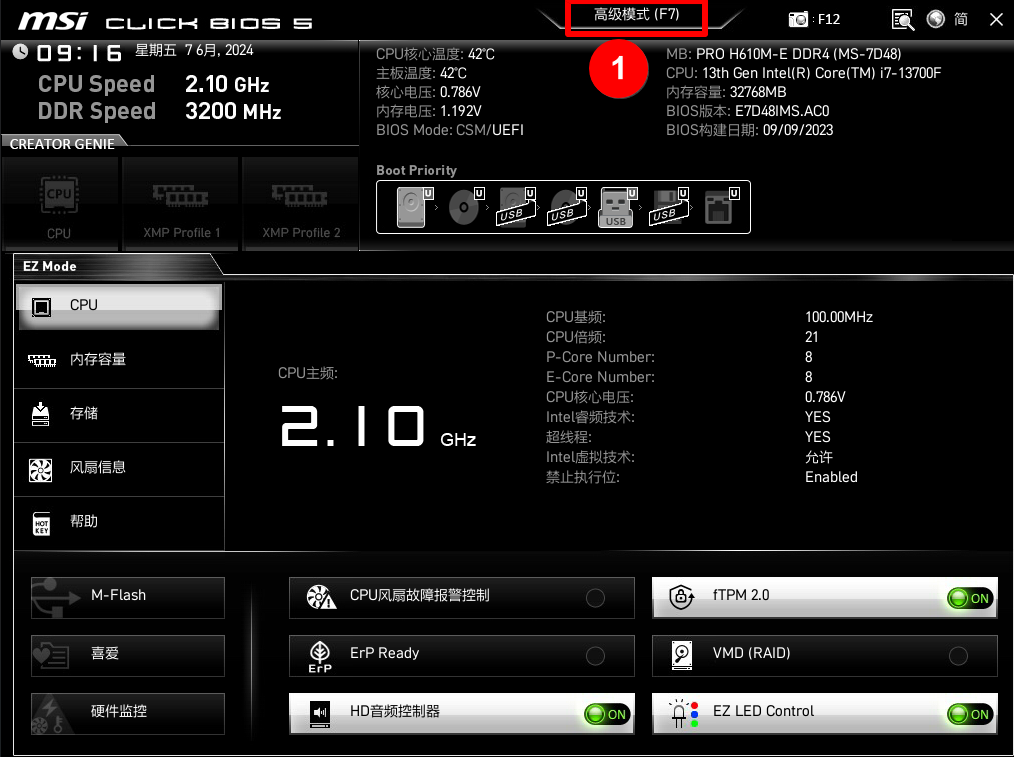
1. Check whether the motherboard supports network wake
- Go to the ASUS official website, search for your motherboard model, and open the corresponding product page.
- Go to the Tech Specs page.

- Under Manageability or a similar section, check whether WOL by PME or a similar network wake feature is supported.

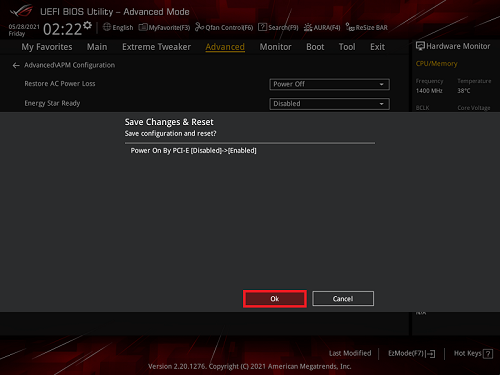
- Immediately press the Delete key after powering on the computer to enter Advanced Mode in BIOS.
If pressing Delete takes you directly to Advanced Mode, there is no need to press F7 again. - Go to the Advanced page and select APM Configuration.

- Set Power On By PCI-E to Enabled.
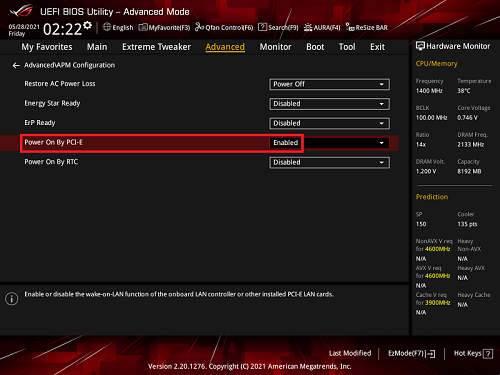
- Press F10, select OK, save the settings, and restart the computer.
- After powering on the computer, repeatedly press the Delete key to enter BIOS, then switch to Advanced Mode.

- Go to SETTINGS > Advanced.
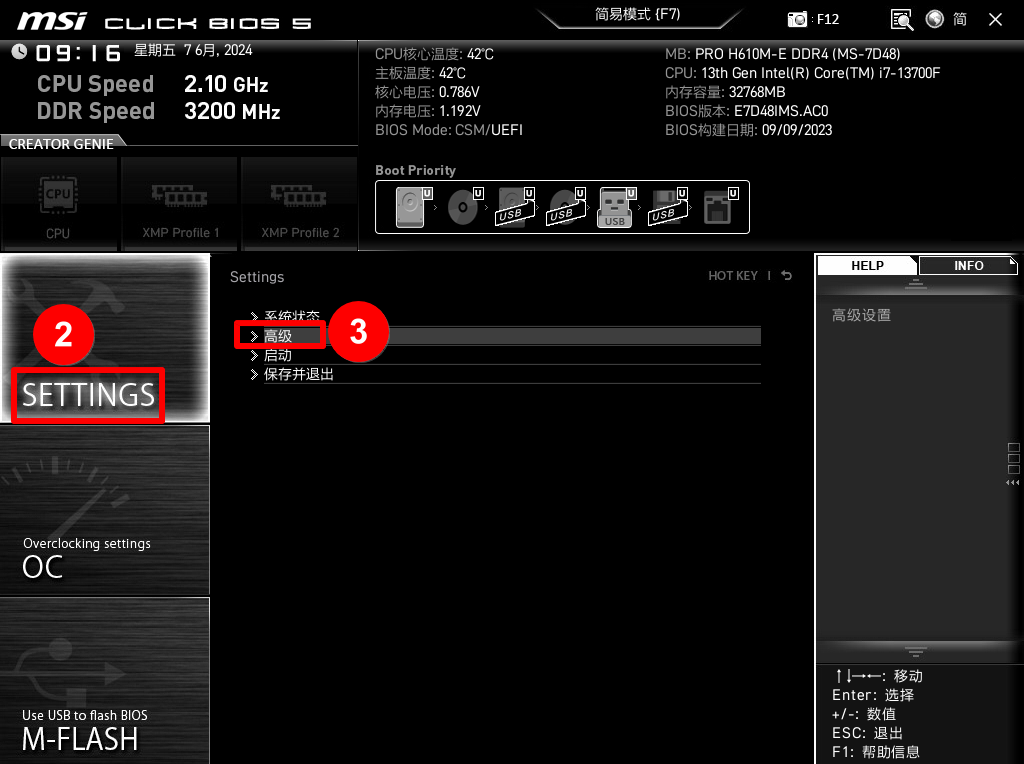
- Select Power Management Setup.
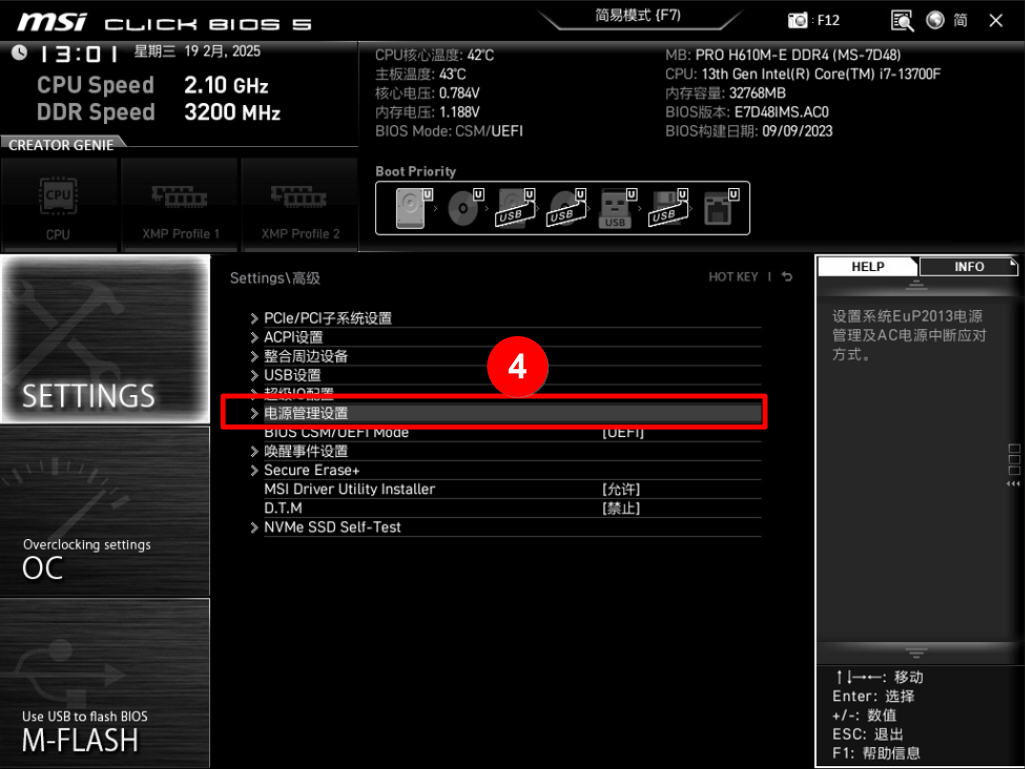
- Set ErP Ready to Disabled.
Note: On some motherboards, this option may appear as EuP 2013. In that case, also set it to Disabled.

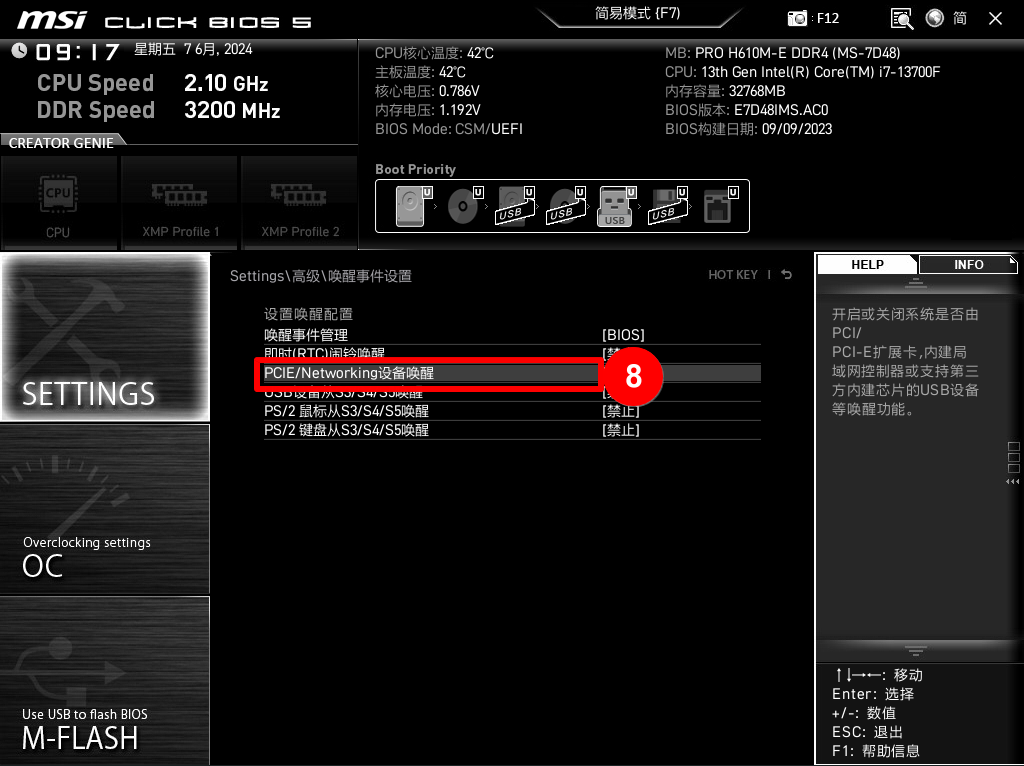
- Return to SETTINGS > Advanced, then enter Wake Up Event Setup.
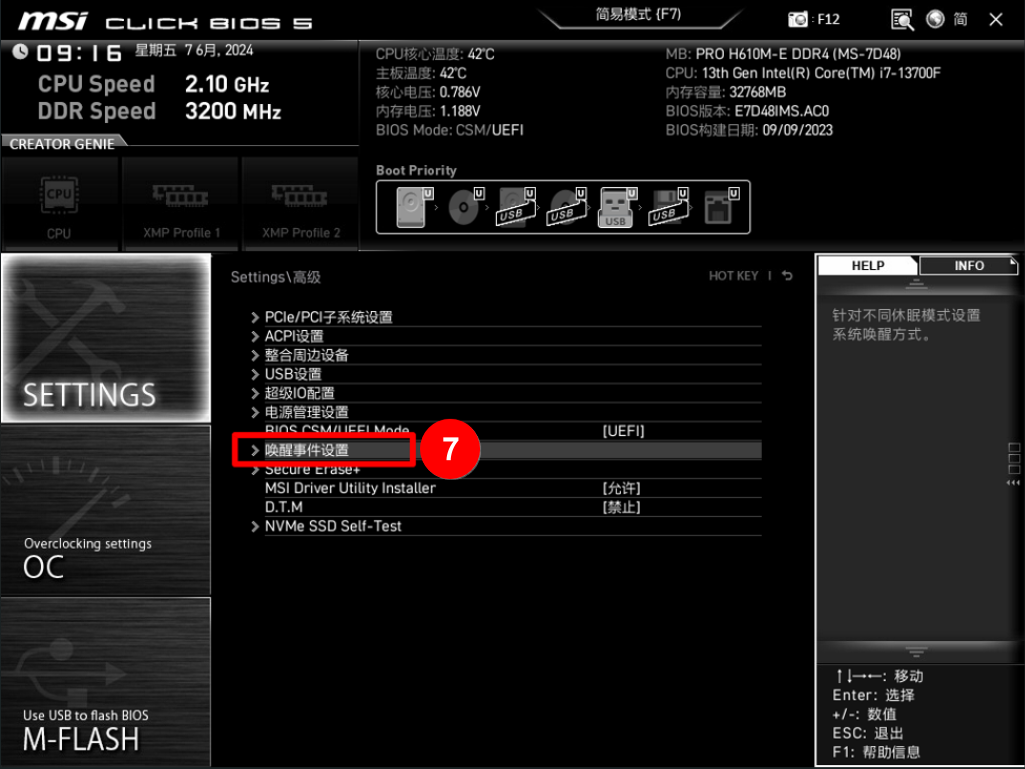
- Find PCIE/Networking Device Wake Up or the corresponding option.
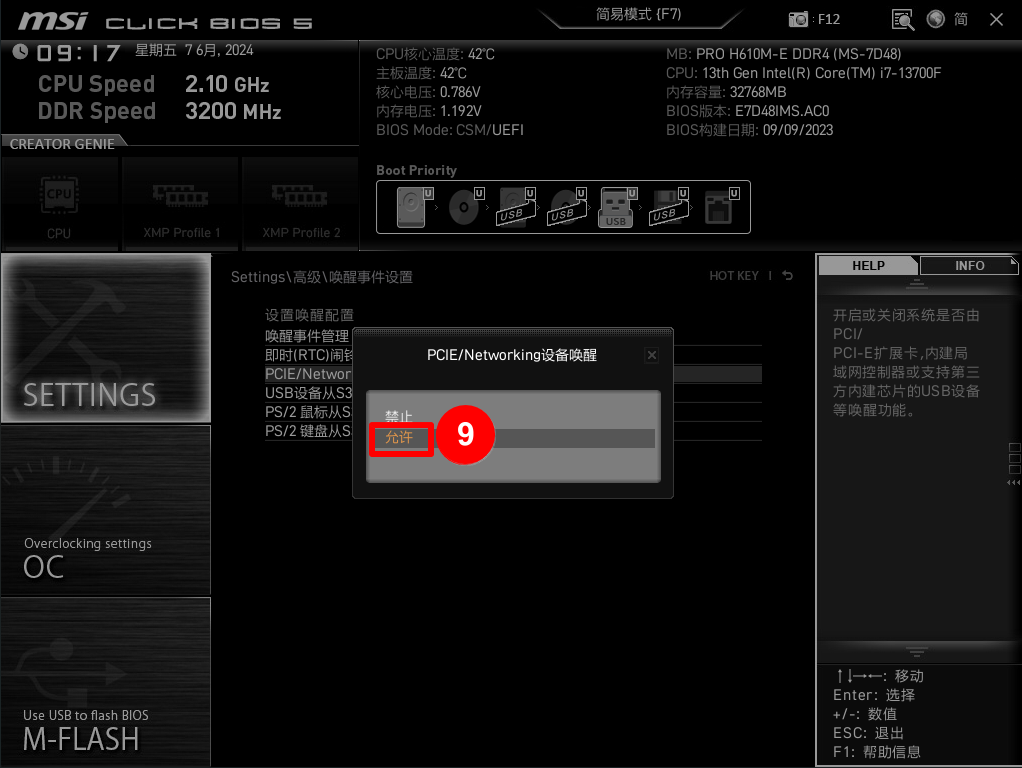
- Change it from Disabled to Enabled.
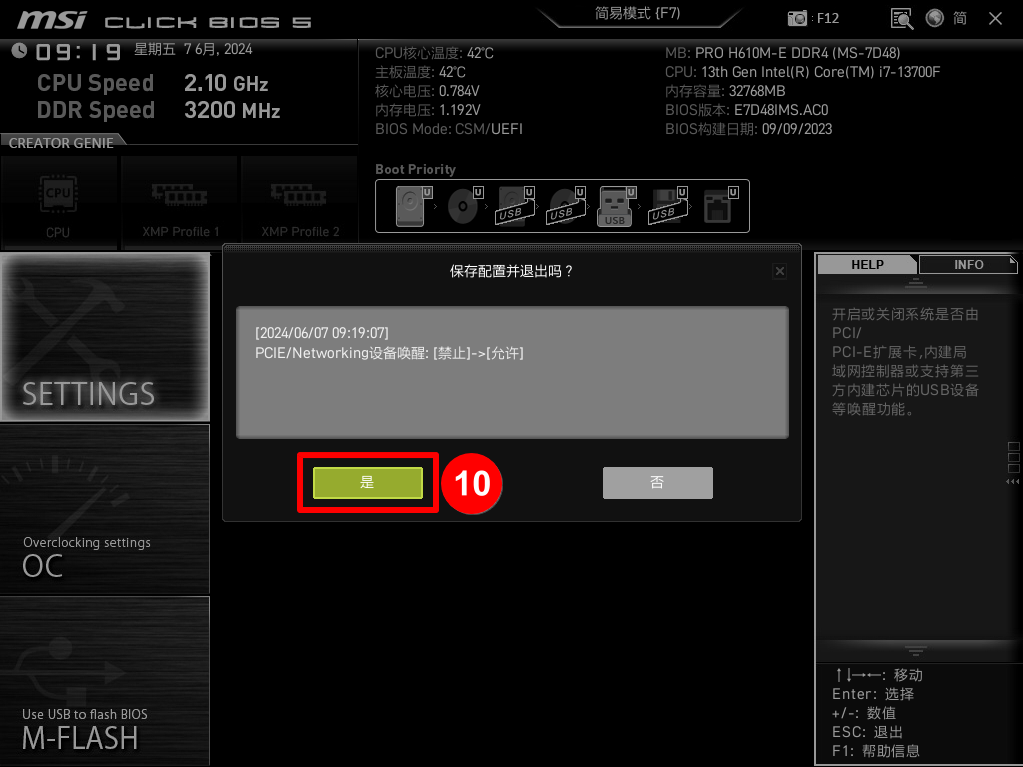
- Press F10, select Yes, save the settings, and restart the computer.
- Restart the server, then press Delete or F2 to enter BIOS.
- In Advanced, Power Management, or a similar menu, look for options such as Wake on LAN, Resume by LAN, or PME Event Wake Up.
- Set the option to Enabled.
- Save the settings and restart.
- After entering the operating system, make sure the Wake-on-LAN related settings in the network adapter driver are also enabled.
Note: Some Supermicro servers also support IPMI remote power-on. IPMI is an independent out-of-band management feature and is not the same mechanism as Wake-on-LAN (WOL). If IPMI is enabled on the device, you may also power it on directly through IPMI without relying on WOL.
- Enter BIOS and look for options related to Wake on LAN, PME Wake Up, or PCIe Wake.
- Set the related options to Enabled.
- If the BIOS provides options such as Wake from S5 or Wake on PCI-E, it is recommended to enable them as well.
- After entering Windows, check whether Wake-on-LAN and Power Management settings are enabled in the Intel network adapter driver.
Notes:
- Some multi-port network adapters support WOL only on specific ports. Please refer to the device specifications.
- Option names may vary depending on the motherboard, network adapter, and driver version. Please refer to the actual interface.
Desktop / All-in-One
- Enter BIOS and use the arrow keys to navigate to Power > Automatic Power On.
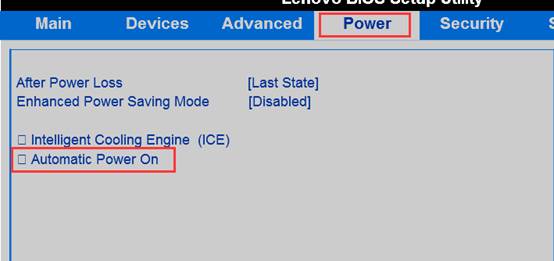
- Set Wake On LAN to Automatic.
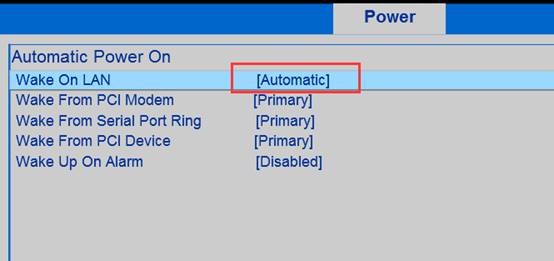
- If you have installed a PCI network adapter yourself, make sure the WOL cable is properly connected to the WOL header on the motherboard (usually a 3-pin connector). Otherwise, the wake signal may not be sent correctly.
ThinkPad Laptop
- Enter BIOS and use the arrow keys to navigate to Config.

- Under Wake On LAN, select AC Only or AC and Battery.
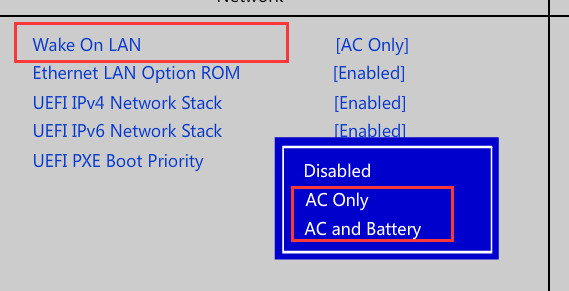
Note: Support for Wake-on-LAN (WOL) varies by model. In particular, some laptops support network wake only when connected to a power adapter. Please refer to your device model documentation.
1. Prerequisites
To use Wake-on-LAN (WOL), the device usually needs to meet the following conditions:
- The motherboard and network adapter support WOL.
- The related options are enabled in BIOS.
- The wake feature is enabled in the network adapter driver in the operating system.
- If the BIOS includes options such as Deep Sleep or Energy Efficient Ethernet, they usually need to be adjusted according to the device model.
- The device must be in a power state that supports wake, depending on the model.
2. BIOS Settings
- Restart the computer and repeatedly press F2 during startup to enter BIOS.
- In BIOS, go to System Management and find the Wake-on-LAN related option.

- Select the appropriate wake mode as needed.
- Click Apply and exit. The system will restart automatically.
3. How to wake the device
After completing the setup, you can first shut down the computer and check whether the network port indicator light remains on. If the indicator is still lit, it usually means the network adapter is still receiving standby power, and you can continue testing wake.
On another device in the same network, use any WOL tool that supports wake-up, enter the physical address (MAC address) of the target device's network adapter, and send the wake command. If the above settings are correct, the target device should wake and boot.
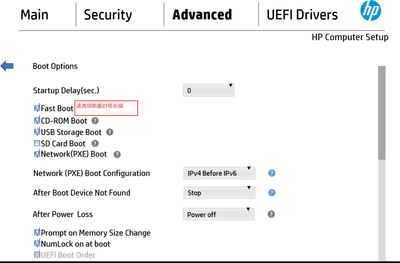
- Enter BIOS, confirm that Network (PXE) is enabled under Boot Options, and disable Fast Boot if needed.
- Under Built-in Device Options or a similar menu, find Wake on LAN. Multiple modes are usually available:
- Disabled: Off
- Boot to Hard Drive: Boot from the local hard drive after wake
- Boot to Network: Boot from the network after wake
In most cases, Boot to Hard Drive is recommended.
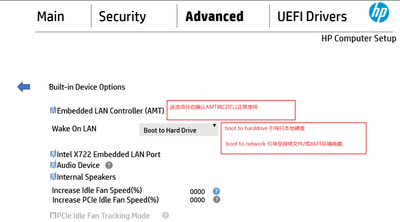
- Some models may also provide AMT related options. If the BIOS and system network adapter settings have already been configured but the device still cannot be woken, you can further check whether this option affects network wake.

Note: In most cases, items 1 and 2 are the key settings. Whether item 3 needs adjustment depends on the device model and the actual scenario.